

Linux
高效操作!linux在终端里快速跳转到文件管理器对应的目录下
Linux • 马化云 发表了文章 • 0 个评论 • 2740 次浏览 • 2023-06-15 19:34
然后你想用chrome打开这个html文件,那么你可能需要打开文件管理器,切换到上述路径,选中上述修改的html文件。
(具体可以参考vs code的打开方式, cd 到某个目录, 然后运行: "code . " 然后就可以直接用vs code打开当前目录 )
你可以使用以下命令在Linux终端中打开文件浏览器并将其设置为当前目录:
- GNOME桌面环境:在终端中输入 `nautilus .`,即可在当前目录下打开Nautilus文件管理器。
- KDE桌面环境:在终端中输入 `dolphin .`,即可在当前目录下打开Dolphin文件管理器。
- Xfce桌面环境:在终端中输入 `thunar .`,即可在当前目录下打开Thunar文件管理器。
- LXDE桌面环境:在终端中输入 `pcmanfm .`,即可在当前目录下打开PCManFM文件管理器。
这些命令都会在当前目录下启动相应的文件管理器,以便您进行文件操作。
当然,手动敲那么多字也是挺累的。
### 如何自动化?
可以做成别名写到启动环境里面vim ~/.bashrc在这个文件里面的最后一行
加入对应的语句alias here="nautilus ."
以后只要你在终端下面输入 here
那么就会自动打开文件管理器,然后文件管理器的路径和你的终端路径一样。这样很方便吧? 查看全部
然后你想用chrome打开这个html文件,那么你可能需要打开文件管理器,切换到上述路径,选中上述修改的html文件。
(具体可以参考vs code的打开方式, cd 到某个目录, 然后运行: "code . " 然后就可以直接用vs code打开当前目录 )
你可以使用以下命令在Linux终端中打开文件浏览器并将其设置为当前目录:
- GNOME桌面环境:在终端中输入 `nautilus .`,即可在当前目录下打开Nautilus文件管理器。
- KDE桌面环境:在终端中输入 `dolphin .`,即可在当前目录下打开Dolphin文件管理器。
- Xfce桌面环境:在终端中输入 `thunar .`,即可在当前目录下打开Thunar文件管理器。
- LXDE桌面环境:在终端中输入 `pcmanfm .`,即可在当前目录下打开PCManFM文件管理器。
这些命令都会在当前目录下启动相应的文件管理器,以便您进行文件操作。
当然,手动敲那么多字也是挺累的。
### 如何自动化?
可以做成别名写到启动环境里面
vim ~/.bashrc在这个文件里面的最后一行
加入对应的语句
alias here="nautilus ."
以后只要你在终端下面输入
here
那么就会自动打开文件管理器,然后文件管理器的路径和你的终端路径一样。这样很方便吧?
修改正在运行的docker容器,禁用重启自动启动
Linux • 马化云 发表了文章 • 0 个评论 • 3307 次浏览 • 2023-03-26 11:17
可以使用 docker update 命令修改容器的配置,示例命令如下:docker update --restart=no <容器ID或名称>
这条命令会将容器的重启策略设置为不重启,即禁用重启自动启动。如果需要启用自动启动,只需要将 --restart 参数的值改为 always 或 on-failure 等相应的选项即可。
需要注意的是,修改容器的配置并不会立即生效,需要重启容器才能使修改生效。可以使用 docker restart 命令重启容器,示例命令如下:
docker restart <容器ID或名称>
执行这条命令后,容器会被重启并应用新的配置。 查看全部
可以使用 docker update 命令修改容器的配置,示例命令如下:
docker update --restart=no <容器ID或名称>
这条命令会将容器的重启策略设置为不重启,即禁用重启自动启动。如果需要启用自动启动,只需要将 --restart 参数的值改为 always 或 on-failure 等相应的选项即可。
需要注意的是,修改容器的配置并不会立即生效,需要重启容器才能使修改生效。可以使用 docker restart 命令重启容器,示例命令如下:
docker restart <容器ID或名称>
执行这条命令后,容器会被重启并应用新的配置。
linux下自制护眼,久坐提醒 python小程序
python • 李魔佛 发表了文章 • 0 个评论 • 2725 次浏览 • 2023-03-09 16:23
保存为app.py
运行; python app.py
然后写到系统的crontab计划任务里面,每个40分钟执行几次,
屏幕会黑屏60s , 60可以自行设置。
挺好用的。import datetime as dt
import tkinter as tk
# Linux 护眼程序
sec = 60 # 休息时间 秒
root = tk.Tk()
root.config(bg='black')
root.wm_attributes('-topmost',1)
root.wm_attributes('-fullscreen',1)
L = tk.Label(root,font=('Consolas', 50), bg='black')
L.place(relx=0.5,rely=0.5,anchor=tk.CENTER)
# 改变的内容
msg = "{}\n 站起来 {} \n 动一动 {}\n{}"
now = dt.datetime.now()
aa = {0:'↑',1:'→',2:'↓',3:'←'}
bb = {0:'~~_↑_~~',1:'~_↑ ↑_~'}
for i in range(sec):
t = msg.format(sec-i,aa[i%4],bb[i%2],(now+dt.timedelta(seconds=i)).ctime())
c = 'Black' # 颜色可以搞随机换
root.after(i*1000,L.config,{'text':t,'fg':c})
root.after(sec*1000,root.destroy)
root.mainloop()
PS: AI生成的image还真心不错呢。 就是太吃显存了
查看全部
保存为app.py
运行; python app.py
然后写到系统的crontab计划任务里面,每个40分钟执行几次,
屏幕会黑屏60s , 60可以自行设置。
挺好用的。
import datetime as dt

import tkinter as tk

# Linux 护眼程序

sec = 60 # 休息时间 秒


root = tk.Tk()

root.config(bg='black')

root.wm_attributes('-topmost',1)

root.wm_attributes('-fullscreen',1)

L = tk.Label(root,font=('Consolas', 50), bg='black')

L.place(relx=0.5,rely=0.5,anchor=tk.CENTER)


# 改变的内容

msg = "{}\n 站起来 {} \n 动一动 {}\n{}"

now = dt.datetime.now()

aa = {0:'↑',1:'→',2:'↓',3:'←'}

bb = {0:'~~_↑_~~',1:'~_↑ ↑_~'}


for i in range(sec):

    t = msg.format(sec-i,aa[i%4],bb[i%2],(now+dt.timedelta(seconds=i)).ctime())

    c = 'Black' # 颜色可以搞随机换

    root.after(i*1000,L.config,{'text':t,'fg':c})

    root.after(sec*1000,root.destroy)


root.mainloop()
PS: AI生成的image还真心不错呢。 就是太吃显存了

ubuntu snap 配置不更新新软件
Linux • 马化云 发表了文章 • 0 个评论 • 2994 次浏览 • 2022-12-17 14:20
网上的禁用方法
$ snap refresh --hold

error: unknown flag `hold'
在ubuntu20.04上是没有用的。因为它的snap不是最新的。要在ubuntu22.04上才可以。
在ubuntu 20.04上,
$ sudo snap set system refresh.hold="2030-01-01T01:00:00-01:00"
$ sudo snap set system refresh.metered=hold
网上说 snap最多只能设置60天内不更新,所以还需要配合crontab,在计划任务里面设置时间。
查看全部
网上的禁用方法
$ snap refresh --hold
error: unknown flag `hold'
在ubuntu20.04上是没有用的。因为它的snap不是最新的。要在ubuntu22.04上才可以。
在ubuntu 20.04上,
$ sudo snap set system refresh.hold="2030-01-01T01:00:00-01:00"
$ sudo snap set system refresh.metered=hold
网上说 snap最多只能设置60天内不更新,所以还需要配合crontab,在计划任务里面设置时间。
程序员是怎样删除安卓手机的垃圾文件?
Linux • 李魔佛 发表了文章 • 0 个评论 • 3337 次浏览 • 2022-09-14 12:08
以至于手机的的可用空间越来越少,内置的清理垃圾的功能越来越鸡肋。而第三方的垃圾清理应用只会引来更多的垃圾文件。
身为一名程序员,就得用geek一点的方法彻底删除垃圾文件,尽可能地释放系统的空间。
由于平时使用的开发环境是Linux,所以下面环境是在Linux下操作,windows的用户应该也可以在git bash下操作。
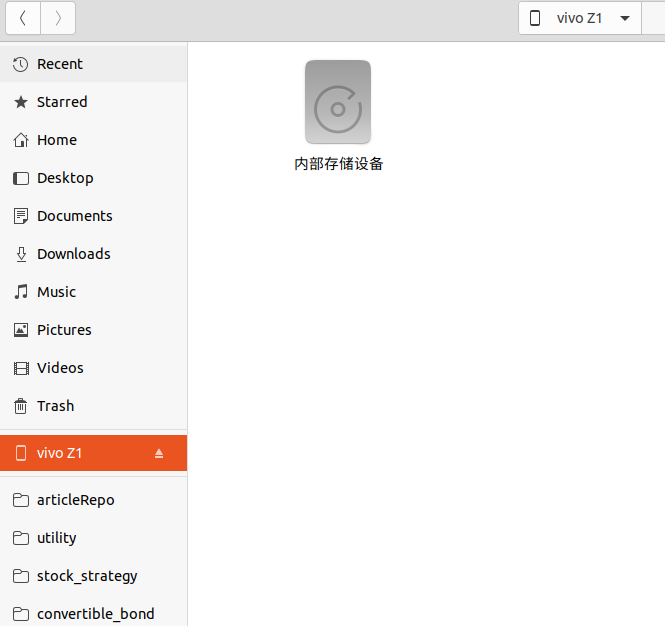
手机usb 连接电脑
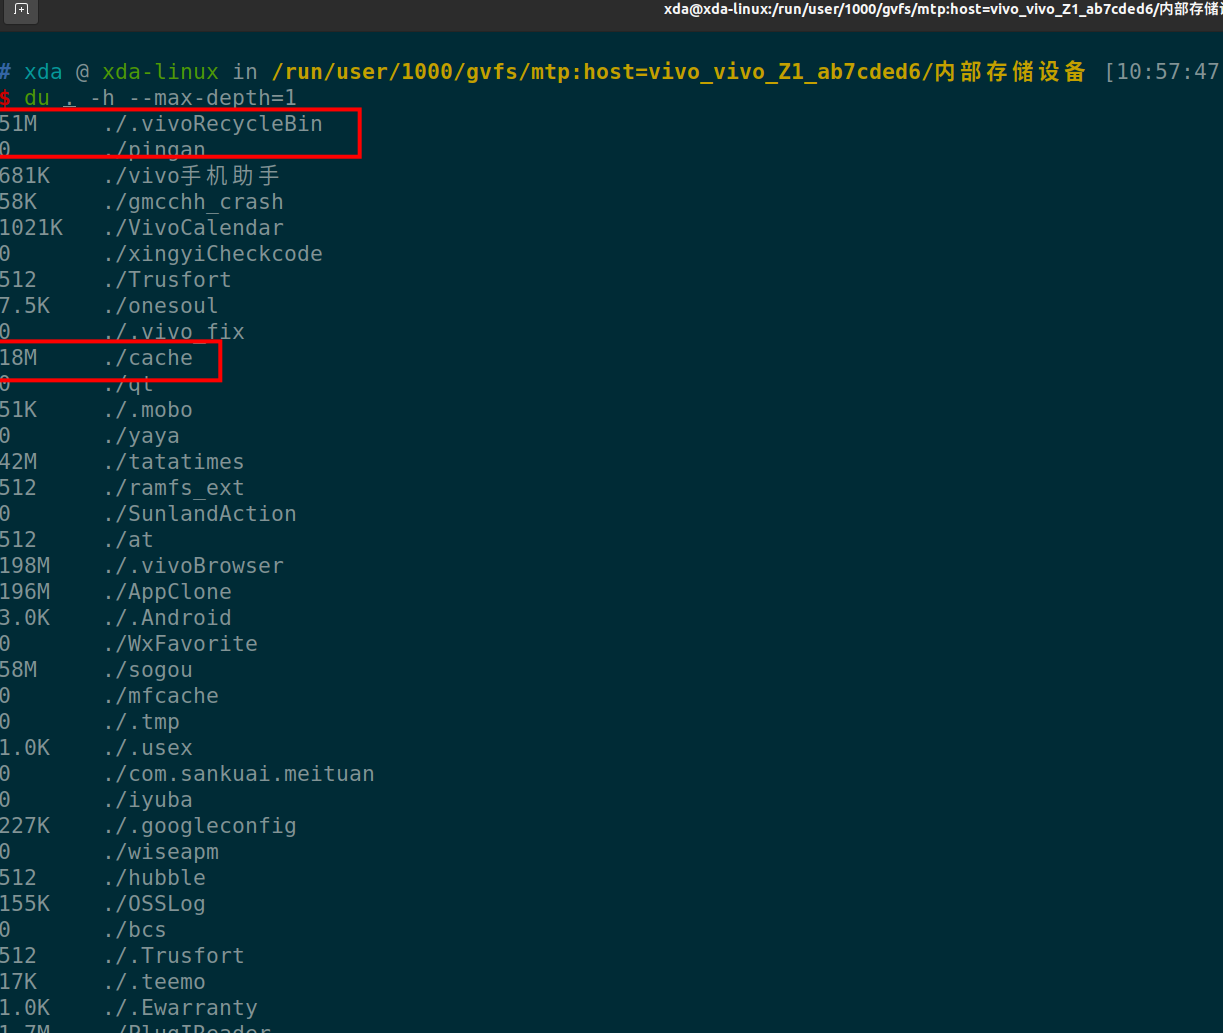
使用usb线连接linux电脑,不一定要adb的功能,但需要电脑能够识别手机的内部存储即可。
然后点击“内部存储设备”, 在文件内右键,进入Terminal 终端。
执行命令
du . -h --max-depth=1
简单解释一下这个语句。 就是显示当前目录下,第一层目录的占用存储大小情况。-h, human效果,人性化,自动转换文件大小单位。
--max-depth 是显示目录层级数目,如果选择2-3-4等目录,则会把子目录,子子目录的存储大小都显示出来,不过运行数据也会随之变慢。
上面命令一下子就把手机根目录下所有的目录的占用大小都列出来了。可以看到上面红框的地方,是一些缓存没用的东西,我们直接用命令 rm -rf 删除。
或者也可以在文件管理器里面直接删除。
如果有些目录底下有多层目录,那么就是把--max-depth 的值调大一些。 这样就知道他子目录的占用空间情况。
如果只想看看微信文件夹下的空间占用,可以指定目录:
du /Weixin/ -h --max-depth=3
这样就知道哪个目录占用的空间最大,然后点击进去,把没用的目录逐个删除。
经过笔者的测试,使用上述操作后,手机可用存储空间释放了40%的空间。主要是一些app下载的内容,由于app被清理了,结果这些下载内容成了孤立的文件,没有索引到对应的app,一直残留在手机内存。
查看全部
以至于手机的的可用空间越来越少,内置的清理垃圾的功能越来越鸡肋。而第三方的垃圾清理应用只会引来更多的垃圾文件。

身为一名程序员,就得用geek一点的方法彻底删除垃圾文件,尽可能地释放系统的空间。
由于平时使用的开发环境是Linux,所以下面环境是在Linux下操作,windows的用户应该也可以在git bash下操作。
手机usb 连接电脑
使用usb线连接linux电脑,不一定要adb的功能,但需要电脑能够识别手机的内部存储即可。
然后点击“内部存储设备”, 在文件内右键,进入Terminal 终端。

执行命令
du . -h --max-depth=1
简单解释一下这个语句。 就是显示当前目录下,第一层目录的占用存储大小情况。-h, human效果,人性化,自动转换文件大小单位。
--max-depth 是显示目录层级数目,如果选择2-3-4等目录,则会把子目录,子子目录的存储大小都显示出来,不过运行数据也会随之变慢。
上面命令一下子就把手机根目录下所有的目录的占用大小都列出来了。可以看到上面红框的地方,是一些缓存没用的东西,我们直接用命令 rm -rf 删除。
或者也可以在文件管理器里面直接删除。
如果有些目录底下有多层目录,那么就是把--max-depth 的值调大一些。 这样就知道他子目录的占用空间情况。
如果只想看看微信文件夹下的空间占用,可以指定目录:
du /Weixin/ -h --max-depth=3
这样就知道哪个目录占用的空间最大,然后点击进去,把没用的目录逐个删除。
经过笔者的测试,使用上述操作后,手机可用存储空间释放了40%的空间。主要是一些app下载的内容,由于app被清理了,结果这些下载内容成了孤立的文件,没有索引到对应的app,一直残留在手机内存。
ubuntu 安装ciso8601库 失败, 已解决
Linux • 李魔佛 发表了文章 • 0 个评论 • 4110 次浏览 • 2022-07-22 12:01
WARNING: Retrying (Retry(total=4, connect=None, read=None, redirect=None, status=None)) after connection broken by 'ReadTimeoutError("HTTPSConnectionPool(host='files.pythonhosted.org', port=443): Read timed out. (read timeout=15)")': /packages/a4/53/bfc6409447ca024558b8b19d055de94c813c3e32c0296c48a0873a161cf5/setuptools-63.2.0-py3-none-any.whl
Downloading setuptools-63.2.0-py3-none-any.whl (1.2 MB)
━━━━╸ 0.1/1.2 MB 102.5 kB/s eta 0:00:11
ERROR: Exception:
Traceback (most recent call last):
File "/tmp/pip-standalone-pip-oas0cddc/__env_pip__.zip/pip/_vendor/urllib3/response.py", line 435, in _error_catcher
yield
File "/tmp/pip-standalone-pip-oas0cddc/__env_pip__.zip/pip/_vendor/urllib3/response.py", line 516, in read
data = self._fp.read(amt) if not fp_closed else b""
File "/tmp/pip-standalone-pip-oas0cddc/__env_pip__.zip/pip/_vendor/cachecontrol/filewrapper.py", line 90, in read
data = self.__fp.read(amt)
File "/home/xda/miniconda3/envs/cpy/lib/python3.9/http/client.py", line 462, in read
n = self.readinto(b)
File "/home/xda/miniconda3/envs/cpy/lib/python3.9/http/client.py", line 506, in readinto
n = self.fp.readinto(b)
File "/home/xda/miniconda3/envs/cpy/lib/python3.9/socket.py", line 704, in readinto
return self._sock.recv_into(b)
File "/home/xda/miniconda3/envs/cpy/lib/python3.9/ssl.py", line 1241, in recv_into
return self.read(nbytes, buffer)
File "/home/xda/miniconda3/envs/cpy/lib/python3.9/ssl.py", line 1099, in read
return self._sslobj.read(len, buffer)
socket.timeout: The read operation timed out
During handling of the above exception, another exception occurred:
Traceback (most recent call last):
File "/tmp/pip-standalone-pip-oas0cddc/__env_pip__.zip/pip/_internal/cli/base_command.py", line 167, in exc_logging_wrapper
status = run_func(*args)
File "/tmp/pip-standalone-pip-oas0cddc/__env_pip__.zip/pip/_internal/cli/req_command.py", line 205, in wrapper
return func(self, options, args)
File "/tmp/pip-standalone-pip-oas0cddc/__env_pip__.zip/pip/_internal/commands/install.py", line 341, in run
requirement_set = resolver.resolve(
File "/tmp/pip-standalone-pip-oas0cddc/__env_pip__.zip/pip/_internal/resolution/resolvelib/resolver.py", line 94, in resolve
result = self._result = resolver.resolve(
File "/tmp/pip-standalone-pip-oas0cddc/__env_pip__.zip/pip/_vendor/resolvelib/resolvers.py", line 481, in resolve
state = resolution.resolve(requirements, max_rounds=max_rounds)
File "/tmp/pip-standalone-pip-oas0cddc/__env_pip__.zip/pip/_vendor/resolvelib/resolvers.py", line 348, in resolve
self._add_to_criteria(self.state.criteria, r, parent=None)
File "/tmp/pip-standalone-pip-oas0cddc/__env_pip__.zip/pip/_vendor/resolvelib/resolvers.py", line 172, in _add_to_criteria
if not criterion.candidates:
File "/tmp/pip-standalone-pip-oas0cddc/__env_pip__.zip/pip/_vendor/resolvelib/structs.py", line 151, in __bool__
return bool(self._sequence)
File "/tmp/pip-standalone-pip-oas0cddc/__env_pip__.zip/pip/_internal/resolution/resolvelib/found_candidates.py", line 155, in __bool__
return any(self)
File "/tmp/pip-standalone-pip-oas0cddc/__env_pip__.zip/pip/_internal/resolution/resolvelib/found_candidates.py", line 143, in <genexpr>
return (c for c in iterator if id(c) not in self._incompatible_ids)
File "/tmp/pip-standalone-pip-oas0cddc/__env_pip__.zip/pip/_internal/resolution/resolvelib/found_candidates.py", line 47, in _iter_built
candidate = func()
File "/tmp/pip-standalone-pip-oas0cddc/__env_pip__.zip/pip/_internal/resolution/resolvelib/factory.py", line 215, in _make_candidate_from_link
self._link_candidate_cache[link] = LinkCandidate(
File "/tmp/pip-standalone-pip-oas0cddc/__env_pip__.zip/pip/_internal/resolution/resolvelib/candidates.py", line 291, in __init__
super().__init__(
File "/tmp/pip-standalone-pip-oas0cddc/__env_pip__.zip/pip/_internal/resolution/resolvelib/candidates.py", line 161, in __init__
self.dist = self._prepare()
File "/tmp/pip-standalone-pip-oas0cddc/__env_pip__.zip/pip/_internal/resolution/resolvelib/candidates.py", line 230, in _prepare
dist = self._prepare_distribution()
File "/tmp/pip-standalone-pip-oas0cddc/__env_pip__.zip/pip/_internal/resolution/resolvelib/candidates.py", line 302, in _prepare_distribution
return preparer.prepare_linked_requirement(self._ireq, parallel_builds=True)
File "/tmp/pip-standalone-pip-oas0cddc/__env_pip__.zip/pip/_internal/operations/prepare.py", line 428, in prepare_linked_requirement
return self._prepare_linked_requirement(req, parallel_builds)
File "/tmp/pip-standalone-pip-oas0cddc/__env_pip__.zip/pip/_internal/operations/prepare.py", line 473, in _prepare_linked_requirement
local_file = unpack_url(
File "/tmp/pip-standalone-pip-oas0cddc/__env_pip__.zip/pip/_internal/operations/prepare.py", line 155, in unpack_url
file = get_http_url(
File "/tmp/pip-standalone-pip-oas0cddc/__env_pip__.zip/pip/_internal/operations/prepare.py", line 96, in get_http_url
from_path, content_type = download(link, temp_dir.path)
File "/tmp/pip-standalone-pip-oas0cddc/__env_pip__.zip/pip/_internal/network/download.py", line 146, in __call__
for chunk in chunks:
File "/tmp/pip-standalone-pip-oas0cddc/__env_pip__.zip/pip/_internal/cli/progress_bars.py", line 53, in _rich_progress_bar
for chunk in iterable:
File "/tmp/pip-standalone-pip-oas0cddc/__env_pip__.zip/pip/_internal/network/utils.py", line 63, in response_chunks
for chunk in response.raw.stream(
File "/tmp/pip-standalone-pip-oas0cddc/__env_pip__.zip/pip/_vendor/urllib3/response.py", line 573, in stream
data = self.read(amt=amt, decode_content=decode_content)
File "/tmp/pip-standalone-pip-oas0cddc/__env_pip__.zip/pip/_vendor/urllib3/response.py", line 538, in read
raise IncompleteRead(self._fp_bytes_read, self.length_remaining)
File "/home/xda/miniconda3/envs/cpy/lib/python3.9/contextlib.py", line 137, in __exit__
self.gen.throw(typ, value, traceback)
File "/tmp/pip-standalone-pip-oas0cddc/__env_pip__.zip/pip/_vendor/urllib3/response.py", line 440, in _error_catcher
raise ReadTimeoutError(self._pool, None, "Read timed out.")
pip._vendor.urllib3.exceptions.ReadTimeoutError: HTTPSConnectionPool(host='files.pythonhosted.org', port=443): Read timed out.
[end of output]
note: This error originates from a subprocess, and is likely not a problem with pip.
error: subprocess-exited-with-error
看样子,是setuptool的问题。 为了避免动这个默认库,可以安装降级版本的ciso。
pip install ciso8601==1.0.7
查看全部
      Collecting setuptools>=40.8.0

        WARNING: Retrying (Retry(total=4, connect=None, read=None, redirect=None, status=None)) after connection broken by 'ReadTimeoutError("HTTPSConnectionPool(host='files.pythonhosted.org', port=443): Read timed out. (read timeout=15)")': /packages/a4/53/bfc6409447ca024558b8b19d055de94c813c3e32c0296c48a0873a161cf5/setuptools-63.2.0-py3-none-any.whl

        Downloading setuptools-63.2.0-py3-none-any.whl (1.2 MB)

           ━━━━╸                                    0.1/1.2 MB 102.5 kB/s eta 0:00:11

      ERROR: Exception:

      Traceback (most recent call last):

        File "/tmp/pip-standalone-pip-oas0cddc/__env_pip__.zip/pip/_vendor/urllib3/response.py", line 435, in _error_catcher

          yield

        File "/tmp/pip-standalone-pip-oas0cddc/__env_pip__.zip/pip/_vendor/urllib3/response.py", line 516, in read

          data = self._fp.read(amt) if not fp_closed else b""

        File "/tmp/pip-standalone-pip-oas0cddc/__env_pip__.zip/pip/_vendor/cachecontrol/filewrapper.py", line 90, in read

          data = self.__fp.read(amt)

        File "/home/xda/miniconda3/envs/cpy/lib/python3.9/http/client.py", line 462, in read

          n = self.readinto(b)

        File "/home/xda/miniconda3/envs/cpy/lib/python3.9/http/client.py", line 506, in readinto

          n = self.fp.readinto(b)

        File "/home/xda/miniconda3/envs/cpy/lib/python3.9/socket.py", line 704, in readinto

          return self._sock.recv_into(b)

        File "/home/xda/miniconda3/envs/cpy/lib/python3.9/ssl.py", line 1241, in recv_into

          return self.read(nbytes, buffer)

        File "/home/xda/miniconda3/envs/cpy/lib/python3.9/ssl.py", line 1099, in read

          return self._sslobj.read(len, buffer)

      socket.timeout: The read operation timed out


      During handling of the above exception, another exception occurred:


      Traceback (most recent call last):

        File "/tmp/pip-standalone-pip-oas0cddc/__env_pip__.zip/pip/_internal/cli/base_command.py", line 167, in exc_logging_wrapper

          status = run_func(*args)

        File "/tmp/pip-standalone-pip-oas0cddc/__env_pip__.zip/pip/_internal/cli/req_command.py", line 205, in wrapper

          return func(self, options, args)

        File "/tmp/pip-standalone-pip-oas0cddc/__env_pip__.zip/pip/_internal/commands/install.py", line 341, in run

          requirement_set = resolver.resolve(

        File "/tmp/pip-standalone-pip-oas0cddc/__env_pip__.zip/pip/_internal/resolution/resolvelib/resolver.py", line 94, in resolve

          result = self._result = resolver.resolve(

        File "/tmp/pip-standalone-pip-oas0cddc/__env_pip__.zip/pip/_vendor/resolvelib/resolvers.py", line 481, in resolve

          state = resolution.resolve(requirements, max_rounds=max_rounds)

        File "/tmp/pip-standalone-pip-oas0cddc/__env_pip__.zip/pip/_vendor/resolvelib/resolvers.py", line 348, in resolve

          self._add_to_criteria(self.state.criteria, r, parent=None)

        File "/tmp/pip-standalone-pip-oas0cddc/__env_pip__.zip/pip/_vendor/resolvelib/resolvers.py", line 172, in _add_to_criteria

          if not criterion.candidates:

        File "/tmp/pip-standalone-pip-oas0cddc/__env_pip__.zip/pip/_vendor/resolvelib/structs.py", line 151, in __bool__

          return bool(self._sequence)

        File "/tmp/pip-standalone-pip-oas0cddc/__env_pip__.zip/pip/_internal/resolution/resolvelib/found_candidates.py", line 155, in __bool__

          return any(self)

        File "/tmp/pip-standalone-pip-oas0cddc/__env_pip__.zip/pip/_internal/resolution/resolvelib/found_candidates.py", line 143, in <genexpr>

          return (c for c in iterator if id(c) not in self._incompatible_ids)

        File "/tmp/pip-standalone-pip-oas0cddc/__env_pip__.zip/pip/_internal/resolution/resolvelib/found_candidates.py", line 47, in _iter_built

          candidate = func()

        File "/tmp/pip-standalone-pip-oas0cddc/__env_pip__.zip/pip/_internal/resolution/resolvelib/factory.py", line 215, in _make_candidate_from_link

          self._link_candidate_cache[link] = LinkCandidate(

        File "/tmp/pip-standalone-pip-oas0cddc/__env_pip__.zip/pip/_internal/resolution/resolvelib/candidates.py", line 291, in __init__

          super().__init__(

        File "/tmp/pip-standalone-pip-oas0cddc/__env_pip__.zip/pip/_internal/resolution/resolvelib/candidates.py", line 161, in __init__

          self.dist = self._prepare()

        File "/tmp/pip-standalone-pip-oas0cddc/__env_pip__.zip/pip/_internal/resolution/resolvelib/candidates.py", line 230, in _prepare

          dist = self._prepare_distribution()

        File "/tmp/pip-standalone-pip-oas0cddc/__env_pip__.zip/pip/_internal/resolution/resolvelib/candidates.py", line 302, in _prepare_distribution

          return preparer.prepare_linked_requirement(self._ireq, parallel_builds=True)

        File "/tmp/pip-standalone-pip-oas0cddc/__env_pip__.zip/pip/_internal/operations/prepare.py", line 428, in prepare_linked_requirement

          return self._prepare_linked_requirement(req, parallel_builds)

        File "/tmp/pip-standalone-pip-oas0cddc/__env_pip__.zip/pip/_internal/operations/prepare.py", line 473, in _prepare_linked_requirement

          local_file = unpack_url(

        File "/tmp/pip-standalone-pip-oas0cddc/__env_pip__.zip/pip/_internal/operations/prepare.py", line 155, in unpack_url

          file = get_http_url(

        File "/tmp/pip-standalone-pip-oas0cddc/__env_pip__.zip/pip/_internal/operations/prepare.py", line 96, in get_http_url

          from_path, content_type = download(link, temp_dir.path)

        File "/tmp/pip-standalone-pip-oas0cddc/__env_pip__.zip/pip/_internal/network/download.py", line 146, in __call__

          for chunk in chunks:

        File "/tmp/pip-standalone-pip-oas0cddc/__env_pip__.zip/pip/_internal/cli/progress_bars.py", line 53, in _rich_progress_bar

          for chunk in iterable:

        File "/tmp/pip-standalone-pip-oas0cddc/__env_pip__.zip/pip/_internal/network/utils.py", line 63, in response_chunks

          for chunk in response.raw.stream(

        File "/tmp/pip-standalone-pip-oas0cddc/__env_pip__.zip/pip/_vendor/urllib3/response.py", line 573, in stream

          data = self.read(amt=amt, decode_content=decode_content)

        File "/tmp/pip-standalone-pip-oas0cddc/__env_pip__.zip/pip/_vendor/urllib3/response.py", line 538, in read

          raise IncompleteRead(self._fp_bytes_read, self.length_remaining)

        File "/home/xda/miniconda3/envs/cpy/lib/python3.9/contextlib.py", line 137, in __exit__

          self.gen.throw(typ, value, traceback)

        File "/tmp/pip-standalone-pip-oas0cddc/__env_pip__.zip/pip/_vendor/urllib3/response.py", line 440, in _error_catcher

          raise ReadTimeoutError(self._pool, None, "Read timed out.")

      pip._vendor.urllib3.exceptions.ReadTimeoutError: HTTPSConnectionPool(host='files.pythonhosted.org', port=443): Read timed out.

      [end of output]


  note: This error originates from a subprocess, and is likely not a problem with pip.

error: subprocess-exited-with-error
看样子,是setuptool的问题。 为了避免动这个默认库,可以安装降级版本的ciso。
pip install ciso8601==1.0.7

查询自己平时用的最多的linux命令
Linux • 李魔佛 发表了文章 • 0 个评论 • 2724 次浏览 • 2022-07-18 23:55
可以用一行shell来统计
history | awk '{CMD[$2]++;count++;}END { for (a in CMD)print CMD[a] " " CMD[a]/count*100 "% " a;}' | grep -v "./" | column -c3 -s " " -t | sort -nr | nl | head -n10
得到如下结果:
神奇吧。
上述语句主要对你的history 返回数据进行统计。 查看全部
可以用一行shell来统计
history | awk '{CMD[$2]++;count++;}END { for (a in CMD)print CMD[a] " " CMD[a]/count*100 "% " a;}' | grep -v "./" | column -c3 -s " " -t | sort -nr | nl | head -n10得到如下结果:

神奇吧。
上述语句主要对你的history 返回数据进行统计。
docker安装的podman报错
Linux • 李魔佛 发表了文章 • 0 个评论 • 3602 次浏览 • 2022-07-17 18:29
ERRO[0000] 'overlay' is not supported over overlayfs

Error: error creating libpod runtime: 'overlay' is not supported over overlayfs: backing file system is unsupported for this graph driver
本来计划在docker里面安装一个docker,启动docker报错,
于是安装了一个podman,结果ps -a的时候报错。
唯一的办法,可能就是启动第一个docker的时候使用特权模式, privillage=True
查看全部
ERRO[0000] 'overlay' is not supported over overlayfs
Error: error creating libpod runtime: 'overlay' is not supported over overlayfs: backing file system is unsupported for this graph driver
本来计划在docker里面安装一个docker,启动docker报错,
于是安装了一个podman,结果ps -a的时候报错。
唯一的办法,可能就是启动第一个docker的时候使用特权模式, privillage=True
映射端口 methodot 云主机 外部访问
Linux • 李魔佛 发表了文章 • 0 个评论 • 3239 次浏览 • 2022-07-17 02:36
如果我们做了web,要怎么映射出来呢?
很简单,只要把web端口改为8001 - 8005 之中的一个。
然后用上面表格中对应的端口映射来访问就可以了
比如下面的flask代码:
from flask import Flask, jsonify


# 最基本的测试


app =Flask(__name__)


@app.route('/about')

def about():

    return 'this is about page'


@app.route('/404')

def error_handle():

    return '404 error'


@app.route('/')

def error_handle():

    return jsonify({'code':100})


if __name__=='__main__':

    app.run(host='0.0.0.0',port=8001,debug=True)
因为8001映射出去的端口是 33442,
所以你可以在浏览器访问你的主机:
curl http://xxxxxxxxxxxxx.methodot.com:33442/
话说,之前以为这个主机随时提桶跑路的,不过用到现在还好。
每一个应用都是一个docker镜像。 所以你的linux系统是无法使用 systemctl 控制服务启动的。
会包权限不够。 查看全部

如果我们做了web,要怎么映射出来呢?
很简单,只要把web端口改为8001 - 8005 之中的一个。
然后用上面表格中对应的端口映射来访问就可以了
比如下面的flask代码:
from flask import Flask, jsonify
# 最基本的测试
app =Flask(__name__)
@app.route('/about')
def about():
return 'this is about page'
@app.route('/404')
def error_handle():
return '404 error'
@app.route('/')
def error_handle():
return jsonify({'code':100})
if __name__=='__main__':
app.run(host='0.0.0.0',port=8001,debug=True)
因为8001映射出去的端口是 33442,
所以你可以在浏览器访问你的主机:
curl http://xxxxxxxxxxxxx.methodot.com:33442/
话说,之前以为这个主机随时提桶跑路的,不过用到现在还好。
每一个应用都是一个docker镜像。 所以你的linux系统是无法使用 systemctl 控制服务启动的。
会包权限不够。
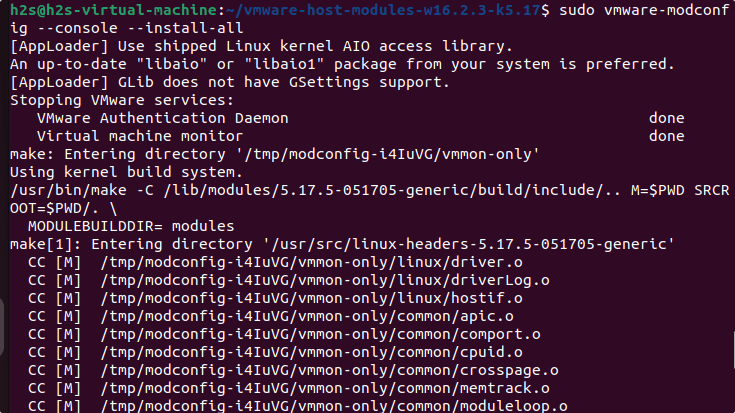
vmware player Unable to install all modules. See log for details
Linux • 李魔佛 发表了文章 • 0 个评论 • 3939 次浏览 • 2022-07-15 13:55
Unable to install all modules. See log for details
ubuntu下的vmware play经常会让更新模块。一起点击确认就可以正常编译更新。
而且一定要编译后才能打开虚拟机系统
但是奇怪的是,最近一次点击 更新,报错:
显示的英文错误信息:
Unable to install all modules. See log for details
看了日志:
 26 2022-07-15T02:15:09.595Z In(05) host-7426 /tmp/modconfig-PB4afO/vmmon-only/./include/vm_assert.h:372:22: note: in definition of macro ‘ASSERT_ON_COMPILE’

     25 2022-07-15T02:15:09.595Z In(05) host-7426   372 |       _Static_assert(e, #e); \

     24 2022-07-15T02:15:09.595Z In(05) host-7426       |                      ^

     23 2022-07-15T02:15:09.595Z In(05) host-7426 /tmp/modconfig-PB4afO/vmmon-only/./include/vm_asm_x86.h:215:7: note: in expansion of macro ‘ASSERT_ON_COMPILE_SELECTOR_SIZE’

     22 2022-07-15T02:15:09.595Z In(05) host-7426   215 |       ASSERT_ON_COMPILE_SELECTOR_SIZE(expr);                           \

     21 2022-07-15T02:15:09.595Z In(05) host-7426       |       ^~~~~~~~~~~~~~~~~~~~~~~~~~~~~~~

     20 2022-07-15T02:15:09.595Z In(05) host-7426 /tmp/modconfig-PB4afO/vmmon-only/./include/vm_asm_x86.h:227:22: note: in expansion of macro ‘SET_SEGREG’

     19 2022-07-15T02:15:09.595Z In(05) host-7426   227 | #define SET_GS(expr) SET_SEGREG(gs, expr)

     18 2022-07-15T02:15:09.595Z In(05) host-7426       |                      ^~~~~~~~~~

     17 2022-07-15T02:15:09.595Z In(05) host-7426 /tmp/modconfig-PB4afO/vmmon-only/common/task.c:2726:10: note: in expansion of macro ‘SET_GS’

     16 2022-07-15T02:15:09.595Z In(05) host-7426  2726 |          SET_GS(gs);

     15 2022-07-15T02:15:09.595Z In(05) host-7426       |          ^~~~~~

     14 2022-07-15T02:15:09.595Z In(05) host-7426 make[2]: *** [scripts/Makefile.build:285: /tmp/modconfig-PB4afO/vmmon-only/common/task.o] Error 1

     13 2022-07-15T02:15:09.595Z In(05) host-7426 make[2]: *** Waiting for unfinished jobs....

     12 2022-07-15T02:15:09.595Z In(05) host-7426 make[1]: *** [Makefile:1875: /tmp/modconfig-PB4afO/vmmon-only] Error 2

     11 2022-07-15T02:15:09.595Z In(05) host-7426 make: *** [Makefile:117: vmmon.ko] Error 2

     10 2022-07-15T02:15:09.595Z In(05) host-7426 Using kernel build system.

      9 2022-07-15T02:15:09.595Z In(05) host-7426 /tmp/modconfig-PB4afO/vmnet-only/driver.c: In function ‘VNetFileOpUnlockedIoctl’:

      8 2022-07-15T02:15:09.595Z In(05) host-7426 /tmp/modconfig-PB4afO/vmnet-only/driver.c:966:7: warning: this statement may fall through [-Wimplicit-fallthrough=]

      7 2022-07-15T02:15:09.595Z In(05) host-7426   966 |       {

      6 2022-07-15T02:15:09.595Z In(05) host-7426       |       ^

      5 2022-07-15T02:15:09.595Z In(05) host-7426 /tmp/modconfig-PB4afO/vmnet-only/driver.c:976:4: note: here

      4 2022-07-15T02:15:09.595Z In(05) host-7426   976 |    case SIOCGETAPIVERSION:

      3 2022-07-15T02:15:09.595Z In(05) host-7426       |    ^~~~

      2 2022-07-15T02:15:09.595Z In(05) host-7426 Skipping BTF generation for /tmp/modconfig-PB4afO/vmnet-only/vmnet.ko due to unavailability of vmlinux

      1 2022-07-15T02:15:09.595Z In(05) host-7426 Unable to install all modules.  See log for details.
报错信息在这里:
   host-7426 Skipping BTF generation for /tmp/modconfig-PB4afO/vmnet-only/vmnet.ko due to unavailability of vmlinux


    host-7426 Unable to install all modules.  See log for details
遇到问题后就google一番。
果然还是老外大神多。
翻了一个解决方案后,终于找到一个可行的。【所以必须的英语水平还是要的】
可行的方案:
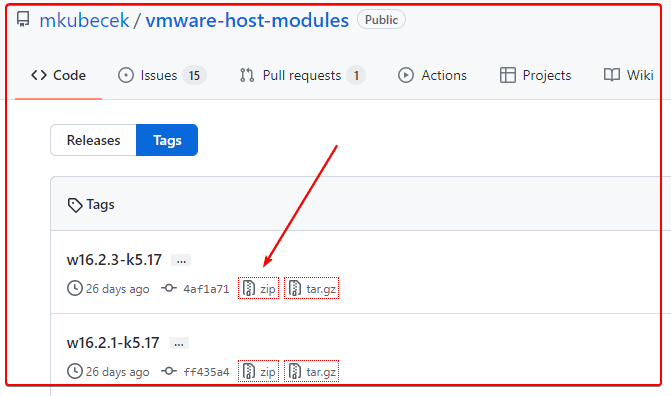
去github下载最新的host-modules
https://github.com/mkubecek/vmware-host-modules
下载一个最新的。
然后解压:unzip w16.2.3-k5.17.zip
得到以下文件 INSTALL
LICENSE
Makefile
README
vmmon-only
vmnet-only
然后我们打包两个文件夹 vmmon-only
vmnet-only tar -cf vmmon.tar vmmon-only
tar -cf vmnet.tar vmnet-only
这时,文件夹下多了2个tar的文件,vmmon.tar和vmnet.tar
然后拷贝到 目录:
/usr/lib/vmware.modules.source
sudo cp -v vmmon.tar vmnet.tar /usr/lib/vmware/modules/source/
之后可以直接编译:
sudo vmware-modconfig --console --install-all
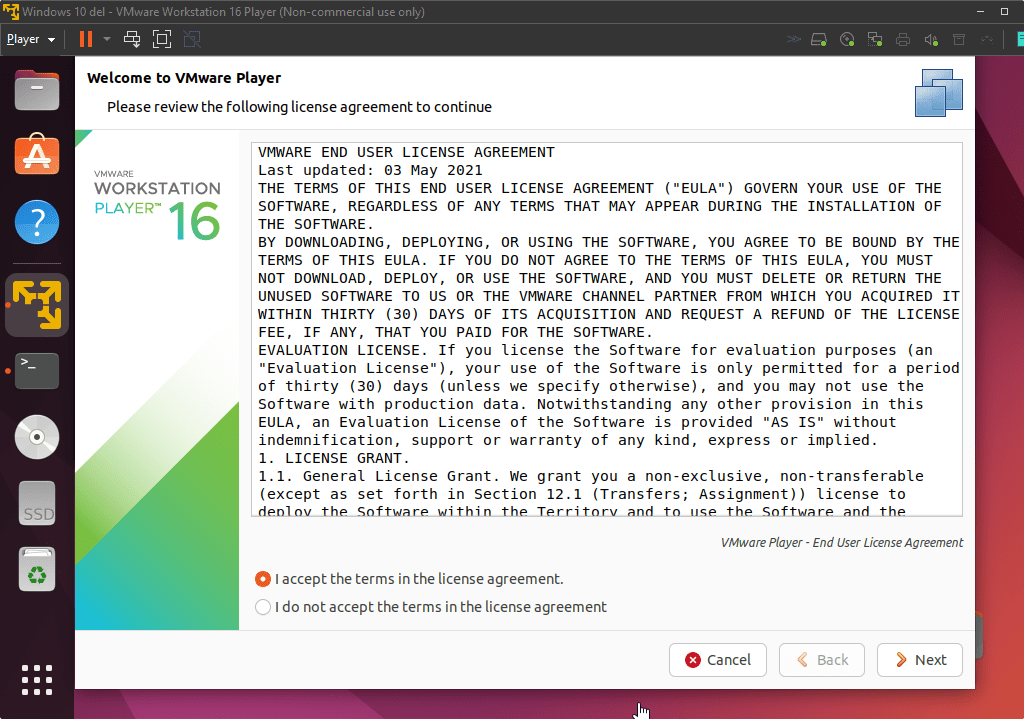
安装完成之后,再次打开vmware player就可以看到:
这样就是成功了。 查看全部
Unable to install all modules. See log for details
ubuntu下的vmware play经常会让更新模块。一起点击确认就可以正常编译更新。
而且一定要编译后才能打开虚拟机系统
但是奇怪的是,最近一次点击 更新,报错:
显示的英文错误信息:
Unable to install all modules. See log for details
看了日志:
26 2022-07-15T02:15:09.595Z In(05) host-7426 /tmp/modconfig-PB4afO/vmmon-only/./include/vm_assert.h:372:22: note: in definition of macro ‘ASSERT_ON_COMPILE’
25 2022-07-15T02:15:09.595Z In(05) host-7426 372 | _Static_assert(e, #e); \
24 2022-07-15T02:15:09.595Z In(05) host-7426 | ^
23 2022-07-15T02:15:09.595Z In(05) host-7426 /tmp/modconfig-PB4afO/vmmon-only/./include/vm_asm_x86.h:215:7: note: in expansion of macro ‘ASSERT_ON_COMPILE_SELECTOR_SIZE’
22 2022-07-15T02:15:09.595Z In(05) host-7426 215 | ASSERT_ON_COMPILE_SELECTOR_SIZE(expr); \
21 2022-07-15T02:15:09.595Z In(05) host-7426 | ^~~~~~~~~~~~~~~~~~~~~~~~~~~~~~~
20 2022-07-15T02:15:09.595Z In(05) host-7426 /tmp/modconfig-PB4afO/vmmon-only/./include/vm_asm_x86.h:227:22: note: in expansion of macro ‘SET_SEGREG’
19 2022-07-15T02:15:09.595Z In(05) host-7426 227 | #define SET_GS(expr) SET_SEGREG(gs, expr)
18 2022-07-15T02:15:09.595Z In(05) host-7426 | ^~~~~~~~~~
17 2022-07-15T02:15:09.595Z In(05) host-7426 /tmp/modconfig-PB4afO/vmmon-only/common/task.c:2726:10: note: in expansion of macro ‘SET_GS’
16 2022-07-15T02:15:09.595Z In(05) host-7426 2726 | SET_GS(gs);
15 2022-07-15T02:15:09.595Z In(05) host-7426 | ^~~~~~
14 2022-07-15T02:15:09.595Z In(05) host-7426 make[2]: *** [scripts/Makefile.build:285: /tmp/modconfig-PB4afO/vmmon-only/common/task.o] Error 1
13 2022-07-15T02:15:09.595Z In(05) host-7426 make[2]: *** Waiting for unfinished jobs....
12 2022-07-15T02:15:09.595Z In(05) host-7426 make[1]: *** [Makefile:1875: /tmp/modconfig-PB4afO/vmmon-only] Error 2
11 2022-07-15T02:15:09.595Z In(05) host-7426 make: *** [Makefile:117: vmmon.ko] Error 2
10 2022-07-15T02:15:09.595Z In(05) host-7426 Using kernel build system.
9 2022-07-15T02:15:09.595Z In(05) host-7426 /tmp/modconfig-PB4afO/vmnet-only/driver.c: In function ‘VNetFileOpUnlockedIoctl’:
8 2022-07-15T02:15:09.595Z In(05) host-7426 /tmp/modconfig-PB4afO/vmnet-only/driver.c:966:7: warning: this statement may fall through [-Wimplicit-fallthrough=]
7 2022-07-15T02:15:09.595Z In(05) host-7426 966 | {
6 2022-07-15T02:15:09.595Z In(05) host-7426 | ^
5 2022-07-15T02:15:09.595Z In(05) host-7426 /tmp/modconfig-PB4afO/vmnet-only/driver.c:976:4: note: here
4 2022-07-15T02:15:09.595Z In(05) host-7426 976 | case SIOCGETAPIVERSION:
3 2022-07-15T02:15:09.595Z In(05) host-7426 | ^~~~
2 2022-07-15T02:15:09.595Z In(05) host-7426 Skipping BTF generation for /tmp/modconfig-PB4afO/vmnet-only/vmnet.ko due to unavailability of vmlinux
1 2022-07-15T02:15:09.595Z In(05) host-7426 Unable to install all modules. See log for details.
报错信息在这里:
host-7426 Skipping BTF generation for /tmp/modconfig-PB4afO/vmnet-only/vmnet.ko due to unavailability of vmlinux
host-7426 Unable to install all modules. See log for details
遇到问题后就google一番。
果然还是老外大神多。
翻了一个解决方案后,终于找到一个可行的。【所以必须的英语水平还是要的】
可行的方案:
去github下载最新的host-modules
https://github.com/mkubecek/vmware-host-modules
下载一个最新的。
然后解压:
unzip w16.2.3-k5.17.zip
得到以下文件
    INSTALL

    LICENSE

    Makefile

    README

    vmmon-only

    vmnet-only
然后我们打包两个文件夹
vmmon-only

vmnet-only
    tar -cf vmmon.tar vmmon-only

    tar -cf vmnet.tar vmnet-only
这时,文件夹下多了2个tar的文件,vmmon.tar和vmnet.tar
然后拷贝到 目录:
/usr/lib/vmware.modules.source
sudo cp -v vmmon.tar vmnet.tar /usr/lib/vmware/modules/source/
之后可以直接编译:
sudo vmware-modconfig --console --install-all
安装完成之后,再次打开vmware player就可以看到:
这样就是成功了。
linux监控shell进程是否运行,不运行的时候自动启动
Linux • 李魔佛 发表了文章 • 0 个评论 • 3186 次浏览 • 2022-07-13 00:17
保存为monitor.sh
#!/bin/bash

line=$(ps -aux | grep -c /usr/sbin/ssh | grep -v "grep")

# 匹配的行数

if [ $line -eq 1 ];

then

sudo /etc/init.d/ssh restart

# 重启ssh服务

else

echo ssh is running....

# 向日志发送邮件,显示ssh运行中。。。

fi
给个执行权限
chmod +x monitor.sh
然后设置定时任务,
比如隔5分钟运行一次上面的脚本
*/5 * * * * monitor.sh
查看全部
保存为monitor.sh
#!/bin/bash
line=$(ps -aux | grep -c /usr/sbin/ssh | grep -v "grep")
# 匹配的行数
if [ $line -eq 1 ];
then
sudo /etc/init.d/ssh restart
# 重启ssh服务
else
echo ssh is running....
# 向日志发送邮件,显示ssh运行中。。。
fi
给个执行权限
chmod +x monitor.sh
然后设置定时任务,
比如隔5分钟运行一次上面的脚本
*/5 * * * * monitor.sh
aria2c 不能下载https的文件
Linux • 李魔佛 发表了文章 • 0 个评论 • 6533 次浏览 • 2022-07-10 11:07
aria2c https:// openresty.org/download/openresty-1.21.4.1-win64.zip$ aria2c
https: //openresty.org/download/openresty-1.21.4.1-win64.zip
07/10 10:58:58 [NOTICE] Downloading 1 item(s)
07/10 10:58:58 [ERROR] CUID#7 - Download aborted. URI=https: //openresty.org/download/openresty-1.21.4.1-win64.zip
Exception: [AbstractCommand.cc:351] errorCode=1 URI=https: //openresty.org/download/openresty-1.21.4.1-win64.zip
-> [InitiateConnectionCommandFactory.cc:87] errorCode=1 https is not supported yet.
07/10 10:58:58 [NOTICE] Download GID#b9bc95619990e7e4 not complete:
Download Results:
gid |stat|avg speed |path/URI
======+====+===========+=======================================================
b9bc95|ERR | n/a|
https: //openresty.org/download/openresty-1.21.4.1-win64.zip
http: //openresty.org/download/openresty-1.21.4.1-win64.zip
Status Legend:
(ERR):error occurred.
aria2 will resume download if the transfer is restarted.
If there are any errors, then see the log file. See '-l' option in help/man page for details.
只要把https改为http就可以了。(前提是完整没有把http跳转到https)
aria2 http: //openresty.org/download/openresty-1.21.4.1-win64.zip
不过这个办法不是长久之计,要解决这个问题,需要你重新编译ariac2, 编译的时候添加 ssl参数就可以啦
进入ariac2的源码目录:./configure --with-openssl接着:make && sudo make install然后就可以啦
查看全部
aria2c https:// openresty.org/download/openresty-1.21.4.1-win64.zip
$ aria2c

https: //openresty.org/download/openresty-1.21.4.1-win64.zip


07/10 10:58:58 [NOTICE] Downloading 1 item(s)


07/10 10:58:58 [ERROR] CUID#7 - Download aborted. URI=https: //openresty.org/download/openresty-1.21.4.1-win64.zip

Exception: [AbstractCommand.cc:351] errorCode=1 URI=https: //openresty.org/download/openresty-1.21.4.1-win64.zip

  -> [InitiateConnectionCommandFactory.cc:87] errorCode=1 https is not supported yet.


07/10 10:58:58 [NOTICE] Download GID#b9bc95619990e7e4 not complete:


Download Results:

gid   |stat|avg speed  |path/URI

======+====+===========+=======================================================

b9bc95|ERR |        n/a|

https: //openresty.org/download/openresty-1.21.4.1-win64.zip


http: //openresty.org/download/openresty-1.21.4.1-win64.zip


Status Legend:

(ERR):error occurred.


aria2 will resume download if the transfer is restarted.

If there are any errors, then see the log file. See '-l' option in help/man page for details.
只要把https改为http就可以了。(前提是完整没有把http跳转到https)
aria2 http: //openresty.org/download/openresty-1.21.4.1-win64.zip
不过这个办法不是长久之计,要解决这个问题,需要你重新编译ariac2, 编译的时候添加 ssl参数就可以啦
进入ariac2的源码目录:
./configure --with-openssl接着:
make && sudo make install然后就可以啦
删除ubuntu snap上旧版本的app 节省硬盘空间
Linux • 李魔佛 发表了文章 • 0 个评论 • 4357 次浏览 • 2021-09-20 18:36
snap list --all
然后可以选择保存下面的作为一个脚本,清理不必要的老版本的app应用
笔者已经试过的,放心使用.人畜无害.
#!/bin/bash

# Removes old revisions of snaps

# CLOSE ALL SNAPS BEFORE RUNNING THIS

set -eu


LANG=C snap list --all | awk '/disabled/{print $1, $3}' |

    while read snapname revision; do

        snap remove "$snapname" --revision="$revision"

done 查看全部
snap list --all

然后可以选择保存下面的作为一个脚本,清理不必要的老版本的app应用
笔者已经试过的,放心使用.人畜无害.
#!/bin/bash
# Removes old revisions of snaps
# CLOSE ALL SNAPS BEFORE RUNNING THIS
set -eu
LANG=C snap list --all | awk '/disabled/{print $1, $3}' |
while read snapname revision; do
snap remove "$snapname" --revision="$revision"
done
ubuntu软件中心 正在安装的软件如何中断
Linux • 李魔佛 发表了文章 • 0 个评论 • 2998 次浏览 • 2021-07-08 08:52
但是看到它里面有个系统版本升级, 丫的要帮我升级ubuntu呀. 要果断阻止呀.
可惜找不到种植的按钮, 不得不吐槽下这个垃圾设计.
无奈只好ps -aux | grep soft
找到了那个软件升级中心的进程pid
再 kill -9 pid
粗暴地把软件升级中心停掉. 查看全部
但是看到它里面有个系统版本升级, 丫的要帮我升级ubuntu呀. 要果断阻止呀.
可惜找不到种植的按钮, 不得不吐槽下这个垃圾设计.
无奈只好ps -aux | grep soft
找到了那个软件升级中心的进程pid
再 kill -9 pid
粗暴地把软件升级中心停掉.
ubuntu16.04 无法访问github
Linux • 李魔佛 发表了文章 • 0 个评论 • 2942 次浏览 • 2021-07-05 15:26
也无法拉去代码。
网上搜了一通,没有一个能够解决问题的。
最终自己折腾了下,把 /etc/hosts 文件里的ipv6的地址注释掉了,就可以访问了。
ubuntu 无法访问github
也无法拉去代码。
网上搜了一通,没有一个能够解决问题的。
最终自己折腾了下,把 /etc/hosts 文件里的ipv6的地址注释掉了,就可以访问了。
cronsun 执行计划任务是报错 exec format error
Linux • 李魔佛 发表了文章 • 0 个评论 • 3109 次浏览 • 2021-03-28 12:32
单独执行shell的脚本是没有问题的。
经过试验测试,是因为shell脚本的开头没有没有添加:#!/bin/bash的标记。
在shell脚本的第一行添加上后就没有问题了。
附一个脚本批量处理: 自动在首行添加 #!/bin/bash
In [1]: folder='/root/crontab_script'


In [2]: import os


In [3]: filelist=os.listdir(folder)


In [6]: def change_file(filename):

   ...:     with open(filename,'r') as fp:

   ...:         content=fp.read()

   ...:         content=content.strip()

   ...:     concat='#!/bin/bash\n'

   ...:     content=concat+content

   ...:     with open(filename,'w') as fp:

   ...:         fp.write(content)

   ...:


In [7]: for file in filelist:

   ...:     if file.endswith('.sh'):

   ...:         full_path = os.path.join(folder,file)

...: change_file(full_path) 查看全部
fork/exec /root/crontab_script/hello.sh: exec format error
单独执行shell的脚本是没有问题的。
经过试验测试,是因为shell脚本的开头没有没有添加:
#!/bin/bash的标记。
在shell脚本的第一行添加上后就没有问题了。
附一个脚本批量处理: 自动在首行添加 #!/bin/bash
In [1]: folder='/root/crontab_script'
In [2]: import os
In [3]: filelist=os.listdir(folder)
In [6]: def change_file(filename):
...: with open(filename,'r') as fp:
...: content=fp.read()
...: content=content.strip()
...: concat='#!/bin/bash\n'
...: content=concat+content
...: with open(filename,'w') as fp:
...: fp.write(content)
...:
In [7]: for file in filelist:
...: if file.endswith('.sh'):
...: full_path = os.path.join(folder,file)
...: change_file(full_path)
cronsun 计划任务运行python脚本
Linux • 李魔佛 发表了文章 • 0 个评论 • 3071 次浏览 • 2021-03-27 23:34
cd xxxxx && python xxx.py这样的操作,这样貌似不会实际去执行
只能把上面的命令放到一个shell文件里面,比如worker.sh
然后把worker.sh 放到指定的位置,然后把这个shell的完整路径放入到 cronsun的计划任务的脚本里面。
查看全部
cd xxxxx && python xxx.py这样的操作,这样貌似不会实际去执行
只能把上面的命令放到一个shell文件里面,比如worker.sh
然后把worker.sh 放到指定的位置,然后把这个shell的完整路径放入到 cronsun的计划任务的脚本里面。


chrome secure shell插件无法上传下载文件
Linux • 李魔佛 发表了文章 • 0 个评论 • 2796 次浏览 • 2021-02-22 19:28
后记:
只好用scp传输啦,还好windows平台的git客户端。
后记:
只好用scp传输啦,还好windows平台的git客户端。
armdebian 修改大写键 为esc
Linux • 李魔佛 发表了文章 • 0 个评论 • 3535 次浏览 • 2021-01-18 18:15
armdebian上没有xmodmap 这个软件,但有一个xkeycaps的GUI的小应用,可以很方便地修改在图形界面上修改按键映射。
而且xkeycaps修改是持续有效的,如果想该回去,上面有个restore的功能,可以一键恢复默认值。
查看全部
armdebian上没有xmodmap 这个软件,但有一个xkeycaps的GUI的小应用,可以很方便地修改在图形界面上修改按键映射。
而且xkeycaps修改是持续有效的,如果想该回去,上面有个restore的功能,可以一键恢复默认值。
bbdoc居然不支持代码搜索
Linux • 李魔佛 发表了文章 • 0 个评论 • 3320 次浏览 • 2021-01-03 16:54
什么python,cpp,java一个都不支持。
什么python,cpp,java一个都不支持。
win7安装sshd服务
闲聊 • 李魔佛 发表了文章 • 0 个评论 • 4380 次浏览 • 2020-12-29 08:52
Recently, Microsoft has released a port of OpenSSH for Windows. You can use the package to set up an SFTP/SSH server on Windows.Installing SFTP/SSH Server
On Windows 10 version 1803 and newer
On earlier versions of Windows
https://github.com/PowerShell/Win32-OpenSSH/releases
Configuring SSH server
Setting up SSH public key authentication
Connecting to the server
Finding Host Key
Connecting
Further readingInstalling SFTP/SSH Server
On Windows 10 version 1803 and newerIn Settings app, go to Apps > Apps & features > Manage optional features.
Locate “OpenSSH server” feature, expand it, and select Install.Binaries are installed to %WINDIR%\System32\OpenSSH.
Configuration file (sshd_config) and host keys are installed to %ProgramData%\ssh
(only after the server is started for the first time).
You may still want to use the following manual installation, if you want to install a newer version of OpenSSH than the one built into Windows 10.
On earlier versions of WindowsDownload the latest OpenSSH for Windows binaries (package OpenSSH-Win64.zip or OpenSSH-Win32.zip)
As the Administrator, extract the package to C:\Program Files\OpenSSH
As the Administrator, install sshd and ssh-agent services:
powershell.exe -ExecutionPolicy Bypass -File install-sshd.ps1
Configuring SSH serverAllow incoming connections to SSH server in Windows Firewall:
When installed as an optional feature, the firewall rule “OpenSSH SSH Server (sshd)” should have been created automatically. If not, proceed to create and enable the rule as follows.
Either run the following PowerShell command as the Administrator:New-NetFirewallRule -Name sshd -DisplayName 'OpenSSH SSH Server' -Enabled True -Direction Inbound -Protocol TCP -Action Allow -LocalPort 22 -Program "C:\System32\OpenSSH\sshd.exe"
Replace C:\System32\OpenSSH\sshd.exe with the actual path to the sshd.exe
(C:\Program Files\OpenSSH\ssh.exe,
had you followed the manual installation instructions above).or go to Control Panel > System and Security > Windows Firewall1 > Advanced Settings > Inbound Rules and add a new rule for port 22.
Start the service and/or configure automatic start:
Go to Control Panel > System and Security > Administrative Tools and open Services. Locate OpenSSH SSH Server service.
If you want the server to start automatically when your machine is started: Go to Action > Properties. In the Properties dialog, change Startup type to Automatic and confirm.
Start the OpenSSH SSH Server service by clicking the Start the service.These instructions are partially based on the official deployment instructions. 查看全部
Recently, Microsoft has released a port of OpenSSH for Windows. You can use the package to set up an SFTP/SSH server on Windows.Installing SFTP/SSH Server
On Windows 10 version 1803 and newer
On earlier versions of Windows
https://github.com/PowerShell/Win32-OpenSSH/releases
Configuring SSH server
Setting up SSH public key authentication
Connecting to the server
Finding Host Key
Connecting
Further readingInstalling SFTP/SSH Server
On Windows 10 version 1803 and newerIn Settings app, go to Apps > Apps & features > Manage optional features.
Locate “OpenSSH server” feature, expand it, and select Install.Binaries are installed to %WINDIR%\System32\OpenSSH.
Configuration file (sshd_config) and host keys are installed to %ProgramData%\ssh
(only after the server is started for the first time).
You may still want to use the following manual installation, if you want to install a newer version of OpenSSH than the one built into Windows 10.
On earlier versions of WindowsDownload the latest OpenSSH for Windows binaries (package OpenSSH-Win64.zip or OpenSSH-Win32.zip)
As the Administrator, extract the package to C:\Program Files\OpenSSH
As the Administrator, install sshd and ssh-agent services:
powershell.exe -ExecutionPolicy Bypass -File install-sshd.ps1
Configuring SSH serverAllow incoming connections to SSH server in Windows Firewall:
When installed as an optional feature, the firewall rule “OpenSSH SSH Server (sshd)” should have been created automatically. If not, proceed to create and enable the rule as follows.
Either run the following PowerShell command as the Administrator:New-NetFirewallRule -Name sshd -DisplayName 'OpenSSH SSH Server' -Enabled True -Direction Inbound -Protocol TCP -Action Allow -LocalPort 22 -Program "C:\System32\OpenSSH\sshd.exe"
Replace C:\System32\OpenSSH\sshd.exe with the actual path to the sshd.exe
(C:\Program Files\OpenSSH\ssh.exe,
had you followed the manual installation instructions above).or go to Control Panel > System and Security > Windows Firewall1 > Advanced Settings > Inbound Rules and add a new rule for port 22.
Start the service and/or configure automatic start:
Go to Control Panel > System and Security > Administrative Tools and open Services. Locate OpenSSH SSH Server service.
If you want the server to start automatically when your machine is started: Go to Action > Properties. In the Properties dialog, change Startup type to Automatic and confirm.
Start the OpenSSH SSH Server service by clicking the Start the service.These instructions are partially based on the official deployment instructions.
网易云音乐居然还有linux版本,网易还是一个良心企业
Linux • 李魔佛 发表了文章 • 0 个评论 • 3857 次浏览 • 2020-12-18 11:31
啥时候有道云笔记也搞一个linux版本的呀.
如果要在ubuntu16.04上安装,就不要去官网下载,gclib库不兼容,要升级到18.04, 会会很折腾.
直接下载:
$ wget http://s1.music.126.net/downlo ... 4.deb --默认下载到Desktop
然后sudo dpkg -i xxxxx.deb 就可以啦
良心的还要搜狗,linux下的输入法好用.
更新:
安装上面方法安装后,可以打开,可以播放mv,不过就是无法播放声音.
需要解决依赖问题.
网上找到了好的方法: 亲测有效
更改源为阿里云的源
# deb cdrom:[Ubuntu 16.04 LTS _Xenial Xerus_ - Release amd64 (20160420.1)]/ xenial main restricted

deb-src http://archive.ubuntu.com/ubuntu xenial main restricted #Added by software-properties

deb http://mirrors.aliyun.com/ubuntu/ xenial main restricted

deb-src http://mirrors.aliyun.com/ubuntu/ xenial main restricted multiverse universe #Added by software-properties

deb http://mirrors.aliyun.com/ubuntu/ xenial-updates main restricted

deb-src http://mirrors.aliyun.com/ubuntu/ xenial-updates main restricted multiverse universe #Added by software-properties

deb http://mirrors.aliyun.com/ubuntu/ xenial universe

deb http://mirrors.aliyun.com/ubuntu/ xenial-updates universe

deb http://mirrors.aliyun.com/ubuntu/ xenial multiverse

deb http://mirrors.aliyun.com/ubuntu/ xenial-updates multiverse

deb http://mirrors.aliyun.com/ubuntu/ xenial-backports main restricted universe multiverse

deb-src http://mirrors.aliyun.com/ubuntu/ xenial-backports main restricted universe multiverse #Added by software-properties

deb http://archive.canonical.com/ubuntu xenial partner

deb-src http://archive.canonical.com/ubuntu xenial partner

deb http://mirrors.aliyun.com/ubuntu/ xenial-security main restricted

deb-src http://mirrors.aliyun.com/ubuntu/ xenial-security main restricted multiverse universe #Added by software-properties

deb http://mirrors.aliyun.com/ubuntu/ xenial-security universe

deb http://mirrors.aliyun.com/ubuntu/ xenial-security multiversean
然后运行 apt -f install 修复依赖关系就可以了.
查看全部

啥时候有道云笔记也搞一个linux版本的呀.
如果要在ubuntu16.04上安装,就不要去官网下载,gclib库不兼容,要升级到18.04, 会会很折腾.
直接下载:
$ wget http://s1.music.126.net/downlo ... 4.deb --默认下载到Desktop
然后sudo dpkg -i xxxxx.deb 就可以啦
良心的还要搜狗,linux下的输入法好用.
更新:
安装上面方法安装后,可以打开,可以播放mv,不过就是无法播放声音.
需要解决依赖问题.
网上找到了好的方法: 亲测有效
更改源为阿里云的源
# deb cdrom:[Ubuntu 16.04 LTS _Xenial Xerus_ - Release amd64 (20160420.1)]/ xenial main restricted然后运行 apt -f install 修复依赖关系就可以了.
deb-src http://archive.ubuntu.com/ubuntu xenial main restricted #Added by software-properties
deb http://mirrors.aliyun.com/ubuntu/ xenial main restricted
deb-src http://mirrors.aliyun.com/ubuntu/ xenial main restricted multiverse universe #Added by software-properties
deb http://mirrors.aliyun.com/ubuntu/ xenial-updates main restricted
deb-src http://mirrors.aliyun.com/ubuntu/ xenial-updates main restricted multiverse universe #Added by software-properties
deb http://mirrors.aliyun.com/ubuntu/ xenial universe
deb http://mirrors.aliyun.com/ubuntu/ xenial-updates universe
deb http://mirrors.aliyun.com/ubuntu/ xenial multiverse
deb http://mirrors.aliyun.com/ubuntu/ xenial-updates multiverse
deb http://mirrors.aliyun.com/ubuntu/ xenial-backports main restricted universe multiverse
deb-src http://mirrors.aliyun.com/ubuntu/ xenial-backports main restricted universe multiverse #Added by software-properties
deb http://archive.canonical.com/ubuntu xenial partner
deb-src http://archive.canonical.com/ubuntu xenial partner
deb http://mirrors.aliyun.com/ubuntu/ xenial-security main restricted
deb-src http://mirrors.aliyun.com/ubuntu/ xenial-security main restricted multiverse universe #Added by software-properties
deb http://mirrors.aliyun.com/ubuntu/ xenial-security universe
deb http://mirrors.aliyun.com/ubuntu/ xenial-security multiversean
vimium 配合chrome 真的好用,尤其用惯vim的用户
Linux • 李魔佛 发表了文章 • 0 个评论 • 3254 次浏览 • 2020-11-22 01:59
上面是vimium的快捷键用法

上面是vimium的快捷键用法
windows下的分区挂载到linux下面,然后docker在上面挂载-无法识别
Linux • 李魔佛 发表了文章 • 0 个评论 • 3447 次浏览 • 2020-11-11 02:40
windows下的分区挂载到linux下面,然后docker在上面挂载-无法识别。
情况是这样的:
双系统的环境,一个ubuntu,一个windows。 ubuntu上的有个docker,但是ubuntu的分区比较小,需要挂载windows的ntfs分区来扩展空间。
其他程序用起来没什么问题,可是,在用docker 挂在windows分区下的文件夹,总是报错,用的 -v xxxx:xxxx 方式。
同样的docker启动命令,在ubuntu下的目录就没有问题,所以就开始怀疑是权限问题。
但是经过一系列的mount操作,chmod也给足了了权限,可是还没无法启动docker。
后来没办法,只好把windows分区缩小容量,把多余的容量格式化为ext分区格式,然后重新用docker mount -v, 后面docker就可以正常启动了。 查看全部
坑:
windows下的分区挂载到linux下面,然后docker在上面挂载-无法识别。
情况是这样的:
双系统的环境,一个ubuntu,一个windows。 ubuntu上的有个docker,但是ubuntu的分区比较小,需要挂载windows的ntfs分区来扩展空间。
其他程序用起来没什么问题,可是,在用docker 挂在windows分区下的文件夹,总是报错,用的 -v xxxx:xxxx 方式。
同样的docker启动命令,在ubuntu下的目录就没有问题,所以就开始怀疑是权限问题。
但是经过一系列的mount操作,chmod也给足了了权限,可是还没无法启动docker。
后来没办法,只好把windows分区缩小容量,把多余的容量格式化为ext分区格式,然后重新用docker mount -v, 后面docker就可以正常启动了。
斐讯N1 armlinux 长时间运行会导致文件系统只读 readonly
Linux • 李魔佛 发表了文章 • 0 个评论 • 4327 次浏览 • 2020-10-25 00:24
比如放着几个晚上不关机,然后文件系统变成了只读,无法写入文件,提示只读系统。
原因是系统分区有坏道。 可能由于关机使用拔电源的方式导致的。
所以要养成好的习惯,正常关机,使用命令 shutdown -h 或者点击关机按钮就好了。
那么如果出现了上述问题,怎么办?
可以使用用U盘启动,运行一次e2fsck /dev/mmcblk1p2
然后选择Y,修复坏道就可以了。
U盘启动就是之前刷Armlinux时的那个U盘。
接上U盘,然后上电启动即可。 然后进入系统运行上述的命令:
e2fsck /dev/mmcblk1p2
查看全部
比如放着几个晚上不关机,然后文件系统变成了只读,无法写入文件,提示只读系统。

原因是系统分区有坏道。 可能由于关机使用拔电源的方式导致的。
所以要养成好的习惯,正常关机,使用命令 shutdown -h 或者点击关机按钮就好了。
那么如果出现了上述问题,怎么办?
可以使用用U盘启动,运行一次e2fsck /dev/mmcblk1p2
然后选择Y,修复坏道就可以了。
U盘启动就是之前刷Armlinux时的那个U盘。
接上U盘,然后上电启动即可。 然后进入系统运行上述的命令:
e2fsck /dev/mmcblk1p2
Started update UTMP about system Runlevel during booting ubuntu/armlinux
Linux • 李魔佛 发表了文章 • 0 个评论 • 6313 次浏览 • 2020-10-20 13:33
Started update UTMP about system Runlevel
Finally, i try to enter into secure mode and check logs.
it was caused by system disk is out of space.
So i try to delete some unless file to release some space, then reboot system, then everything is ok now.
http://30daydo.com/article/617
查看全部
Started update UTMP about system Runlevel
Finally, i try to enter into secure mode and check logs.
it was caused by system disk is out of space.
So i try to delete some unless file to release some space, then reboot system, then everything is ok now.
http://30daydo.com/article/617
zsh历史记录文件损坏: zsh: corrupt history file /home/admin/.zsh_history
Linux • 李魔佛 发表了文章 • 0 个评论 • 5978 次浏览 • 2020-10-09 18:12
mv .zsh_history .zsh_history_bad
strings .zsh_history_bad > .zsh_history
fc -R .zsh_history
如果最后一步提示出错 fc的参数不对,可以进入zsh,然后再执行 fc -R .zsh_histroy
原创文章,转载请注明出处:
http://30daydo.com/article/612
查看全部
cd ~

mv .zsh_history .zsh_history_bad

strings .zsh_history_bad > .zsh_history

fc -R .zsh_history
如果最后一步提示出错 fc的参数不对,可以进入zsh,然后再执行 fc -R .zsh_histroy
原创文章,转载请注明出处:
http://30daydo.com/article/612
crontab定时运行图形程序
Linux • 李魔佛 发表了文章 • 0 个评论 • 4383 次浏览 • 2019-08-26 15:56
export DISPLAY=:0;* * * * * export DISPLAY=:0; gedit
附一个linux下桌面提醒GUI程序,定时提醒你休息哈:
import pyautogui as pag

import datetime


def neck_rest():

    f = open('neck_record.txt', 'a')

    ret = pag.prompt("Rest! Protect your neck !")

    if ret == 'rest':

        f.write(datetime.datetime.now().strftime("%Y-%m-%d %H:%M:%S"))

        f.write('\t')

        f.write('Rest')

        f.write('\n')

    else:

        f.write(datetime.datetime.now().strftime("%Y-%m-%d %H:%M:%S"))

        f.write('\t')

        f.write('Failed to rest')

        f.write('\n')

    f.close()


neck_rest()
程序保存为task.py
然后设定crontab任务:
* * * * * export DISPLAY=:0; python task.py
即可
查看全部
export DISPLAY=:0;
* * * * * export DISPLAY=:0; gedit
附一个linux下桌面提醒GUI程序,定时提醒你休息哈:
import pyautogui as pag
import datetime
def neck_rest():
f = open('neck_record.txt', 'a')
ret = pag.prompt("Rest! Protect your neck !")
if ret == 'rest':
f.write(datetime.datetime.now().strftime("%Y-%m-%d %H:%M:%S"))
f.write('\t')
f.write('Rest')
f.write('\n')
else:
f.write(datetime.datetime.now().strftime("%Y-%m-%d %H:%M:%S"))
f.write('\t')
f.write('Failed to rest')
f.write('\n')
f.close()
neck_rest()
程序保存为task.py
然后设定crontab任务:
* * * * * export DISPLAY=:0; python task.py
即可
alias别名 等号后面不用
Linux • 李魔佛 发表了文章 • 0 个评论 • 3455 次浏览 • 2019-08-12 14:17
alias fetch="git fetch origin"
alias dj="python manage.py runserver 0.0.0.0"
alias py2="python2"
alias py3="python3"
alias ggg="cd ~/git" 查看全部
alias fetch="git fetch origin"
alias dj="python manage.py runserver 0.0.0.0"
alias py2="python2"
alias py3="python3"
alias ggg="cd ~/git"
ubuntu/linux shell根据进程名杀死进程 一句搞定
Linux • 李魔佛 发表了文章 • 0 个评论 • 5784 次浏览 • 2019-04-19 23:15
比如我要杀死python的进程,就使用
ps -ef | grep "python" | grep -v grep | cut -c 10-16 | xargs kill -9
来使用。
grep -v grep 因为 ps 会把grep python这个进程也打印出来,所以-v 是反转的意思,不匹配的才打印出来,然后cut 是找出10到16位的字符,这里需要大家根据自己的用户名来调整。
一般ps -ef输出是 前面 用户名,然后空格, 接着是进程号。 如果你的用户名很长,可以调整10-16的位置来适应。
后面就是把进程号传递给kill作为参数,-9 是强制杀死。
查看全部
ps -ef | grep "进程名" | grep -v grep | cut -c 10-16 | xargs kill -9
比如我要杀死python的进程,就使用
ps -ef | grep "python" | grep -v grep | cut -c 10-16 | xargs kill -9
来使用。
grep -v grep 因为 ps 会把grep python这个进程也打印出来,所以-v 是反转的意思,不匹配的才打印出来,然后cut 是找出10到16位的字符,这里需要大家根据自己的用户名来调整。
一般ps -ef输出是 前面 用户名,然后空格, 接着是进程号。 如果你的用户名很长,可以调整10-16的位置来适应。
后面就是把进程号传递给kill作为参数,-9 是强制杀死。
linux监控shell进程是否运行,不运行的时候自动启动
Linux • 李魔佛 发表了文章 • 0 个评论 • 3186 次浏览 • 2022-07-13 00:17
保存为monitor.sh
#!/bin/bash

line=$(ps -aux | grep -c /usr/sbin/ssh | grep -v "grep")

# 匹配的行数

if [ $line -eq 1 ];

then

sudo /etc/init.d/ssh restart

# 重启ssh服务

else

echo ssh is running....

# 向日志发送邮件,显示ssh运行中。。。

fi
给个执行权限
chmod +x monitor.sh
然后设置定时任务,
比如隔5分钟运行一次上面的脚本
*/5 * * * * monitor.sh
查看全部
保存为monitor.sh
#!/bin/bash
line=$(ps -aux | grep -c /usr/sbin/ssh | grep -v "grep")
# 匹配的行数
if [ $line -eq 1 ];
then
sudo /etc/init.d/ssh restart
# 重启ssh服务
else
echo ssh is running....
# 向日志发送邮件,显示ssh运行中。。。
fi
给个执行权限
chmod +x monitor.sh
然后设置定时任务,
比如隔5分钟运行一次上面的脚本
*/5 * * * * monitor.sh
linux目录跳转利器 z.sh
Linux • 李魔佛 发表了文章 • 0 个评论 • 8306 次浏览 • 2016-06-17 17:32
浪费时间且效率低下。
推荐大家使用一个小脚本,可以快速切换目录,不需要经常cd了。
拷贝下面的代码,保存为z.sh,放在用户目录下,/home/xxxx, xxx为用户名, 然后 给予 777权限, chmod 777 z.sh
然后 修改 .bashrc 文件, vim ~/.bashrc
在文件的最后添加一句 source ~/z.sh
然后保存.bashrc
然后运行 source ~./bashrc , 然后就马上生效了。
然后你进入到某一个目录,比如 /home/user/build/data/bin/hello/, 运行 z
系统会纪录你的hello目录一次,
下一次在其他目录比如在/etc/apt/,如果要跳转到 /home/user/build/data/bin/hello/,
直接运行 z hello 就可以了。# Copyright (c) 2009 rupa deadwyler under the WTFPL license
# maintains a jump-list of the directories you actually use
#
# INSTALL:
# * put something like this in your .bashrc/.zshrc:
# . /path/to/z.sh
# * cd around for a while to build up the db
# * PROFIT!!
# * optionally:
# set $_Z_CMD in .bashrc/.zshrc to change the command (default z).
# set $_Z_DATA in .bashrc/.zshrc to change the datafile (default ~/.z).
# set $_Z_NO_RESOLVE_SYMLINKS to prevent symlink resolution.
# set $_Z_NO_PROMPT_COMMAND if you're handling PROMPT_COMMAND yourself.
# set $_Z_EXCLUDE_DIRS to an array of directories to exclude.
# set $_Z_OWNER to your username if you want use z while sudo with $HOME kept
#
# USE:
# * z foo # cd to most frecent dir matching foo
# * z foo bar # cd to most frecent dir matching foo and bar
# * z -r foo # cd to highest ranked dir matching foo
# * z -t foo # cd to most recently accessed dir matching foo
# * z -l foo # list matches instead of cd
# * z -c foo # restrict matches to subdirs of $PWD
[ -d "${_Z_DATA:-$HOME/.z}" ] && {
echo "ERROR: z.sh's datafile (${_Z_DATA:-$HOME/.z}) is a directory."
}
_z() {
local datafile="${_Z_DATA:-$HOME/.z}"
# bail if we don't own ~/.z and $_Z_OWNER not set
[ -z "$_Z_OWNER" -a -f "$datafile" -a ! -O "$datafile" ] && return
# add entries
if [ "$1" = "--add" ]; then
shift
# $HOME isn't worth matching
[ "$*" = "$HOME" ] && return
# don't track excluded directory trees
local exclude
for exclude in "${_Z_EXCLUDE_DIRS[@]}"; do
case "$*" in "$exclude*") return;; esac
done
# maintain the data file
local tempfile="$datafile.$RANDOM"
while read line; do
# only count directories
[ -d "${line%%\|*}" ] && echo $line
done < "$datafile" | awk -v path="$*" -v now="$(date +%s)" -F"|" '
BEGIN {
rank[path] = 1
time[path] = now
}
$2 >= 1 {
# drop ranks below 1
if( $1 == path ) {
rank[$1] = $2 + 1
time[$1] = now
} else {
rank[$1] = $2
time[$1] = $3
}
count += $2
}
END {
if( count > 9000 ) {
# aging
for( x in rank ) print x "|" 0.99*rank[x] "|" time[x]
} else for( x in rank ) print x "|" rank[x] "|" time[x]
}
' 2>/dev/null >| "$tempfile"
# do our best to avoid clobbering the datafile in a race condition
if [ $? -ne 0 -a -f "$datafile" ]; then
env rm -f "$tempfile"
else
[ "$_Z_OWNER" ] && chown $_Z_OWNER:$(id -ng $_Z_OWNER) "$tempfile"
env mv -f "$tempfile" "$datafile" || env rm -f "$tempfile"
fi
# tab completion
elif [ "$1" = "--complete" -a -s "$datafile" ]; then
while read line; do
[ -d "${line%%\|*}" ] && echo $line
done < "$datafile" | awk -v q="$2" -F"|" '
BEGIN {
if( q == tolower(q) ) imatch = 1
q = substr(q, 3)
gsub(" ", ".*", q)
}
{
if( imatch ) {
if( tolower($1) ~ tolower(q) ) print $1
} else if( $1 ~ q ) print $1
}
' 2>/dev/null
else
# list/go
while [ "$1" ]; do case "$1" in
--) while [ "$1" ]; do shift; local fnd="$fnd${fnd:+ }$1";done;;
-*) local opt=${1:1}; while [ "$opt" ]; do case ${opt:0:1} in
c) local fnd="^$PWD $fnd";;
h) echo "${_Z_CMD:-z} [-chlrtx] args" >&2; return;;
x) sed -i -e "\:^${PWD}|.*:d" "$datafile";;
l) local list=1;;
r) local typ="rank";;
t) local typ="recent";;
esac; opt=${opt:1}; done;;
*) local fnd="$fnd${fnd:+ }$1";;
esac; local last=$1; [ "$#" -gt 0 ] && shift; done
[ "$fnd" -a "$fnd" != "^$PWD " ] || local list=1
# if we hit enter on a completion just go there
case "$last" in
# completions will always start with /
/*) [ -z "$list" -a -d "$last" ] && cd "$last" && return;;
esac
# no file yet
[ -f "$datafile" ] || return
local cd
cd="$(while read line; do
[ -d "${line%%\|*}" ] && echo $line
done < "$datafile" | awk -v t="$(date +%s)" -v list="$list" -v typ="$typ" -v q="$fnd" -F"|" '
function frecent(rank, time) {
# relate frequency and time
dx = t - time
if( dx < 3600 ) return rank * 4
if( dx < 86400 ) return rank * 2
if( dx < 604800 ) return rank / 2
return rank / 4
}
function output(files, out, common) {
# list or return the desired directory
if( list ) {
cmd = "sort -n >&2"
for( x in files ) {
if( files[x] ) printf "%-10s %s\n", files[x], x | cmd
}
if( common ) {
printf "%-10s %s\n", "common:", common > "/dev/stderr"
}
} else {
if( common ) out = common
print out
}
}
function common(matches) {
# find the common root of a list of matches, if it exists
for( x in matches ) {
if( matches[x] && (!short || length(x) < length(short)) ) {
short = x
}
}
if( short == "/" ) return
# use a copy to escape special characters, as we want to return
# the original. yeah, this escaping is awful.
clean_short = short
gsub(/\[\(\)\[\]\|\]/, "\\\\&", clean_short)
for( x in matches ) if( matches[x] && x !~ clean_short ) return
return short
}
BEGIN {
gsub(" ", ".*", q)
hi_rank = ihi_rank = -9999999999
}
{
if( typ == "rank" ) {
rank = $2
} else if( typ == "recent" ) {
rank = $3 - t
} else rank = frecent($2, $3)
if( $1 ~ q ) {
matches[$1] = rank
} else if( tolower($1) ~ tolower(q) ) imatches[$1] = rank
if( matches[$1] && matches[$1] > hi_rank ) {
best_match = $1
hi_rank = matches[$1]
} else if( imatches[$1] && imatches[$1] > ihi_rank ) {
ibest_match = $1
ihi_rank = imatches[$1]
}
}
END {
# prefer case sensitive
if( best_match ) {
output(matches, best_match, common(matches))
} else if( ibest_match ) {
output(imatches, ibest_match, common(imatches))
}
}
')"
[ $? -gt 0 ] && return
[ "$cd" ] && cd "$cd"
fi
}
alias ${_Z_CMD:-z}='_z 2>&1'
[ "$_Z_NO_RESOLVE_SYMLINKS" ] || _Z_RESOLVE_SYMLINKS="-P"
if type compctl >/dev/null 2>&1; then
# zsh
[ "$_Z_NO_PROMPT_COMMAND" ] || {
# populate directory list, avoid clobbering any other precmds.
if [ "$_Z_NO_RESOLVE_SYMLINKS" ]; then
_z_precmd() {
_z --add "${PWD:a}"
}
else
_z_precmd() {
_z --add "${PWD:A}"
}
fi
[[ -n "${precmd_functions[(r)_z_precmd]}" ]] || {
precmd_functions[$(($#precmd_functions+1))]=_z_precmd
}
}
_z_zsh_tab_completion() {
# tab completion
local compl
read -l compl
reply=(${(f)"$(_z --complete "$compl")"})
}
compctl -U -K _z_zsh_tab_completion _z
elif type complete >/dev/null 2>&1; then
# bash
# tab completion
complete -o filenames -C '_z --complete "$COMP_LINE"' ${_Z_CMD:-z}
[ "$_Z_NO_PROMPT_COMMAND" ] || {
# populate directory list. avoid clobbering other PROMPT_COMMANDs.
grep "_z --add" <<< "$PROMPT_COMMAND" >/dev/null || {
PROMPT_COMMAND="$PROMPT_COMMAND"$'\n''_z --add "$(command pwd '$_Z_RESOLVE_SYMLINKS' 2>/dev/null)" 2>/dev/null;'
}
}
fi 查看全部
浪费时间且效率低下。
推荐大家使用一个小脚本,可以快速切换目录,不需要经常cd了。
拷贝下面的代码,保存为z.sh,放在用户目录下,/home/xxxx, xxx为用户名, 然后 给予 777权限, chmod 777 z.sh
然后 修改 .bashrc 文件, vim ~/.bashrc
在文件的最后添加一句 source ~/z.sh
然后保存.bashrc
然后运行 source ~./bashrc , 然后就马上生效了。
然后你进入到某一个目录,比如 /home/user/build/data/bin/hello/, 运行 z
系统会纪录你的hello目录一次,
下一次在其他目录比如在/etc/apt/,如果要跳转到 /home/user/build/data/bin/hello/,
直接运行 z hello 就可以了。
# Copyright (c) 2009 rupa deadwyler under the WTFPL license


# maintains a jump-list of the directories you actually use

#

# INSTALL:

#     * put something like this in your .bashrc/.zshrc:

#         . /path/to/z.sh

#     * cd around for a while to build up the db

#     * PROFIT!!

#     * optionally:

#         set $_Z_CMD in .bashrc/.zshrc to change the command (default z).

#         set $_Z_DATA in .bashrc/.zshrc to change the datafile (default ~/.z).

#         set $_Z_NO_RESOLVE_SYMLINKS to prevent symlink resolution.

#         set $_Z_NO_PROMPT_COMMAND if you're handling PROMPT_COMMAND yourself.

#         set $_Z_EXCLUDE_DIRS to an array of directories to exclude.

#         set $_Z_OWNER to your username if you want use z while sudo with $HOME kept

#

# USE:

#     * z foo     # cd to most frecent dir matching foo

#     * z foo bar # cd to most frecent dir matching foo and bar

#     * z -r foo  # cd to highest ranked dir matching foo

#     * z -t foo  # cd to most recently accessed dir matching foo

#     * z -l foo  # list matches instead of cd

#     * z -c foo  # restrict matches to subdirs of $PWD


[ -d "${_Z_DATA:-$HOME/.z}" ] && {

    echo "ERROR: z.sh's datafile (${_Z_DATA:-$HOME/.z}) is a directory."

}


_z() {


    local datafile="${_Z_DATA:-$HOME/.z}"


    # bail if we don't own ~/.z and $_Z_OWNER not set

    [ -z "$_Z_OWNER" -a -f "$datafile" -a ! -O "$datafile" ] && return


    # add entries

    if [ "$1" = "--add" ]; then

        shift


        # $HOME isn't worth matching

        [ "$*" = "$HOME" ] && return


        # don't track excluded directory trees

        local exclude

        for exclude in "${_Z_EXCLUDE_DIRS[@]}"; do

            case "$*" in "$exclude*") return;; esac

        done


        # maintain the data file

        local tempfile="$datafile.$RANDOM"

        while read line; do

            # only count directories

            [ -d "${line%%\|*}" ] && echo $line

        done < "$datafile" | awk -v path="$*" -v now="$(date +%s)" -F"|" '

            BEGIN {

                rank[path] = 1

                time[path] = now

            }

            $2 >= 1 {

                # drop ranks below 1

                if( $1 == path ) {

                    rank[$1] = $2 + 1

                    time[$1] = now

                } else {

                    rank[$1] = $2

                    time[$1] = $3

                }

                count += $2

            }

            END {

                if( count > 9000 ) {

                    # aging

                    for( x in rank ) print x "|" 0.99*rank[x] "|" time[x]

                } else for( x in rank ) print x "|" rank[x] "|" time[x]

            }

        ' 2>/dev/null >| "$tempfile"

        # do our best to avoid clobbering the datafile in a race condition

        if [ $? -ne 0 -a -f "$datafile" ]; then

            env rm -f "$tempfile"

        else

            [ "$_Z_OWNER" ] && chown $_Z_OWNER:$(id -ng $_Z_OWNER) "$tempfile"

            env mv -f "$tempfile" "$datafile" || env rm -f "$tempfile"

        fi


    # tab completion

    elif [ "$1" = "--complete" -a -s "$datafile" ]; then

        while read line; do

            [ -d "${line%%\|*}" ] && echo $line

        done < "$datafile" | awk -v q="$2" -F"|" '

            BEGIN {

                if( q == tolower(q) ) imatch = 1

                q = substr(q, 3)

                gsub(" ", ".*", q)

            }

            {

                if( imatch ) {

                    if( tolower($1) ~ tolower(q) ) print $1

                } else if( $1 ~ q ) print $1

            }

        ' 2>/dev/null


    else

        # list/go

        while [ "$1" ]; do case "$1" in

            --) while [ "$1" ]; do shift; local fnd="$fnd${fnd:+ }$1";done;;

            -*) local opt=${1:1}; while [ "$opt" ]; do case ${opt:0:1} in

                    c) local fnd="^$PWD $fnd";;

                    h) echo "${_Z_CMD:-z} [-chlrtx] args" >&2; return;;

                    x) sed -i -e "\:^${PWD}|.*:d" "$datafile";;

                    l) local list=1;;

                    r) local typ="rank";;

                    t) local typ="recent";;

                esac; opt=${opt:1}; done;;

             *) local fnd="$fnd${fnd:+ }$1";;

        esac; local last=$1; [ "$#" -gt 0 ] && shift; done

        [ "$fnd" -a "$fnd" != "^$PWD " ] || local list=1


        # if we hit enter on a completion just go there

        case "$last" in

            # completions will always start with /

            /*) [ -z "$list" -a -d "$last" ] && cd "$last" && return;;

        esac


        # no file yet

        [ -f "$datafile" ] || return


        local cd

        cd="$(while read line; do

            [ -d "${line%%\|*}" ] && echo $line

        done < "$datafile" | awk -v t="$(date +%s)" -v list="$list" -v typ="$typ" -v q="$fnd" -F"|" '

            function frecent(rank, time) {

                # relate frequency and time

                dx = t - time

                if( dx < 3600 ) return rank * 4

                if( dx < 86400 ) return rank * 2

                if( dx < 604800 ) return rank / 2

                return rank / 4

            }

            function output(files, out, common) {

                # list or return the desired directory

                if( list ) {

                    cmd = "sort -n >&2"

                    for( x in files ) {

                        if( files[x] ) printf "%-10s %s\n", files[x], x | cmd

                    }

                    if( common ) {

                        printf "%-10s %s\n", "common:", common > "/dev/stderr"

                    }

                } else {

                    if( common ) out = common

                    print out

                }

            }

            function common(matches) {

                # find the common root of a list of matches, if it exists

                for( x in matches ) {

                    if( matches[x] && (!short || length(x) < length(short)) ) {

                        short = x

                    }

                }

                if( short == "/" ) return

                # use a copy to escape special characters, as we want to return

                # the original. yeah, this escaping is awful.

                clean_short = short

                gsub(/\[\(\)\[\]\|\]/, "\\\\&", clean_short)

                for( x in matches ) if( matches[x] && x !~ clean_short ) return

                return short

            }

            BEGIN {

                gsub(" ", ".*", q)

                hi_rank = ihi_rank = -9999999999

            }

            {

                if( typ == "rank" ) {

                    rank = $2

                } else if( typ == "recent" ) {

                    rank = $3 - t

                } else rank = frecent($2, $3)

                if( $1 ~ q ) {

                    matches[$1] = rank

                } else if( tolower($1) ~ tolower(q) ) imatches[$1] = rank

                if( matches[$1] && matches[$1] > hi_rank ) {

                    best_match = $1

                    hi_rank = matches[$1]

                } else if( imatches[$1] && imatches[$1] > ihi_rank ) {

                    ibest_match = $1

                    ihi_rank = imatches[$1]

                }

            }

            END {

                # prefer case sensitive

                if( best_match ) {

                    output(matches, best_match, common(matches))

                } else if( ibest_match ) {

                    output(imatches, ibest_match, common(imatches))

                }

            }

        ')"

        [ $? -gt 0 ] && return

        [ "$cd" ] && cd "$cd"

    fi

}


alias ${_Z_CMD:-z}='_z 2>&1'


[ "$_Z_NO_RESOLVE_SYMLINKS" ] || _Z_RESOLVE_SYMLINKS="-P"


if type compctl >/dev/null 2>&1; then

    # zsh

    [ "$_Z_NO_PROMPT_COMMAND" ] || {

        # populate directory list, avoid clobbering any other precmds.

        if [ "$_Z_NO_RESOLVE_SYMLINKS" ]; then

            _z_precmd() {

                _z --add "${PWD:a}"

            }

        else

            _z_precmd() {

                _z --add "${PWD:A}"

            }

        fi

        [[ -n "${precmd_functions[(r)_z_precmd]}" ]] || {

            precmd_functions[$(($#precmd_functions+1))]=_z_precmd

        }

    }

    _z_zsh_tab_completion() {

        # tab completion

        local compl

        read -l compl

        reply=(${(f)"$(_z --complete "$compl")"})

    }

    compctl -U -K _z_zsh_tab_completion _z

elif type complete >/dev/null 2>&1; then

    # bash

    # tab completion

    complete -o filenames -C '_z --complete "$COMP_LINE"' ${_Z_CMD:-z}

    [ "$_Z_NO_PROMPT_COMMAND" ] || {

        # populate directory list. avoid clobbering other PROMPT_COMMANDs.

        grep "_z --add" <<< "$PROMPT_COMMAND" >/dev/null || {

            PROMPT_COMMAND="$PROMPT_COMMAND"$'\n''_z --add "$(command pwd '$_Z_RESOLVE_SYMLINKS' 2>/dev/null)" 2>/dev/null;'

        }

    }

fi
高效操作!linux在终端里快速跳转到文件管理器对应的目录下
Linux • 马化云 发表了文章 • 0 个评论 • 2740 次浏览 • 2023-06-15 19:34
然后你想用chrome打开这个html文件,那么你可能需要打开文件管理器,切换到上述路径,选中上述修改的html文件。
(具体可以参考vs code的打开方式, cd 到某个目录, 然后运行: "code . " 然后就可以直接用vs code打开当前目录 )
你可以使用以下命令在Linux终端中打开文件浏览器并将其设置为当前目录:
- GNOME桌面环境:在终端中输入 `nautilus .`,即可在当前目录下打开Nautilus文件管理器。
- KDE桌面环境:在终端中输入 `dolphin .`,即可在当前目录下打开Dolphin文件管理器。
- Xfce桌面环境:在终端中输入 `thunar .`,即可在当前目录下打开Thunar文件管理器。
- LXDE桌面环境:在终端中输入 `pcmanfm .`,即可在当前目录下打开PCManFM文件管理器。
这些命令都会在当前目录下启动相应的文件管理器,以便您进行文件操作。
当然,手动敲那么多字也是挺累的。
### 如何自动化?
可以做成别名写到启动环境里面vim ~/.bashrc在这个文件里面的最后一行
加入对应的语句alias here="nautilus ."
以后只要你在终端下面输入 here
那么就会自动打开文件管理器,然后文件管理器的路径和你的终端路径一样。这样很方便吧? 查看全部
然后你想用chrome打开这个html文件,那么你可能需要打开文件管理器,切换到上述路径,选中上述修改的html文件。
(具体可以参考vs code的打开方式, cd 到某个目录, 然后运行: "code . " 然后就可以直接用vs code打开当前目录 )
你可以使用以下命令在Linux终端中打开文件浏览器并将其设置为当前目录:
- GNOME桌面环境:在终端中输入 `nautilus .`,即可在当前目录下打开Nautilus文件管理器。
- KDE桌面环境:在终端中输入 `dolphin .`,即可在当前目录下打开Dolphin文件管理器。
- Xfce桌面环境:在终端中输入 `thunar .`,即可在当前目录下打开Thunar文件管理器。
- LXDE桌面环境:在终端中输入 `pcmanfm .`,即可在当前目录下打开PCManFM文件管理器。
这些命令都会在当前目录下启动相应的文件管理器,以便您进行文件操作。
当然,手动敲那么多字也是挺累的。
### 如何自动化?
可以做成别名写到启动环境里面
vim ~/.bashrc在这个文件里面的最后一行
加入对应的语句
alias here="nautilus ."
以后只要你在终端下面输入
here
那么就会自动打开文件管理器,然后文件管理器的路径和你的终端路径一样。这样很方便吧?
修改正在运行的docker容器,禁用重启自动启动
Linux • 马化云 发表了文章 • 0 个评论 • 3307 次浏览 • 2023-03-26 11:17
可以使用 docker update 命令修改容器的配置,示例命令如下:docker update --restart=no <容器ID或名称>
这条命令会将容器的重启策略设置为不重启,即禁用重启自动启动。如果需要启用自动启动,只需要将 --restart 参数的值改为 always 或 on-failure 等相应的选项即可。
需要注意的是,修改容器的配置并不会立即生效,需要重启容器才能使修改生效。可以使用 docker restart 命令重启容器,示例命令如下:
docker restart <容器ID或名称>
执行这条命令后,容器会被重启并应用新的配置。 查看全部
可以使用 docker update 命令修改容器的配置,示例命令如下:
docker update --restart=no <容器ID或名称>
这条命令会将容器的重启策略设置为不重启,即禁用重启自动启动。如果需要启用自动启动,只需要将 --restart 参数的值改为 always 或 on-failure 等相应的选项即可。
需要注意的是,修改容器的配置并不会立即生效,需要重启容器才能使修改生效。可以使用 docker restart 命令重启容器,示例命令如下:
docker restart <容器ID或名称>
执行这条命令后,容器会被重启并应用新的配置。
linux下自制护眼,久坐提醒 python小程序
python • 李魔佛 发表了文章 • 0 个评论 • 2725 次浏览 • 2023-03-09 16:23
保存为app.py
运行; python app.py
然后写到系统的crontab计划任务里面,每个40分钟执行几次,
屏幕会黑屏60s , 60可以自行设置。
挺好用的。import datetime as dt
import tkinter as tk
# Linux 护眼程序
sec = 60 # 休息时间 秒
root = tk.Tk()
root.config(bg='black')
root.wm_attributes('-topmost',1)
root.wm_attributes('-fullscreen',1)
L = tk.Label(root,font=('Consolas', 50), bg='black')
L.place(relx=0.5,rely=0.5,anchor=tk.CENTER)
# 改变的内容
msg = "{}\n 站起来 {} \n 动一动 {}\n{}"
now = dt.datetime.now()
aa = {0:'↑',1:'→',2:'↓',3:'←'}
bb = {0:'~~_↑_~~',1:'~_↑ ↑_~'}
for i in range(sec):
t = msg.format(sec-i,aa[i%4],bb[i%2],(now+dt.timedelta(seconds=i)).ctime())
c = 'Black' # 颜色可以搞随机换
root.after(i*1000,L.config,{'text':t,'fg':c})
root.after(sec*1000,root.destroy)
root.mainloop()
PS: AI生成的image还真心不错呢。 就是太吃显存了
查看全部
保存为app.py
运行; python app.py
然后写到系统的crontab计划任务里面,每个40分钟执行几次,
屏幕会黑屏60s , 60可以自行设置。
挺好用的。
import datetime as dt

import tkinter as tk

# Linux 护眼程序

sec = 60 # 休息时间 秒


root = tk.Tk()

root.config(bg='black')

root.wm_attributes('-topmost',1)

root.wm_attributes('-fullscreen',1)

L = tk.Label(root,font=('Consolas', 50), bg='black')

L.place(relx=0.5,rely=0.5,anchor=tk.CENTER)


# 改变的内容

msg = "{}\n 站起来 {} \n 动一动 {}\n{}"

now = dt.datetime.now()

aa = {0:'↑',1:'→',2:'↓',3:'←'}

bb = {0:'~~_↑_~~',1:'~_↑ ↑_~'}


for i in range(sec):

    t = msg.format(sec-i,aa[i%4],bb[i%2],(now+dt.timedelta(seconds=i)).ctime())

    c = 'Black' # 颜色可以搞随机换

    root.after(i*1000,L.config,{'text':t,'fg':c})

    root.after(sec*1000,root.destroy)


root.mainloop()
PS: AI生成的image还真心不错呢。 就是太吃显存了
ubuntu snap 配置不更新新软件
Linux • 马化云 发表了文章 • 0 个评论 • 2994 次浏览 • 2022-12-17 14:20
网上的禁用方法
$ snap refresh --hold

error: unknown flag `hold'
在ubuntu20.04上是没有用的。因为它的snap不是最新的。要在ubuntu22.04上才可以。
在ubuntu 20.04上,
$ sudo snap set system refresh.hold="2030-01-01T01:00:00-01:00"
$ sudo snap set system refresh.metered=hold
网上说 snap最多只能设置60天内不更新,所以还需要配合crontab,在计划任务里面设置时间。
查看全部
网上的禁用方法
$ snap refresh --hold
error: unknown flag `hold'
在ubuntu20.04上是没有用的。因为它的snap不是最新的。要在ubuntu22.04上才可以。
在ubuntu 20.04上,
$ sudo snap set system refresh.hold="2030-01-01T01:00:00-01:00"
$ sudo snap set system refresh.metered=hold
网上说 snap最多只能设置60天内不更新,所以还需要配合crontab,在计划任务里面设置时间。
程序员是怎样删除安卓手机的垃圾文件?
Linux • 李魔佛 发表了文章 • 0 个评论 • 3337 次浏览 • 2022-09-14 12:08
以至于手机的的可用空间越来越少,内置的清理垃圾的功能越来越鸡肋。而第三方的垃圾清理应用只会引来更多的垃圾文件。
身为一名程序员,就得用geek一点的方法彻底删除垃圾文件,尽可能地释放系统的空间。
由于平时使用的开发环境是Linux,所以下面环境是在Linux下操作,windows的用户应该也可以在git bash下操作。
手机usb 连接电脑
使用usb线连接linux电脑,不一定要adb的功能,但需要电脑能够识别手机的内部存储即可。
然后点击“内部存储设备”, 在文件内右键,进入Terminal 终端。
执行命令
du . -h --max-depth=1
简单解释一下这个语句。 就是显示当前目录下,第一层目录的占用存储大小情况。-h, human效果,人性化,自动转换文件大小单位。
--max-depth 是显示目录层级数目,如果选择2-3-4等目录,则会把子目录,子子目录的存储大小都显示出来,不过运行数据也会随之变慢。
上面命令一下子就把手机根目录下所有的目录的占用大小都列出来了。可以看到上面红框的地方,是一些缓存没用的东西,我们直接用命令 rm -rf 删除。
或者也可以在文件管理器里面直接删除。
如果有些目录底下有多层目录,那么就是把--max-depth 的值调大一些。 这样就知道他子目录的占用空间情况。
如果只想看看微信文件夹下的空间占用,可以指定目录:
du /Weixin/ -h --max-depth=3
这样就知道哪个目录占用的空间最大,然后点击进去,把没用的目录逐个删除。
经过笔者的测试,使用上述操作后,手机可用存储空间释放了40%的空间。主要是一些app下载的内容,由于app被清理了,结果这些下载内容成了孤立的文件,没有索引到对应的app,一直残留在手机内存。
查看全部
以至于手机的的可用空间越来越少,内置的清理垃圾的功能越来越鸡肋。而第三方的垃圾清理应用只会引来更多的垃圾文件。
身为一名程序员,就得用geek一点的方法彻底删除垃圾文件,尽可能地释放系统的空间。
由于平时使用的开发环境是Linux,所以下面环境是在Linux下操作,windows的用户应该也可以在git bash下操作。
手机usb 连接电脑
使用usb线连接linux电脑,不一定要adb的功能,但需要电脑能够识别手机的内部存储即可。
然后点击“内部存储设备”, 在文件内右键,进入Terminal 终端。
执行命令
du . -h --max-depth=1
简单解释一下这个语句。 就是显示当前目录下,第一层目录的占用存储大小情况。-h, human效果,人性化,自动转换文件大小单位。
--max-depth 是显示目录层级数目,如果选择2-3-4等目录,则会把子目录,子子目录的存储大小都显示出来,不过运行数据也会随之变慢。
上面命令一下子就把手机根目录下所有的目录的占用大小都列出来了。可以看到上面红框的地方,是一些缓存没用的东西,我们直接用命令 rm -rf 删除。
或者也可以在文件管理器里面直接删除。
如果有些目录底下有多层目录,那么就是把--max-depth 的值调大一些。 这样就知道他子目录的占用空间情况。
如果只想看看微信文件夹下的空间占用,可以指定目录:
du /Weixin/ -h --max-depth=3
这样就知道哪个目录占用的空间最大,然后点击进去,把没用的目录逐个删除。
经过笔者的测试,使用上述操作后,手机可用存储空间释放了40%的空间。主要是一些app下载的内容,由于app被清理了,结果这些下载内容成了孤立的文件,没有索引到对应的app,一直残留在手机内存。
ubuntu 安装ciso8601库 失败, 已解决
Linux • 李魔佛 发表了文章 • 0 个评论 • 4110 次浏览 • 2022-07-22 12:01
WARNING: Retrying (Retry(total=4, connect=None, read=None, redirect=None, status=None)) after connection broken by 'ReadTimeoutError("HTTPSConnectionPool(host='files.pythonhosted.org', port=443): Read timed out. (read timeout=15)")': /packages/a4/53/bfc6409447ca024558b8b19d055de94c813c3e32c0296c48a0873a161cf5/setuptools-63.2.0-py3-none-any.whl
Downloading setuptools-63.2.0-py3-none-any.whl (1.2 MB)
━━━━╸ 0.1/1.2 MB 102.5 kB/s eta 0:00:11
ERROR: Exception:
Traceback (most recent call last):
File "/tmp/pip-standalone-pip-oas0cddc/__env_pip__.zip/pip/_vendor/urllib3/response.py", line 435, in _error_catcher
yield
File "/tmp/pip-standalone-pip-oas0cddc/__env_pip__.zip/pip/_vendor/urllib3/response.py", line 516, in read
data = self._fp.read(amt) if not fp_closed else b""
File "/tmp/pip-standalone-pip-oas0cddc/__env_pip__.zip/pip/_vendor/cachecontrol/filewrapper.py", line 90, in read
data = self.__fp.read(amt)
File "/home/xda/miniconda3/envs/cpy/lib/python3.9/http/client.py", line 462, in read
n = self.readinto(b)
File "/home/xda/miniconda3/envs/cpy/lib/python3.9/http/client.py", line 506, in readinto
n = self.fp.readinto(b)
File "/home/xda/miniconda3/envs/cpy/lib/python3.9/socket.py", line 704, in readinto
return self._sock.recv_into(b)
File "/home/xda/miniconda3/envs/cpy/lib/python3.9/ssl.py", line 1241, in recv_into
return self.read(nbytes, buffer)
File "/home/xda/miniconda3/envs/cpy/lib/python3.9/ssl.py", line 1099, in read
return self._sslobj.read(len, buffer)
socket.timeout: The read operation timed out
During handling of the above exception, another exception occurred:
Traceback (most recent call last):
File "/tmp/pip-standalone-pip-oas0cddc/__env_pip__.zip/pip/_internal/cli/base_command.py", line 167, in exc_logging_wrapper
status = run_func(*args)
File "/tmp/pip-standalone-pip-oas0cddc/__env_pip__.zip/pip/_internal/cli/req_command.py", line 205, in wrapper
return func(self, options, args)
File "/tmp/pip-standalone-pip-oas0cddc/__env_pip__.zip/pip/_internal/commands/install.py", line 341, in run
requirement_set = resolver.resolve(
File "/tmp/pip-standalone-pip-oas0cddc/__env_pip__.zip/pip/_internal/resolution/resolvelib/resolver.py", line 94, in resolve
result = self._result = resolver.resolve(
File "/tmp/pip-standalone-pip-oas0cddc/__env_pip__.zip/pip/_vendor/resolvelib/resolvers.py", line 481, in resolve
state = resolution.resolve(requirements, max_rounds=max_rounds)
File "/tmp/pip-standalone-pip-oas0cddc/__env_pip__.zip/pip/_vendor/resolvelib/resolvers.py", line 348, in resolve
self._add_to_criteria(self.state.criteria, r, parent=None)
File "/tmp/pip-standalone-pip-oas0cddc/__env_pip__.zip/pip/_vendor/resolvelib/resolvers.py", line 172, in _add_to_criteria
if not criterion.candidates:
File "/tmp/pip-standalone-pip-oas0cddc/__env_pip__.zip/pip/_vendor/resolvelib/structs.py", line 151, in __bool__
return bool(self._sequence)
File "/tmp/pip-standalone-pip-oas0cddc/__env_pip__.zip/pip/_internal/resolution/resolvelib/found_candidates.py", line 155, in __bool__
return any(self)
File "/tmp/pip-standalone-pip-oas0cddc/__env_pip__.zip/pip/_internal/resolution/resolvelib/found_candidates.py", line 143, in <genexpr>
return (c for c in iterator if id(c) not in self._incompatible_ids)
File "/tmp/pip-standalone-pip-oas0cddc/__env_pip__.zip/pip/_internal/resolution/resolvelib/found_candidates.py", line 47, in _iter_built
candidate = func()
File "/tmp/pip-standalone-pip-oas0cddc/__env_pip__.zip/pip/_internal/resolution/resolvelib/factory.py", line 215, in _make_candidate_from_link
self._link_candidate_cache[link] = LinkCandidate(
File "/tmp/pip-standalone-pip-oas0cddc/__env_pip__.zip/pip/_internal/resolution/resolvelib/candidates.py", line 291, in __init__
super().__init__(
File "/tmp/pip-standalone-pip-oas0cddc/__env_pip__.zip/pip/_internal/resolution/resolvelib/candidates.py", line 161, in __init__
self.dist = self._prepare()
File "/tmp/pip-standalone-pip-oas0cddc/__env_pip__.zip/pip/_internal/resolution/resolvelib/candidates.py", line 230, in _prepare
dist = self._prepare_distribution()
File "/tmp/pip-standalone-pip-oas0cddc/__env_pip__.zip/pip/_internal/resolution/resolvelib/candidates.py", line 302, in _prepare_distribution
return preparer.prepare_linked_requirement(self._ireq, parallel_builds=True)
File "/tmp/pip-standalone-pip-oas0cddc/__env_pip__.zip/pip/_internal/operations/prepare.py", line 428, in prepare_linked_requirement
return self._prepare_linked_requirement(req, parallel_builds)
File "/tmp/pip-standalone-pip-oas0cddc/__env_pip__.zip/pip/_internal/operations/prepare.py", line 473, in _prepare_linked_requirement
local_file = unpack_url(
File "/tmp/pip-standalone-pip-oas0cddc/__env_pip__.zip/pip/_internal/operations/prepare.py", line 155, in unpack_url
file = get_http_url(
File "/tmp/pip-standalone-pip-oas0cddc/__env_pip__.zip/pip/_internal/operations/prepare.py", line 96, in get_http_url
from_path, content_type = download(link, temp_dir.path)
File "/tmp/pip-standalone-pip-oas0cddc/__env_pip__.zip/pip/_internal/network/download.py", line 146, in __call__
for chunk in chunks:
File "/tmp/pip-standalone-pip-oas0cddc/__env_pip__.zip/pip/_internal/cli/progress_bars.py", line 53, in _rich_progress_bar
for chunk in iterable:
File "/tmp/pip-standalone-pip-oas0cddc/__env_pip__.zip/pip/_internal/network/utils.py", line 63, in response_chunks
for chunk in response.raw.stream(
File "/tmp/pip-standalone-pip-oas0cddc/__env_pip__.zip/pip/_vendor/urllib3/response.py", line 573, in stream
data = self.read(amt=amt, decode_content=decode_content)
File "/tmp/pip-standalone-pip-oas0cddc/__env_pip__.zip/pip/_vendor/urllib3/response.py", line 538, in read
raise IncompleteRead(self._fp_bytes_read, self.length_remaining)
File "/home/xda/miniconda3/envs/cpy/lib/python3.9/contextlib.py", line 137, in __exit__
self.gen.throw(typ, value, traceback)
File "/tmp/pip-standalone-pip-oas0cddc/__env_pip__.zip/pip/_vendor/urllib3/response.py", line 440, in _error_catcher
raise ReadTimeoutError(self._pool, None, "Read timed out.")
pip._vendor.urllib3.exceptions.ReadTimeoutError: HTTPSConnectionPool(host='files.pythonhosted.org', port=443): Read timed out.
[end of output]
note: This error originates from a subprocess, and is likely not a problem with pip.
error: subprocess-exited-with-error
看样子,是setuptool的问题。 为了避免动这个默认库,可以安装降级版本的ciso。
pip install ciso8601==1.0.7
查看全部
      Collecting setuptools>=40.8.0

        WARNING: Retrying (Retry(total=4, connect=None, read=None, redirect=None, status=None)) after connection broken by 'ReadTimeoutError("HTTPSConnectionPool(host='files.pythonhosted.org', port=443): Read timed out. (read timeout=15)")': /packages/a4/53/bfc6409447ca024558b8b19d055de94c813c3e32c0296c48a0873a161cf5/setuptools-63.2.0-py3-none-any.whl

        Downloading setuptools-63.2.0-py3-none-any.whl (1.2 MB)

           ━━━━╸                                    0.1/1.2 MB 102.5 kB/s eta 0:00:11

      ERROR: Exception:

      Traceback (most recent call last):

        File "/tmp/pip-standalone-pip-oas0cddc/__env_pip__.zip/pip/_vendor/urllib3/response.py", line 435, in _error_catcher

          yield

        File "/tmp/pip-standalone-pip-oas0cddc/__env_pip__.zip/pip/_vendor/urllib3/response.py", line 516, in read

          data = self._fp.read(amt) if not fp_closed else b""

        File "/tmp/pip-standalone-pip-oas0cddc/__env_pip__.zip/pip/_vendor/cachecontrol/filewrapper.py", line 90, in read

          data = self.__fp.read(amt)

        File "/home/xda/miniconda3/envs/cpy/lib/python3.9/http/client.py", line 462, in read

          n = self.readinto(b)

        File "/home/xda/miniconda3/envs/cpy/lib/python3.9/http/client.py", line 506, in readinto

          n = self.fp.readinto(b)

        File "/home/xda/miniconda3/envs/cpy/lib/python3.9/socket.py", line 704, in readinto

          return self._sock.recv_into(b)

        File "/home/xda/miniconda3/envs/cpy/lib/python3.9/ssl.py", line 1241, in recv_into

          return self.read(nbytes, buffer)

        File "/home/xda/miniconda3/envs/cpy/lib/python3.9/ssl.py", line 1099, in read

          return self._sslobj.read(len, buffer)

      socket.timeout: The read operation timed out


      During handling of the above exception, another exception occurred:


      Traceback (most recent call last):

        File "/tmp/pip-standalone-pip-oas0cddc/__env_pip__.zip/pip/_internal/cli/base_command.py", line 167, in exc_logging_wrapper

          status = run_func(*args)

        File "/tmp/pip-standalone-pip-oas0cddc/__env_pip__.zip/pip/_internal/cli/req_command.py", line 205, in wrapper

          return func(self, options, args)

        File "/tmp/pip-standalone-pip-oas0cddc/__env_pip__.zip/pip/_internal/commands/install.py", line 341, in run

          requirement_set = resolver.resolve(

        File "/tmp/pip-standalone-pip-oas0cddc/__env_pip__.zip/pip/_internal/resolution/resolvelib/resolver.py", line 94, in resolve

          result = self._result = resolver.resolve(

        File "/tmp/pip-standalone-pip-oas0cddc/__env_pip__.zip/pip/_vendor/resolvelib/resolvers.py", line 481, in resolve

          state = resolution.resolve(requirements, max_rounds=max_rounds)

        File "/tmp/pip-standalone-pip-oas0cddc/__env_pip__.zip/pip/_vendor/resolvelib/resolvers.py", line 348, in resolve

          self._add_to_criteria(self.state.criteria, r, parent=None)

        File "/tmp/pip-standalone-pip-oas0cddc/__env_pip__.zip/pip/_vendor/resolvelib/resolvers.py", line 172, in _add_to_criteria

          if not criterion.candidates:

        File "/tmp/pip-standalone-pip-oas0cddc/__env_pip__.zip/pip/_vendor/resolvelib/structs.py", line 151, in __bool__

          return bool(self._sequence)

        File "/tmp/pip-standalone-pip-oas0cddc/__env_pip__.zip/pip/_internal/resolution/resolvelib/found_candidates.py", line 155, in __bool__

          return any(self)

        File "/tmp/pip-standalone-pip-oas0cddc/__env_pip__.zip/pip/_internal/resolution/resolvelib/found_candidates.py", line 143, in <genexpr>

          return (c for c in iterator if id(c) not in self._incompatible_ids)

        File "/tmp/pip-standalone-pip-oas0cddc/__env_pip__.zip/pip/_internal/resolution/resolvelib/found_candidates.py", line 47, in _iter_built

          candidate = func()

        File "/tmp/pip-standalone-pip-oas0cddc/__env_pip__.zip/pip/_internal/resolution/resolvelib/factory.py", line 215, in _make_candidate_from_link

          self._link_candidate_cache[link] = LinkCandidate(

        File "/tmp/pip-standalone-pip-oas0cddc/__env_pip__.zip/pip/_internal/resolution/resolvelib/candidates.py", line 291, in __init__

          super().__init__(

        File "/tmp/pip-standalone-pip-oas0cddc/__env_pip__.zip/pip/_internal/resolution/resolvelib/candidates.py", line 161, in __init__

          self.dist = self._prepare()

        File "/tmp/pip-standalone-pip-oas0cddc/__env_pip__.zip/pip/_internal/resolution/resolvelib/candidates.py", line 230, in _prepare

          dist = self._prepare_distribution()

        File "/tmp/pip-standalone-pip-oas0cddc/__env_pip__.zip/pip/_internal/resolution/resolvelib/candidates.py", line 302, in _prepare_distribution

          return preparer.prepare_linked_requirement(self._ireq, parallel_builds=True)

        File "/tmp/pip-standalone-pip-oas0cddc/__env_pip__.zip/pip/_internal/operations/prepare.py", line 428, in prepare_linked_requirement

          return self._prepare_linked_requirement(req, parallel_builds)

        File "/tmp/pip-standalone-pip-oas0cddc/__env_pip__.zip/pip/_internal/operations/prepare.py", line 473, in _prepare_linked_requirement

          local_file = unpack_url(

        File "/tmp/pip-standalone-pip-oas0cddc/__env_pip__.zip/pip/_internal/operations/prepare.py", line 155, in unpack_url

          file = get_http_url(

        File "/tmp/pip-standalone-pip-oas0cddc/__env_pip__.zip/pip/_internal/operations/prepare.py", line 96, in get_http_url

          from_path, content_type = download(link, temp_dir.path)

        File "/tmp/pip-standalone-pip-oas0cddc/__env_pip__.zip/pip/_internal/network/download.py", line 146, in __call__

          for chunk in chunks:

        File "/tmp/pip-standalone-pip-oas0cddc/__env_pip__.zip/pip/_internal/cli/progress_bars.py", line 53, in _rich_progress_bar

          for chunk in iterable:

        File "/tmp/pip-standalone-pip-oas0cddc/__env_pip__.zip/pip/_internal/network/utils.py", line 63, in response_chunks

          for chunk in response.raw.stream(

        File "/tmp/pip-standalone-pip-oas0cddc/__env_pip__.zip/pip/_vendor/urllib3/response.py", line 573, in stream

          data = self.read(amt=amt, decode_content=decode_content)

        File "/tmp/pip-standalone-pip-oas0cddc/__env_pip__.zip/pip/_vendor/urllib3/response.py", line 538, in read

          raise IncompleteRead(self._fp_bytes_read, self.length_remaining)

        File "/home/xda/miniconda3/envs/cpy/lib/python3.9/contextlib.py", line 137, in __exit__

          self.gen.throw(typ, value, traceback)

        File "/tmp/pip-standalone-pip-oas0cddc/__env_pip__.zip/pip/_vendor/urllib3/response.py", line 440, in _error_catcher

          raise ReadTimeoutError(self._pool, None, "Read timed out.")

      pip._vendor.urllib3.exceptions.ReadTimeoutError: HTTPSConnectionPool(host='files.pythonhosted.org', port=443): Read timed out.

      [end of output]


  note: This error originates from a subprocess, and is likely not a problem with pip.

error: subprocess-exited-with-error
看样子,是setuptool的问题。 为了避免动这个默认库,可以安装降级版本的ciso。
pip install ciso8601==1.0.7
查询自己平时用的最多的linux命令
Linux • 李魔佛 发表了文章 • 0 个评论 • 2724 次浏览 • 2022-07-18 23:55
可以用一行shell来统计
history | awk '{CMD[$2]++;count++;}END { for (a in CMD)print CMD[a] " " CMD[a]/count*100 "% " a;}' | grep -v "./" | column -c3 -s " " -t | sort -nr | nl | head -n10
得到如下结果:
神奇吧。
上述语句主要对你的history 返回数据进行统计。 查看全部
可以用一行shell来统计
history | awk '{CMD[$2]++;count++;}END { for (a in CMD)print CMD[a] " " CMD[a]/count*100 "% " a;}' | grep -v "./" | column -c3 -s " " -t | sort -nr | nl | head -n10得到如下结果:
神奇吧。
上述语句主要对你的history 返回数据进行统计。
docker安装的podman报错
Linux • 李魔佛 发表了文章 • 0 个评论 • 3602 次浏览 • 2022-07-17 18:29
ERRO[0000] 'overlay' is not supported over overlayfs

Error: error creating libpod runtime: 'overlay' is not supported over overlayfs: backing file system is unsupported for this graph driver
本来计划在docker里面安装一个docker,启动docker报错,
于是安装了一个podman,结果ps -a的时候报错。
唯一的办法,可能就是启动第一个docker的时候使用特权模式, privillage=True
查看全部
ERRO[0000] 'overlay' is not supported over overlayfs
Error: error creating libpod runtime: 'overlay' is not supported over overlayfs: backing file system is unsupported for this graph driver
本来计划在docker里面安装一个docker,启动docker报错,
于是安装了一个podman,结果ps -a的时候报错。
唯一的办法,可能就是启动第一个docker的时候使用特权模式, privillage=True
映射端口 methodot 云主机 外部访问
Linux • 李魔佛 发表了文章 • 0 个评论 • 3239 次浏览 • 2022-07-17 02:36
如果我们做了web,要怎么映射出来呢?
很简单,只要把web端口改为8001 - 8005 之中的一个。
然后用上面表格中对应的端口映射来访问就可以了
比如下面的flask代码:
from flask import Flask, jsonify


# 最基本的测试


app =Flask(__name__)


@app.route('/about')

def about():

    return 'this is about page'


@app.route('/404')

def error_handle():

    return '404 error'


@app.route('/')

def error_handle():

    return jsonify({'code':100})


if __name__=='__main__':

    app.run(host='0.0.0.0',port=8001,debug=True)
因为8001映射出去的端口是 33442,
所以你可以在浏览器访问你的主机:
curl http://xxxxxxxxxxxxx.methodot.com:33442/
话说,之前以为这个主机随时提桶跑路的,不过用到现在还好。
每一个应用都是一个docker镜像。 所以你的linux系统是无法使用 systemctl 控制服务启动的。
会包权限不够。 查看全部
如果我们做了web,要怎么映射出来呢?
很简单,只要把web端口改为8001 - 8005 之中的一个。
然后用上面表格中对应的端口映射来访问就可以了
比如下面的flask代码:
from flask import Flask, jsonify
# 最基本的测试
app =Flask(__name__)
@app.route('/about')
def about():
return 'this is about page'
@app.route('/404')
def error_handle():
return '404 error'
@app.route('/')
def error_handle():
return jsonify({'code':100})
if __name__=='__main__':
app.run(host='0.0.0.0',port=8001,debug=True)
因为8001映射出去的端口是 33442,
所以你可以在浏览器访问你的主机:
curl http://xxxxxxxxxxxxx.methodot.com:33442/
话说,之前以为这个主机随时提桶跑路的,不过用到现在还好。
每一个应用都是一个docker镜像。 所以你的linux系统是无法使用 systemctl 控制服务启动的。
会包权限不够。
vmware player Unable to install all modules. See log for details
Linux • 李魔佛 发表了文章 • 0 个评论 • 3939 次浏览 • 2022-07-15 13:55
Unable to install all modules. See log for details
ubuntu下的vmware play经常会让更新模块。一起点击确认就可以正常编译更新。
而且一定要编译后才能打开虚拟机系统
但是奇怪的是,最近一次点击 更新,报错:
显示的英文错误信息:
Unable to install all modules. See log for details
看了日志:
 26 2022-07-15T02:15:09.595Z In(05) host-7426 /tmp/modconfig-PB4afO/vmmon-only/./include/vm_assert.h:372:22: note: in definition of macro ‘ASSERT_ON_COMPILE’

     25 2022-07-15T02:15:09.595Z In(05) host-7426   372 |       _Static_assert(e, #e); \

     24 2022-07-15T02:15:09.595Z In(05) host-7426       |                      ^

     23 2022-07-15T02:15:09.595Z In(05) host-7426 /tmp/modconfig-PB4afO/vmmon-only/./include/vm_asm_x86.h:215:7: note: in expansion of macro ‘ASSERT_ON_COMPILE_SELECTOR_SIZE’

     22 2022-07-15T02:15:09.595Z In(05) host-7426   215 |       ASSERT_ON_COMPILE_SELECTOR_SIZE(expr);                           \

     21 2022-07-15T02:15:09.595Z In(05) host-7426       |       ^~~~~~~~~~~~~~~~~~~~~~~~~~~~~~~

     20 2022-07-15T02:15:09.595Z In(05) host-7426 /tmp/modconfig-PB4afO/vmmon-only/./include/vm_asm_x86.h:227:22: note: in expansion of macro ‘SET_SEGREG’

     19 2022-07-15T02:15:09.595Z In(05) host-7426   227 | #define SET_GS(expr) SET_SEGREG(gs, expr)

     18 2022-07-15T02:15:09.595Z In(05) host-7426       |                      ^~~~~~~~~~

     17 2022-07-15T02:15:09.595Z In(05) host-7426 /tmp/modconfig-PB4afO/vmmon-only/common/task.c:2726:10: note: in expansion of macro ‘SET_GS’

     16 2022-07-15T02:15:09.595Z In(05) host-7426  2726 |          SET_GS(gs);

     15 2022-07-15T02:15:09.595Z In(05) host-7426       |          ^~~~~~

     14 2022-07-15T02:15:09.595Z In(05) host-7426 make[2]: *** [scripts/Makefile.build:285: /tmp/modconfig-PB4afO/vmmon-only/common/task.o] Error 1

     13 2022-07-15T02:15:09.595Z In(05) host-7426 make[2]: *** Waiting for unfinished jobs....

     12 2022-07-15T02:15:09.595Z In(05) host-7426 make[1]: *** [Makefile:1875: /tmp/modconfig-PB4afO/vmmon-only] Error 2

     11 2022-07-15T02:15:09.595Z In(05) host-7426 make: *** [Makefile:117: vmmon.ko] Error 2

     10 2022-07-15T02:15:09.595Z In(05) host-7426 Using kernel build system.

      9 2022-07-15T02:15:09.595Z In(05) host-7426 /tmp/modconfig-PB4afO/vmnet-only/driver.c: In function ‘VNetFileOpUnlockedIoctl’:

      8 2022-07-15T02:15:09.595Z In(05) host-7426 /tmp/modconfig-PB4afO/vmnet-only/driver.c:966:7: warning: this statement may fall through [-Wimplicit-fallthrough=]

      7 2022-07-15T02:15:09.595Z In(05) host-7426   966 |       {

      6 2022-07-15T02:15:09.595Z In(05) host-7426       |       ^

      5 2022-07-15T02:15:09.595Z In(05) host-7426 /tmp/modconfig-PB4afO/vmnet-only/driver.c:976:4: note: here

      4 2022-07-15T02:15:09.595Z In(05) host-7426   976 |    case SIOCGETAPIVERSION:

      3 2022-07-15T02:15:09.595Z In(05) host-7426       |    ^~~~

      2 2022-07-15T02:15:09.595Z In(05) host-7426 Skipping BTF generation for /tmp/modconfig-PB4afO/vmnet-only/vmnet.ko due to unavailability of vmlinux

      1 2022-07-15T02:15:09.595Z In(05) host-7426 Unable to install all modules.  See log for details.
报错信息在这里:
   host-7426 Skipping BTF generation for /tmp/modconfig-PB4afO/vmnet-only/vmnet.ko due to unavailability of vmlinux


    host-7426 Unable to install all modules.  See log for details
遇到问题后就google一番。
果然还是老外大神多。
翻了一个解决方案后,终于找到一个可行的。【所以必须的英语水平还是要的】
可行的方案:
去github下载最新的host-modules
https://github.com/mkubecek/vmware-host-modules
下载一个最新的。
然后解压:unzip w16.2.3-k5.17.zip
得到以下文件 INSTALL
LICENSE
Makefile
README
vmmon-only
vmnet-only
然后我们打包两个文件夹 vmmon-only
vmnet-only tar -cf vmmon.tar vmmon-only
tar -cf vmnet.tar vmnet-only
这时,文件夹下多了2个tar的文件,vmmon.tar和vmnet.tar
然后拷贝到 目录:
/usr/lib/vmware.modules.source
sudo cp -v vmmon.tar vmnet.tar /usr/lib/vmware/modules/source/
之后可以直接编译:
sudo vmware-modconfig --console --install-all
安装完成之后,再次打开vmware player就可以看到:
这样就是成功了。 查看全部
Unable to install all modules. See log for details
ubuntu下的vmware play经常会让更新模块。一起点击确认就可以正常编译更新。
而且一定要编译后才能打开虚拟机系统
但是奇怪的是,最近一次点击 更新,报错:
显示的英文错误信息:
Unable to install all modules. See log for details
看了日志:
26 2022-07-15T02:15:09.595Z In(05) host-7426 /tmp/modconfig-PB4afO/vmmon-only/./include/vm_assert.h:372:22: note: in definition of macro ‘ASSERT_ON_COMPILE’
25 2022-07-15T02:15:09.595Z In(05) host-7426 372 | _Static_assert(e, #e); \
24 2022-07-15T02:15:09.595Z In(05) host-7426 | ^
23 2022-07-15T02:15:09.595Z In(05) host-7426 /tmp/modconfig-PB4afO/vmmon-only/./include/vm_asm_x86.h:215:7: note: in expansion of macro ‘ASSERT_ON_COMPILE_SELECTOR_SIZE’
22 2022-07-15T02:15:09.595Z In(05) host-7426 215 | ASSERT_ON_COMPILE_SELECTOR_SIZE(expr); \
21 2022-07-15T02:15:09.595Z In(05) host-7426 | ^~~~~~~~~~~~~~~~~~~~~~~~~~~~~~~
20 2022-07-15T02:15:09.595Z In(05) host-7426 /tmp/modconfig-PB4afO/vmmon-only/./include/vm_asm_x86.h:227:22: note: in expansion of macro ‘SET_SEGREG’
19 2022-07-15T02:15:09.595Z In(05) host-7426 227 | #define SET_GS(expr) SET_SEGREG(gs, expr)
18 2022-07-15T02:15:09.595Z In(05) host-7426 | ^~~~~~~~~~
17 2022-07-15T02:15:09.595Z In(05) host-7426 /tmp/modconfig-PB4afO/vmmon-only/common/task.c:2726:10: note: in expansion of macro ‘SET_GS’
16 2022-07-15T02:15:09.595Z In(05) host-7426 2726 | SET_GS(gs);
15 2022-07-15T02:15:09.595Z In(05) host-7426 | ^~~~~~
14 2022-07-15T02:15:09.595Z In(05) host-7426 make[2]: *** [scripts/Makefile.build:285: /tmp/modconfig-PB4afO/vmmon-only/common/task.o] Error 1
13 2022-07-15T02:15:09.595Z In(05) host-7426 make[2]: *** Waiting for unfinished jobs....
12 2022-07-15T02:15:09.595Z In(05) host-7426 make[1]: *** [Makefile:1875: /tmp/modconfig-PB4afO/vmmon-only] Error 2
11 2022-07-15T02:15:09.595Z In(05) host-7426 make: *** [Makefile:117: vmmon.ko] Error 2
10 2022-07-15T02:15:09.595Z In(05) host-7426 Using kernel build system.
9 2022-07-15T02:15:09.595Z In(05) host-7426 /tmp/modconfig-PB4afO/vmnet-only/driver.c: In function ‘VNetFileOpUnlockedIoctl’:
8 2022-07-15T02:15:09.595Z In(05) host-7426 /tmp/modconfig-PB4afO/vmnet-only/driver.c:966:7: warning: this statement may fall through [-Wimplicit-fallthrough=]
7 2022-07-15T02:15:09.595Z In(05) host-7426 966 | {
6 2022-07-15T02:15:09.595Z In(05) host-7426 | ^
5 2022-07-15T02:15:09.595Z In(05) host-7426 /tmp/modconfig-PB4afO/vmnet-only/driver.c:976:4: note: here
4 2022-07-15T02:15:09.595Z In(05) host-7426 976 | case SIOCGETAPIVERSION:
3 2022-07-15T02:15:09.595Z In(05) host-7426 | ^~~~
2 2022-07-15T02:15:09.595Z In(05) host-7426 Skipping BTF generation for /tmp/modconfig-PB4afO/vmnet-only/vmnet.ko due to unavailability of vmlinux
1 2022-07-15T02:15:09.595Z In(05) host-7426 Unable to install all modules. See log for details.
报错信息在这里:
host-7426 Skipping BTF generation for /tmp/modconfig-PB4afO/vmnet-only/vmnet.ko due to unavailability of vmlinux
host-7426 Unable to install all modules. See log for details
遇到问题后就google一番。
果然还是老外大神多。
翻了一个解决方案后,终于找到一个可行的。【所以必须的英语水平还是要的】
可行的方案:
去github下载最新的host-modules
https://github.com/mkubecek/vmware-host-modules
下载一个最新的。
然后解压:
unzip w16.2.3-k5.17.zip
得到以下文件
    INSTALL

    LICENSE

    Makefile

    README

    vmmon-only

    vmnet-only
然后我们打包两个文件夹
vmmon-only

vmnet-only
    tar -cf vmmon.tar vmmon-only

    tar -cf vmnet.tar vmnet-only
这时,文件夹下多了2个tar的文件,vmmon.tar和vmnet.tar
然后拷贝到 目录:
/usr/lib/vmware.modules.source
sudo cp -v vmmon.tar vmnet.tar /usr/lib/vmware/modules/source/
之后可以直接编译:
sudo vmware-modconfig --console --install-all
安装完成之后,再次打开vmware player就可以看到:
这样就是成功了。
linux监控shell进程是否运行,不运行的时候自动启动
Linux • 李魔佛 发表了文章 • 0 个评论 • 3186 次浏览 • 2022-07-13 00:17
保存为monitor.sh
#!/bin/bash

line=$(ps -aux | grep -c /usr/sbin/ssh | grep -v "grep")

# 匹配的行数

if [ $line -eq 1 ];

then

sudo /etc/init.d/ssh restart

# 重启ssh服务

else

echo ssh is running....

# 向日志发送邮件,显示ssh运行中。。。

fi
给个执行权限
chmod +x monitor.sh
然后设置定时任务,
比如隔5分钟运行一次上面的脚本
*/5 * * * * monitor.sh
查看全部
保存为monitor.sh
#!/bin/bash
line=$(ps -aux | grep -c /usr/sbin/ssh | grep -v "grep")
# 匹配的行数
if [ $line -eq 1 ];
then
sudo /etc/init.d/ssh restart
# 重启ssh服务
else
echo ssh is running....
# 向日志发送邮件,显示ssh运行中。。。
fi
给个执行权限
chmod +x monitor.sh
然后设置定时任务,
比如隔5分钟运行一次上面的脚本
*/5 * * * * monitor.sh
aria2c 不能下载https的文件
Linux • 李魔佛 发表了文章 • 0 个评论 • 6533 次浏览 • 2022-07-10 11:07
aria2c https:// openresty.org/download/openresty-1.21.4.1-win64.zip$ aria2c
https: //openresty.org/download/openresty-1.21.4.1-win64.zip
07/10 10:58:58 [NOTICE] Downloading 1 item(s)
07/10 10:58:58 [ERROR] CUID#7 - Download aborted. URI=https: //openresty.org/download/openresty-1.21.4.1-win64.zip
Exception: [AbstractCommand.cc:351] errorCode=1 URI=https: //openresty.org/download/openresty-1.21.4.1-win64.zip
-> [InitiateConnectionCommandFactory.cc:87] errorCode=1 https is not supported yet.
07/10 10:58:58 [NOTICE] Download GID#b9bc95619990e7e4 not complete:
Download Results:
gid |stat|avg speed |path/URI
======+====+===========+=======================================================
b9bc95|ERR | n/a|
https: //openresty.org/download/openresty-1.21.4.1-win64.zip
http: //openresty.org/download/openresty-1.21.4.1-win64.zip
Status Legend:
(ERR):error occurred.
aria2 will resume download if the transfer is restarted.
If there are any errors, then see the log file. See '-l' option in help/man page for details.
只要把https改为http就可以了。(前提是完整没有把http跳转到https)
aria2 http: //openresty.org/download/openresty-1.21.4.1-win64.zip
不过这个办法不是长久之计,要解决这个问题,需要你重新编译ariac2, 编译的时候添加 ssl参数就可以啦
进入ariac2的源码目录:./configure --with-openssl接着:make && sudo make install然后就可以啦
查看全部
aria2c https:// openresty.org/download/openresty-1.21.4.1-win64.zip
$ aria2c

https: //openresty.org/download/openresty-1.21.4.1-win64.zip


07/10 10:58:58 [NOTICE] Downloading 1 item(s)


07/10 10:58:58 [ERROR] CUID#7 - Download aborted. URI=https: //openresty.org/download/openresty-1.21.4.1-win64.zip

Exception: [AbstractCommand.cc:351] errorCode=1 URI=https: //openresty.org/download/openresty-1.21.4.1-win64.zip

  -> [InitiateConnectionCommandFactory.cc:87] errorCode=1 https is not supported yet.


07/10 10:58:58 [NOTICE] Download GID#b9bc95619990e7e4 not complete:


Download Results:

gid   |stat|avg speed  |path/URI

======+====+===========+=======================================================

b9bc95|ERR |        n/a|

https: //openresty.org/download/openresty-1.21.4.1-win64.zip


http: //openresty.org/download/openresty-1.21.4.1-win64.zip


Status Legend:

(ERR):error occurred.


aria2 will resume download if the transfer is restarted.

If there are any errors, then see the log file. See '-l' option in help/man page for details.
只要把https改为http就可以了。(前提是完整没有把http跳转到https)
aria2 http: //openresty.org/download/openresty-1.21.4.1-win64.zip
不过这个办法不是长久之计,要解决这个问题,需要你重新编译ariac2, 编译的时候添加 ssl参数就可以啦
进入ariac2的源码目录:
./configure --with-openssl接着:
make && sudo make install然后就可以啦
删除ubuntu snap上旧版本的app 节省硬盘空间
Linux • 李魔佛 发表了文章 • 0 个评论 • 4357 次浏览 • 2021-09-20 18:36
snap list --all
然后可以选择保存下面的作为一个脚本,清理不必要的老版本的app应用
笔者已经试过的,放心使用.人畜无害.
#!/bin/bash

# Removes old revisions of snaps

# CLOSE ALL SNAPS BEFORE RUNNING THIS

set -eu


LANG=C snap list --all | awk '/disabled/{print $1, $3}' |

    while read snapname revision; do

        snap remove "$snapname" --revision="$revision"

done 查看全部
snap list --all
然后可以选择保存下面的作为一个脚本,清理不必要的老版本的app应用
笔者已经试过的,放心使用.人畜无害.
#!/bin/bash
# Removes old revisions of snaps
# CLOSE ALL SNAPS BEFORE RUNNING THIS
set -eu
LANG=C snap list --all | awk '/disabled/{print $1, $3}' |
while read snapname revision; do
snap remove "$snapname" --revision="$revision"
done
ubuntu软件中心 正在安装的软件如何中断
Linux • 李魔佛 发表了文章 • 0 个评论 • 2998 次浏览 • 2021-07-08 08:52
但是看到它里面有个系统版本升级, 丫的要帮我升级ubuntu呀. 要果断阻止呀.
可惜找不到种植的按钮, 不得不吐槽下这个垃圾设计.
无奈只好ps -aux | grep soft
找到了那个软件升级中心的进程pid
再 kill -9 pid
粗暴地把软件升级中心停掉. 查看全部
但是看到它里面有个系统版本升级, 丫的要帮我升级ubuntu呀. 要果断阻止呀.
可惜找不到种植的按钮, 不得不吐槽下这个垃圾设计.
无奈只好ps -aux | grep soft
找到了那个软件升级中心的进程pid
再 kill -9 pid
粗暴地把软件升级中心停掉.
ubuntu16.04 无法访问github
Linux • 李魔佛 发表了文章 • 0 个评论 • 2942 次浏览 • 2021-07-05 15:26
也无法拉去代码。
网上搜了一通,没有一个能够解决问题的。
最终自己折腾了下,把 /etc/hosts 文件里的ipv6的地址注释掉了,就可以访问了。
ubuntu 无法访问github
也无法拉去代码。
网上搜了一通,没有一个能够解决问题的。
最终自己折腾了下,把 /etc/hosts 文件里的ipv6的地址注释掉了,就可以访问了。
cronsun 执行计划任务是报错 exec format error
Linux • 李魔佛 发表了文章 • 0 个评论 • 3109 次浏览 • 2021-03-28 12:32
单独执行shell的脚本是没有问题的。
经过试验测试,是因为shell脚本的开头没有没有添加:#!/bin/bash的标记。
在shell脚本的第一行添加上后就没有问题了。
附一个脚本批量处理: 自动在首行添加 #!/bin/bash
In [1]: folder='/root/crontab_script'


In [2]: import os


In [3]: filelist=os.listdir(folder)


In [6]: def change_file(filename):

   ...:     with open(filename,'r') as fp:

   ...:         content=fp.read()

   ...:         content=content.strip()

   ...:     concat='#!/bin/bash\n'

   ...:     content=concat+content

   ...:     with open(filename,'w') as fp:

   ...:         fp.write(content)

   ...:


In [7]: for file in filelist:

   ...:     if file.endswith('.sh'):

   ...:         full_path = os.path.join(folder,file)

...: change_file(full_path) 查看全部
fork/exec /root/crontab_script/hello.sh: exec format error
单独执行shell的脚本是没有问题的。
经过试验测试,是因为shell脚本的开头没有没有添加:
#!/bin/bash的标记。
在shell脚本的第一行添加上后就没有问题了。
附一个脚本批量处理: 自动在首行添加 #!/bin/bash
In [1]: folder='/root/crontab_script'
In [2]: import os
In [3]: filelist=os.listdir(folder)
In [6]: def change_file(filename):
...: with open(filename,'r') as fp:
...: content=fp.read()
...: content=content.strip()
...: concat='#!/bin/bash\n'
...: content=concat+content
...: with open(filename,'w') as fp:
...: fp.write(content)
...:
In [7]: for file in filelist:
...: if file.endswith('.sh'):
...: full_path = os.path.join(folder,file)
...: change_file(full_path)
cronsun 计划任务运行python脚本
Linux • 李魔佛 发表了文章 • 0 个评论 • 3071 次浏览 • 2021-03-27 23:34
cd xxxxx && python xxx.py这样的操作,这样貌似不会实际去执行
只能把上面的命令放到一个shell文件里面,比如worker.sh
然后把worker.sh 放到指定的位置,然后把这个shell的完整路径放入到 cronsun的计划任务的脚本里面。
查看全部
cd xxxxx && python xxx.py这样的操作,这样貌似不会实际去执行
只能把上面的命令放到一个shell文件里面,比如worker.sh
然后把worker.sh 放到指定的位置,然后把这个shell的完整路径放入到 cronsun的计划任务的脚本里面。
chrome secure shell插件无法上传下载文件
Linux • 李魔佛 发表了文章 • 0 个评论 • 2796 次浏览 • 2021-02-22 19:28
后记:
只好用scp传输啦,还好windows平台的git客户端。
后记:
只好用scp传输啦,还好windows平台的git客户端。
armdebian 修改大写键 为esc
Linux • 李魔佛 发表了文章 • 0 个评论 • 3535 次浏览 • 2021-01-18 18:15
armdebian上没有xmodmap 这个软件,但有一个xkeycaps的GUI的小应用,可以很方便地修改在图形界面上修改按键映射。
而且xkeycaps修改是持续有效的,如果想该回去,上面有个restore的功能,可以一键恢复默认值。
查看全部
armdebian上没有xmodmap 这个软件,但有一个xkeycaps的GUI的小应用,可以很方便地修改在图形界面上修改按键映射。
而且xkeycaps修改是持续有效的,如果想该回去,上面有个restore的功能,可以一键恢复默认值。
bbdoc居然不支持代码搜索
Linux • 李魔佛 发表了文章 • 0 个评论 • 3320 次浏览 • 2021-01-03 16:54
什么python,cpp,java一个都不支持。
什么python,cpp,java一个都不支持。
win7安装sshd服务
闲聊 • 李魔佛 发表了文章 • 0 个评论 • 4380 次浏览 • 2020-12-29 08:52
Recently, Microsoft has released a port of OpenSSH for Windows. You can use the package to set up an SFTP/SSH server on Windows.Installing SFTP/SSH Server
On Windows 10 version 1803 and newer
On earlier versions of Windows
https://github.com/PowerShell/Win32-OpenSSH/releases
Configuring SSH server
Setting up SSH public key authentication
Connecting to the server
Finding Host Key
Connecting
Further readingInstalling SFTP/SSH Server
On Windows 10 version 1803 and newerIn Settings app, go to Apps > Apps & features > Manage optional features.
Locate “OpenSSH server” feature, expand it, and select Install.Binaries are installed to %WINDIR%\System32\OpenSSH.
Configuration file (sshd_config) and host keys are installed to %ProgramData%\ssh
(only after the server is started for the first time).
You may still want to use the following manual installation, if you want to install a newer version of OpenSSH than the one built into Windows 10.
On earlier versions of WindowsDownload the latest OpenSSH for Windows binaries (package OpenSSH-Win64.zip or OpenSSH-Win32.zip)
As the Administrator, extract the package to C:\Program Files\OpenSSH
As the Administrator, install sshd and ssh-agent services:
powershell.exe -ExecutionPolicy Bypass -File install-sshd.ps1
Configuring SSH serverAllow incoming connections to SSH server in Windows Firewall:
When installed as an optional feature, the firewall rule “OpenSSH SSH Server (sshd)” should have been created automatically. If not, proceed to create and enable the rule as follows.
Either run the following PowerShell command as the Administrator:New-NetFirewallRule -Name sshd -DisplayName 'OpenSSH SSH Server' -Enabled True -Direction Inbound -Protocol TCP -Action Allow -LocalPort 22 -Program "C:\System32\OpenSSH\sshd.exe"
Replace C:\System32\OpenSSH\sshd.exe with the actual path to the sshd.exe
(C:\Program Files\OpenSSH\ssh.exe,
had you followed the manual installation instructions above).or go to Control Panel > System and Security > Windows Firewall1 > Advanced Settings > Inbound Rules and add a new rule for port 22.
Start the service and/or configure automatic start:
Go to Control Panel > System and Security > Administrative Tools and open Services. Locate OpenSSH SSH Server service.
If you want the server to start automatically when your machine is started: Go to Action > Properties. In the Properties dialog, change Startup type to Automatic and confirm.
Start the OpenSSH SSH Server service by clicking the Start the service.These instructions are partially based on the official deployment instructions. 查看全部
Recently, Microsoft has released a port of OpenSSH for Windows. You can use the package to set up an SFTP/SSH server on Windows.Installing SFTP/SSH Server
On Windows 10 version 1803 and newer
On earlier versions of Windows
https://github.com/PowerShell/Win32-OpenSSH/releases
Configuring SSH server
Setting up SSH public key authentication
Connecting to the server
Finding Host Key
Connecting
Further readingInstalling SFTP/SSH Server
On Windows 10 version 1803 and newerIn Settings app, go to Apps > Apps & features > Manage optional features.
Locate “OpenSSH server” feature, expand it, and select Install.Binaries are installed to %WINDIR%\System32\OpenSSH.
Configuration file (sshd_config) and host keys are installed to %ProgramData%\ssh
(only after the server is started for the first time).
You may still want to use the following manual installation, if you want to install a newer version of OpenSSH than the one built into Windows 10.
On earlier versions of WindowsDownload the latest OpenSSH for Windows binaries (package OpenSSH-Win64.zip or OpenSSH-Win32.zip)
As the Administrator, extract the package to C:\Program Files\OpenSSH
As the Administrator, install sshd and ssh-agent services:
powershell.exe -ExecutionPolicy Bypass -File install-sshd.ps1
Configuring SSH serverAllow incoming connections to SSH server in Windows Firewall:
When installed as an optional feature, the firewall rule “OpenSSH SSH Server (sshd)” should have been created automatically. If not, proceed to create and enable the rule as follows.
Either run the following PowerShell command as the Administrator:New-NetFirewallRule -Name sshd -DisplayName 'OpenSSH SSH Server' -Enabled True -Direction Inbound -Protocol TCP -Action Allow -LocalPort 22 -Program "C:\System32\OpenSSH\sshd.exe"
Replace C:\System32\OpenSSH\sshd.exe with the actual path to the sshd.exe
(C:\Program Files\OpenSSH\ssh.exe,
had you followed the manual installation instructions above).or go to Control Panel > System and Security > Windows Firewall1 > Advanced Settings > Inbound Rules and add a new rule for port 22.
Start the service and/or configure automatic start:
Go to Control Panel > System and Security > Administrative Tools and open Services. Locate OpenSSH SSH Server service.
If you want the server to start automatically when your machine is started: Go to Action > Properties. In the Properties dialog, change Startup type to Automatic and confirm.
Start the OpenSSH SSH Server service by clicking the Start the service.These instructions are partially based on the official deployment instructions.
网易云音乐居然还有linux版本,网易还是一个良心企业
Linux • 李魔佛 发表了文章 • 0 个评论 • 3857 次浏览 • 2020-12-18 11:31
啥时候有道云笔记也搞一个linux版本的呀.
如果要在ubuntu16.04上安装,就不要去官网下载,gclib库不兼容,要升级到18.04, 会会很折腾.
直接下载:
$ wget http://s1.music.126.net/downlo ... 4.deb --默认下载到Desktop
然后sudo dpkg -i xxxxx.deb 就可以啦
良心的还要搜狗,linux下的输入法好用.
更新:
安装上面方法安装后,可以打开,可以播放mv,不过就是无法播放声音.
需要解决依赖问题.
网上找到了好的方法: 亲测有效
更改源为阿里云的源
# deb cdrom:[Ubuntu 16.04 LTS _Xenial Xerus_ - Release amd64 (20160420.1)]/ xenial main restricted

deb-src http://archive.ubuntu.com/ubuntu xenial main restricted #Added by software-properties

deb http://mirrors.aliyun.com/ubuntu/ xenial main restricted

deb-src http://mirrors.aliyun.com/ubuntu/ xenial main restricted multiverse universe #Added by software-properties

deb http://mirrors.aliyun.com/ubuntu/ xenial-updates main restricted

deb-src http://mirrors.aliyun.com/ubuntu/ xenial-updates main restricted multiverse universe #Added by software-properties

deb http://mirrors.aliyun.com/ubuntu/ xenial universe

deb http://mirrors.aliyun.com/ubuntu/ xenial-updates universe

deb http://mirrors.aliyun.com/ubuntu/ xenial multiverse

deb http://mirrors.aliyun.com/ubuntu/ xenial-updates multiverse

deb http://mirrors.aliyun.com/ubuntu/ xenial-backports main restricted universe multiverse

deb-src http://mirrors.aliyun.com/ubuntu/ xenial-backports main restricted universe multiverse #Added by software-properties

deb http://archive.canonical.com/ubuntu xenial partner

deb-src http://archive.canonical.com/ubuntu xenial partner

deb http://mirrors.aliyun.com/ubuntu/ xenial-security main restricted

deb-src http://mirrors.aliyun.com/ubuntu/ xenial-security main restricted multiverse universe #Added by software-properties

deb http://mirrors.aliyun.com/ubuntu/ xenial-security universe

deb http://mirrors.aliyun.com/ubuntu/ xenial-security multiversean
然后运行 apt -f install 修复依赖关系就可以了.
查看全部
啥时候有道云笔记也搞一个linux版本的呀.
如果要在ubuntu16.04上安装,就不要去官网下载,gclib库不兼容,要升级到18.04, 会会很折腾.
直接下载:
$ wget http://s1.music.126.net/downlo ... 4.deb --默认下载到Desktop
然后sudo dpkg -i xxxxx.deb 就可以啦
良心的还要搜狗,linux下的输入法好用.
更新:
安装上面方法安装后,可以打开,可以播放mv,不过就是无法播放声音.
需要解决依赖问题.
网上找到了好的方法: 亲测有效
更改源为阿里云的源
# deb cdrom:[Ubuntu 16.04 LTS _Xenial Xerus_ - Release amd64 (20160420.1)]/ xenial main restricted然后运行 apt -f install 修复依赖关系就可以了.
deb-src http://archive.ubuntu.com/ubuntu xenial main restricted #Added by software-properties
deb http://mirrors.aliyun.com/ubuntu/ xenial main restricted
deb-src http://mirrors.aliyun.com/ubuntu/ xenial main restricted multiverse universe #Added by software-properties
deb http://mirrors.aliyun.com/ubuntu/ xenial-updates main restricted
deb-src http://mirrors.aliyun.com/ubuntu/ xenial-updates main restricted multiverse universe #Added by software-properties
deb http://mirrors.aliyun.com/ubuntu/ xenial universe
deb http://mirrors.aliyun.com/ubuntu/ xenial-updates universe
deb http://mirrors.aliyun.com/ubuntu/ xenial multiverse
deb http://mirrors.aliyun.com/ubuntu/ xenial-updates multiverse
deb http://mirrors.aliyun.com/ubuntu/ xenial-backports main restricted universe multiverse
deb-src http://mirrors.aliyun.com/ubuntu/ xenial-backports main restricted universe multiverse #Added by software-properties
deb http://archive.canonical.com/ubuntu xenial partner
deb-src http://archive.canonical.com/ubuntu xenial partner
deb http://mirrors.aliyun.com/ubuntu/ xenial-security main restricted
deb-src http://mirrors.aliyun.com/ubuntu/ xenial-security main restricted multiverse universe #Added by software-properties
deb http://mirrors.aliyun.com/ubuntu/ xenial-security universe
deb http://mirrors.aliyun.com/ubuntu/ xenial-security multiversean
vimium 配合chrome 真的好用,尤其用惯vim的用户
Linux • 李魔佛 发表了文章 • 0 个评论 • 3254 次浏览 • 2020-11-22 01:59
上面是vimium的快捷键用法
上面是vimium的快捷键用法
windows下的分区挂载到linux下面,然后docker在上面挂载-无法识别
Linux • 李魔佛 发表了文章 • 0 个评论 • 3447 次浏览 • 2020-11-11 02:40
windows下的分区挂载到linux下面,然后docker在上面挂载-无法识别。
情况是这样的:
双系统的环境,一个ubuntu,一个windows。 ubuntu上的有个docker,但是ubuntu的分区比较小,需要挂载windows的ntfs分区来扩展空间。
其他程序用起来没什么问题,可是,在用docker 挂在windows分区下的文件夹,总是报错,用的 -v xxxx:xxxx 方式。
同样的docker启动命令,在ubuntu下的目录就没有问题,所以就开始怀疑是权限问题。
但是经过一系列的mount操作,chmod也给足了了权限,可是还没无法启动docker。
后来没办法,只好把windows分区缩小容量,把多余的容量格式化为ext分区格式,然后重新用docker mount -v, 后面docker就可以正常启动了。 查看全部
坑:
windows下的分区挂载到linux下面,然后docker在上面挂载-无法识别。
情况是这样的:
双系统的环境,一个ubuntu,一个windows。 ubuntu上的有个docker,但是ubuntu的分区比较小,需要挂载windows的ntfs分区来扩展空间。
其他程序用起来没什么问题,可是,在用docker 挂在windows分区下的文件夹,总是报错,用的 -v xxxx:xxxx 方式。
同样的docker启动命令,在ubuntu下的目录就没有问题,所以就开始怀疑是权限问题。
但是经过一系列的mount操作,chmod也给足了了权限,可是还没无法启动docker。
后来没办法,只好把windows分区缩小容量,把多余的容量格式化为ext分区格式,然后重新用docker mount -v, 后面docker就可以正常启动了。
斐讯N1 armlinux 长时间运行会导致文件系统只读 readonly
Linux • 李魔佛 发表了文章 • 0 个评论 • 4327 次浏览 • 2020-10-25 00:24
比如放着几个晚上不关机,然后文件系统变成了只读,无法写入文件,提示只读系统。
原因是系统分区有坏道。 可能由于关机使用拔电源的方式导致的。
所以要养成好的习惯,正常关机,使用命令 shutdown -h 或者点击关机按钮就好了。
那么如果出现了上述问题,怎么办?
可以使用用U盘启动,运行一次e2fsck /dev/mmcblk1p2
然后选择Y,修复坏道就可以了。
U盘启动就是之前刷Armlinux时的那个U盘。
接上U盘,然后上电启动即可。 然后进入系统运行上述的命令:
e2fsck /dev/mmcblk1p2
查看全部
比如放着几个晚上不关机,然后文件系统变成了只读,无法写入文件,提示只读系统。
原因是系统分区有坏道。 可能由于关机使用拔电源的方式导致的。
所以要养成好的习惯,正常关机,使用命令 shutdown -h 或者点击关机按钮就好了。
那么如果出现了上述问题,怎么办?
可以使用用U盘启动,运行一次e2fsck /dev/mmcblk1p2
然后选择Y,修复坏道就可以了。
U盘启动就是之前刷Armlinux时的那个U盘。
接上U盘,然后上电启动即可。 然后进入系统运行上述的命令:
e2fsck /dev/mmcblk1p2
Started update UTMP about system Runlevel during booting ubuntu/armlinux
Linux • 李魔佛 发表了文章 • 0 个评论 • 6313 次浏览 • 2020-10-20 13:33
Started update UTMP about system Runlevel
Finally, i try to enter into secure mode and check logs.
it was caused by system disk is out of space.
So i try to delete some unless file to release some space, then reboot system, then everything is ok now.
http://30daydo.com/article/617
查看全部
Started update UTMP about system Runlevel
Finally, i try to enter into secure mode and check logs.
it was caused by system disk is out of space.
So i try to delete some unless file to release some space, then reboot system, then everything is ok now.
http://30daydo.com/article/617
zsh历史记录文件损坏: zsh: corrupt history file /home/admin/.zsh_history
Linux • 李魔佛 发表了文章 • 0 个评论 • 5978 次浏览 • 2020-10-09 18:12
mv .zsh_history .zsh_history_bad
strings .zsh_history_bad > .zsh_history
fc -R .zsh_history
如果最后一步提示出错 fc的参数不对,可以进入zsh,然后再执行 fc -R .zsh_histroy
原创文章,转载请注明出处:
http://30daydo.com/article/612
查看全部
cd ~

mv .zsh_history .zsh_history_bad

strings .zsh_history_bad > .zsh_history

fc -R .zsh_history
如果最后一步提示出错 fc的参数不对,可以进入zsh,然后再执行 fc -R .zsh_histroy
原创文章,转载请注明出处:
http://30daydo.com/article/612
crontab定时运行图形程序
Linux • 李魔佛 发表了文章 • 0 个评论 • 4383 次浏览 • 2019-08-26 15:56
export DISPLAY=:0;* * * * * export DISPLAY=:0; gedit
附一个linux下桌面提醒GUI程序,定时提醒你休息哈:
import pyautogui as pag

import datetime


def neck_rest():

    f = open('neck_record.txt', 'a')

    ret = pag.prompt("Rest! Protect your neck !")

    if ret == 'rest':

        f.write(datetime.datetime.now().strftime("%Y-%m-%d %H:%M:%S"))

        f.write('\t')

        f.write('Rest')

        f.write('\n')

    else:

        f.write(datetime.datetime.now().strftime("%Y-%m-%d %H:%M:%S"))

        f.write('\t')

        f.write('Failed to rest')

        f.write('\n')

    f.close()


neck_rest()
程序保存为task.py
然后设定crontab任务:
* * * * * export DISPLAY=:0; python task.py
即可
查看全部
export DISPLAY=:0;
* * * * * export DISPLAY=:0; gedit
附一个linux下桌面提醒GUI程序,定时提醒你休息哈:
import pyautogui as pag
import datetime
def neck_rest():
f = open('neck_record.txt', 'a')
ret = pag.prompt("Rest! Protect your neck !")
if ret == 'rest':
f.write(datetime.datetime.now().strftime("%Y-%m-%d %H:%M:%S"))
f.write('\t')
f.write('Rest')
f.write('\n')
else:
f.write(datetime.datetime.now().strftime("%Y-%m-%d %H:%M:%S"))
f.write('\t')
f.write('Failed to rest')
f.write('\n')
f.close()
neck_rest()
程序保存为task.py
然后设定crontab任务:
* * * * * export DISPLAY=:0; python task.py
即可
alias别名 等号后面不用
Linux • 李魔佛 发表了文章 • 0 个评论 • 3455 次浏览 • 2019-08-12 14:17
alias fetch="git fetch origin"
alias dj="python manage.py runserver 0.0.0.0"
alias py2="python2"
alias py3="python3"
alias ggg="cd ~/git" 查看全部
alias fetch="git fetch origin"
alias dj="python manage.py runserver 0.0.0.0"
alias py2="python2"
alias py3="python3"
alias ggg="cd ~/git"
ubuntu/linux shell根据进程名杀死进程 一句搞定
Linux • 李魔佛 发表了文章 • 0 个评论 • 5784 次浏览 • 2019-04-19 23:15
比如我要杀死python的进程,就使用
ps -ef | grep "python" | grep -v grep | cut -c 10-16 | xargs kill -9
来使用。
grep -v grep 因为 ps 会把grep python这个进程也打印出来,所以-v 是反转的意思,不匹配的才打印出来,然后cut 是找出10到16位的字符,这里需要大家根据自己的用户名来调整。
一般ps -ef输出是 前面 用户名,然后空格, 接着是进程号。 如果你的用户名很长,可以调整10-16的位置来适应。
后面就是把进程号传递给kill作为参数,-9 是强制杀死。
查看全部
ps -ef | grep "进程名" | grep -v grep | cut -c 10-16 | xargs kill -9
比如我要杀死python的进程,就使用
ps -ef | grep "python" | grep -v grep | cut -c 10-16 | xargs kill -9
来使用。
grep -v grep 因为 ps 会把grep python这个进程也打印出来,所以-v 是反转的意思,不匹配的才打印出来,然后cut 是找出10到16位的字符,这里需要大家根据自己的用户名来调整。
一般ps -ef输出是 前面 用户名,然后空格, 接着是进程号。 如果你的用户名很长,可以调整10-16的位置来适应。
后面就是把进程号传递给kill作为参数,-9 是强制杀死。