通知设置 新通知
python django3 跨域问题解决
李魔佛 发表了文章 • 0 个评论 • 1864 次浏览 • 2024-11-22 11:53
然后react范围django api,会有跨域问题,所以需要额外配置一下。
网上很多教程都是基于最新的django4或者更新。
本文只针对django3 解决。
如果用的django3.10


需要对应的版本的cors库:


pip install django-cors-headers==3.10.0
不然大概率是装不上的。
然后在setting里面配置这个
CORS_ORIGIN_ALLOW_ALL = True


INSTALLED_APPS = [


    'corsheaders',

]


MIDDLEWARE = [


    'corsheaders.middleware.CorsMiddleware',

]
然后就OK了。
如果需要更加细致的配置,比如只要求某个IP的机子才能访问,或者只能某个GET方法运行跨域。
# 允许跨域源

CORS_ORIGIN_ALLOW_ALL = True

CORS_ALLOW_CREDENTIALS = True

CORS_ORIGIN_WHITELIST = (

	'*'

)


# 允许的请求方式

CORS_ALLOW_METHODS = (

    'DELETE',

    'GET',

    'OPTIONS',

    'PATCH',

    'POST',

    'PUT',

    'VIEW',

)


# 允许的请求头

CORS_ALLOW_HEADERS = (

    'XMLHttpRequest',

    'X_FILENAME',

    'accept-encoding',

    'authorization',

    'content-type',

    'dnt',

    'origin',

    'user-agent',

    'x-csrftoken',

    'x-requested-with',

    'Pragma',

    # 额外允许的请求头

    'token',

)
就可以了 查看全部
然后react范围django api,会有跨域问题,所以需要额外配置一下。
网上很多教程都是基于最新的django4或者更新。
本文只针对django3 解决。
如果用的django3.10不然大概率是装不上的。
需要对应的版本的cors库:
pip install django-cors-headers==3.10.0
然后在setting里面配置这个
然后就OK了。
CORS_ORIGIN_ALLOW_ALL = True
INSTALLED_APPS = [
'corsheaders',
]
MIDDLEWARE = [
'corsheaders.middleware.CorsMiddleware',
]
如果需要更加细致的配置,比如只要求某个IP的机子才能访问,或者只能某个GET方法运行跨域。
# 允许跨域源
CORS_ORIGIN_ALLOW_ALL = True
CORS_ALLOW_CREDENTIALS = True
CORS_ORIGIN_WHITELIST = (
'*'
)
# 允许的请求方式
CORS_ALLOW_METHODS = (
'DELETE',
'GET',
'OPTIONS',
'PATCH',
'POST',
'PUT',
'VIEW',
)
# 允许的请求头
CORS_ALLOW_HEADERS = (
'XMLHttpRequest',
'X_FILENAME',
'accept-encoding',
'authorization',
'content-type',
'dnt',
'origin',
'user-agent',
'x-csrftoken',
'x-requested-with',
'Pragma',
# 额外允许的请求头
'token',
)
就可以了
python自动生成网站sitemap.xml 代码
李魔佛 发表了文章 • 0 个评论 • 2263 次浏览 • 2024-06-30 13:32
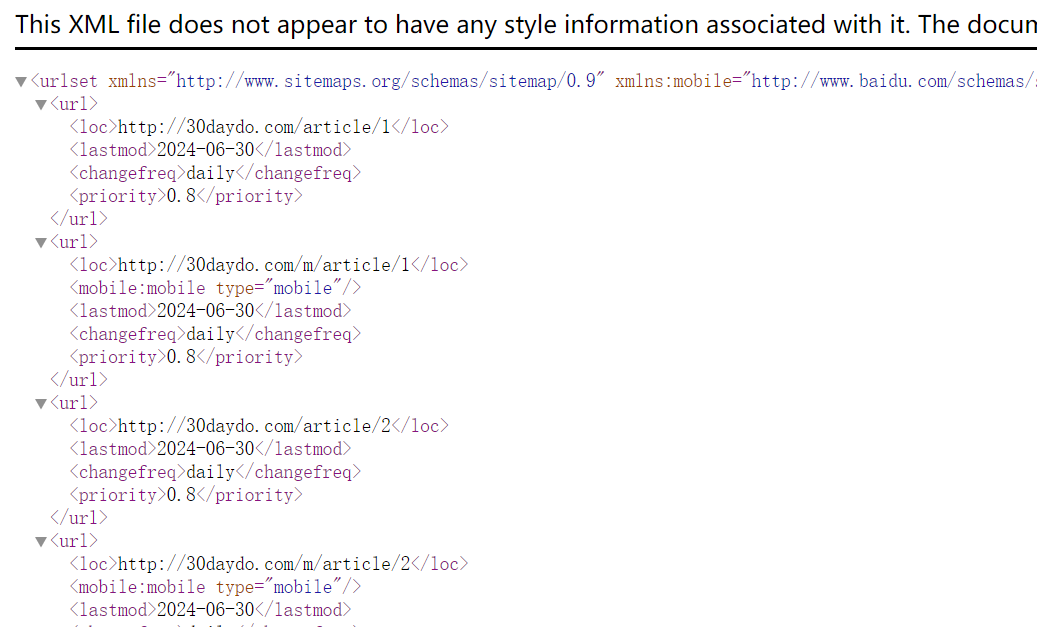
<urlset xmlns="http://www.sitemaps.org/schemas/sitemap/0.9" xmlns:mobile="http://www.baidu.com/schemas/s ... gt%3B

<url>

<loc>http://30daydo.com/article/1</loc>

<mobile:mobile type="mobile"/>

<lastmod>2024-06-30</lastmod>

<changefreq>daily</changefreq>

<priority>0.8</priority>

</url>

</urlset>
然后我们要做的就是拿到我们页面上所有的链接地址,填充到这里:
<url>

<loc>http://30daydo.com/article/1</loc>

<mobile:mobile type="mobile"/>

<lastmod>2024-06-30</lastmod>

<changefreq>daily</changefreq>

<priority>0.8</priority>

</url>
只需要替换上面的http://30daydo.com/article/1 地址就可以了。这个你跟你的完整url规律生成,或者从数据库读取就好了。
然后生成一个文件,自动复制到文章目录就可以了。
完整源码:
https://github.com/Rockyzsu/sitemap_generator
欢迎star,有问题留言。
查看全部
<urlset xmlns="http://www.sitemaps.org/schemas/sitemap/0.9" xmlns:mobile="http://www.baidu.com/schemas/s ... gt%3B
<url>
<loc>http://30daydo.com/article/1</loc>
<mobile:mobile type="mobile"/>
<lastmod>2024-06-30</lastmod>
<changefreq>daily</changefreq>
<priority>0.8</priority>
</url>
</urlset>
然后我们要做的就是拿到我们页面上所有的链接地址,填充到这里:
<url>
<loc>http://30daydo.com/article/1</loc>
<mobile:mobile type="mobile"/>
<lastmod>2024-06-30</lastmod>
<changefreq>daily</changefreq>
<priority>0.8</priority>
</url>
只需要替换上面的http://30daydo.com/article/1 地址就可以了。这个你跟你的完整url规律生成,或者从数据库读取就好了。
然后生成一个文件,自动复制到文章目录就可以了。
完整源码:
https://github.com/Rockyzsu/sitemap_generator
欢迎star,有问题留言。
python redis 是没有 blpush这个操作的
马化云 发表了文章 • 0 个评论 • 2098 次浏览 • 2024-05-22 09:29
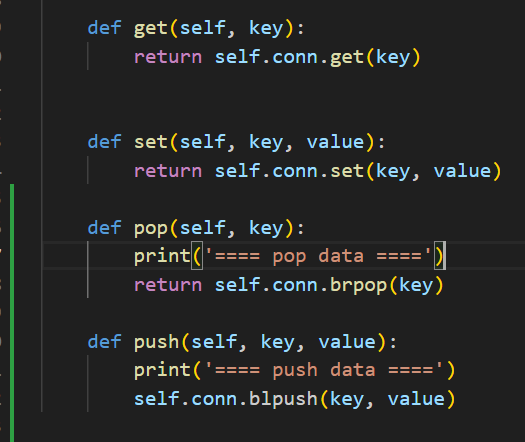
class RedisCls:


    def __init__(self):

        self.conn = self.getConn()


    def getConn(self):

        try:

            r = redis.Redis(host=redisconfig['redis']['host'], port=redisconfig['redis']['port'], db=0,

                            decode_responses=True, password=redisconfig['redis']['password'], socket_connect_timeout=5)

        except Exception as e:

            print(e)

            raise IOError('connect redis failed')

        else:

            return r


    def get(self, key):

        return self.conn.get(key)


    def set(self, key, value):

        return self.conn.set(key, value)


    def pop(self, key):

        print('==== pop data ====')

        return self.conn.brpop(key)


    def push(self, key, value):

        print('==== push data ====')

        self.conn.blpush(key, value)
报错:
AttributeError: 'Redis' object has no attribute 'blpush'. Did you mean: 'lpush'?
问题在于这一句:
self.conn.blpush(key, value)
python redis里面是没有blpush这个操作的。
也就是没有阻塞插入这个动作。 比如一个list满了,就阻塞插入数据,在python redis里面是没有这个操作。
你可以用llen 先判读一下长度,然后再决定是否插入就可以了。
查看全部
class RedisCls:
def __init__(self):
self.conn = self.getConn()
def getConn(self):
try:
r = redis.Redis(host=redisconfig['redis']['host'], port=redisconfig['redis']['port'], db=0,
decode_responses=True, password=redisconfig['redis']['password'], socket_connect_timeout=5)
except Exception as e:
print(e)
raise IOError('connect redis failed')
else:
return r
def get(self, key):
return self.conn.get(key)
def set(self, key, value):
return self.conn.set(key, value)
def pop(self, key):
print('==== pop data ====')
return self.conn.brpop(key)
def push(self, key, value):
print('==== push data ====')
self.conn.blpush(key, value)
报错:
AttributeError: 'Redis' object has no attribute 'blpush'. Did you mean: 'lpush'?
问题在于这一句:
self.conn.blpush(key, value)
python redis里面是没有blpush这个操作的。
也就是没有阻塞插入这个动作。 比如一个list满了,就阻塞插入数据,在python redis里面是没有这个操作。
你可以用llen 先判读一下长度,然后再决定是否插入就可以了。
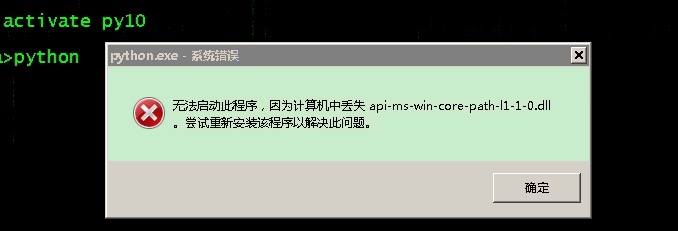
anaconda安装python报错 缺少:api-ms-win-core-path-l1-1-0.dll
马化云 发表了文章 • 0 个评论 • 3292 次浏览 • 2023-03-30 18:16
少了dll文件。
于是学网上(csdn)的方法进行修复,把缺的dll下载下来复制到system32的目录。
但是后面还是报错。
Python path configuration:

  PYTHONHOME = (not set)

  PYTHONPATH = (not set)

  program name = 'python'

  isolated = 0

  environment = 1

  user site = 1

  import site = 1

  sys._base_executable = '\u0158\x06'

  sys.base_prefix = '.'

  sys.base_exec_prefix = '.'

  sys.executable = '\u0158\x06'

  sys.prefix = '.'

  sys.exec_prefix = '.'

  sys.path = [

    'C:\\anaconda\\python38.zip',

    '.\\DLLs',

    '.\\lib',

    '',

  ]

Fatal Python error: init_fs_encoding: failed to get the Python codec of the filesystem encodin

Python runtime state: core initialized

ModuleNotFoundError: No module named 'encodings'


Current thread 0x000013a8 (most recent call first):
后面才发现,win7的机子只能安装python3.8以下的版本,高版本会报错。
查看全部
少了dll文件。
于是学网上(csdn)的方法进行修复,把缺的dll下载下来复制到system32的目录。
但是后面还是报错。
Python path configuration:
PYTHONHOME = (not set)
PYTHONPATH = (not set)
program name = 'python'
isolated = 0
environment = 1
user site = 1
import site = 1
sys._base_executable = '\u0158\x06'
sys.base_prefix = '.'
sys.base_exec_prefix = '.'
sys.executable = '\u0158\x06'
sys.prefix = '.'
sys.exec_prefix = '.'
sys.path = [
'C:\\anaconda\\python38.zip',
'.\\DLLs',
'.\\lib',
'',
]
Fatal Python error: init_fs_encoding: failed to get the Python codec of the filesystem encodin
Python runtime state: core initialized
ModuleNotFoundError: No module named 'encodings'
Current thread 0x000013a8 (most recent call first):
后面才发现,win7的机子只能安装python3.8以下的版本,高版本会报错。
linux下自制护眼,久坐提醒 python小程序
李魔佛 发表了文章 • 0 个评论 • 2447 次浏览 • 2023-03-09 16:23
保存为app.py
运行; python app.py
然后写到系统的crontab计划任务里面,每个40分钟执行几次,
屏幕会黑屏60s , 60可以自行设置。
挺好用的。import datetime as dt
import tkinter as tk
# Linux 护眼程序
sec = 60 # 休息时间 秒
root = tk.Tk()
root.config(bg='black')
root.wm_attributes('-topmost',1)
root.wm_attributes('-fullscreen',1)
L = tk.Label(root,font=('Consolas', 50), bg='black')
L.place(relx=0.5,rely=0.5,anchor=tk.CENTER)
# 改变的内容
msg = "{}\n 站起来 {} \n 动一动 {}\n{}"
now = dt.datetime.now()
aa = {0:'↑',1:'→',2:'↓',3:'←'}
bb = {0:'~~_↑_~~',1:'~_↑ ↑_~'}
for i in range(sec):
t = msg.format(sec-i,aa[i%4],bb[i%2],(now+dt.timedelta(seconds=i)).ctime())
c = 'Black' # 颜色可以搞随机换
root.after(i*1000,L.config,{'text':t,'fg':c})
root.after(sec*1000,root.destroy)
root.mainloop()
PS: AI生成的image还真心不错呢。 就是太吃显存了
查看全部
保存为app.py
运行; python app.py
然后写到系统的crontab计划任务里面,每个40分钟执行几次,
屏幕会黑屏60s , 60可以自行设置。
挺好用的。
import datetime as dt

import tkinter as tk

# Linux 护眼程序

sec = 60 # 休息时间 秒


root = tk.Tk()

root.config(bg='black')

root.wm_attributes('-topmost',1)

root.wm_attributes('-fullscreen',1)

L = tk.Label(root,font=('Consolas', 50), bg='black')

L.place(relx=0.5,rely=0.5,anchor=tk.CENTER)


# 改变的内容

msg = "{}\n 站起来 {} \n 动一动 {}\n{}"

now = dt.datetime.now()

aa = {0:'↑',1:'→',2:'↓',3:'←'}

bb = {0:'~~_↑_~~',1:'~_↑ ↑_~'}


for i in range(sec):

    t = msg.format(sec-i,aa[i%4],bb[i%2],(now+dt.timedelta(seconds=i)).ctime())

    c = 'Black' # 颜色可以搞随机换

    root.after(i*1000,L.config,{'text':t,'fg':c})

    root.after(sec*1000,root.destroy)


root.mainloop()
PS: AI生成的image还真心不错呢。 就是太吃显存了
pycharm 最新版2022.03 无法使用ida-eval-resetter 插件重置试用日期
马化云 发表了文章 • 0 个评论 • 3992 次浏览 • 2022-12-17 14:10
0x5. 新试用机制
最新的IDE试用需要登录,我们可以任选以下方式中的一种来继续使用重置插件:
使用网络上热心大佬收集总结的key,进入IDE后使用重置插件。
登录账号试用IDE,安装设置好本插件,退出登录账号重启IDE即可。
先安装旧版本IDE,安装设置好本插件,升级IDE到最新版本即可。
不管哪种方法原理都是为了让你进入IDE,以便重置插件接管试用。
2021.3已经彻底不支持离线试用,本重置插件已失效。可以考虑暂缓升级至2021.3!
如果要使用重置日期插件,那么得要把你的pycharm降级到2021.3版本或者以下。
查看全部
python父类如何判断子类时候实现了某个方法或者属性赋值
李魔佛 发表了文章 • 0 个评论 • 2469 次浏览 • 2022-12-04 10:47
看看下面的例子 class Parent:
def __init__(self):
self.name='parent'
self.age=10
def run(self):
if hasattr(self,'get_salary'):
print('has func')
print(self.get_salary())
class Child(Parent):
def __init__(self):
# self.name='child'
Parent.__init__(self)
self.salary=100
def get_salary(self):
return self.salary
obj = Child()
obj.run()
obj.run调用的是parent里面的方法。
而parent的run里面调用一个hasattr, 来判断self 是否有get_salary这个函数。
因为self是从子类传进去的,所以self实际是 child的实例。
因为child里面是有get_salary方法(属性)的,所以hasatrr 是返回true, 然后调用子类的self.get_salary
从而程序没有报错。打印正确的返回数据
查看全部
看看下面的例子
 class Parent:


        def __init__(self):

            self.name='parent'

            self.age=10


        def run(self):

            if hasattr(self,'get_salary'):

                print('has func')

                print(self.get_salary())


class Child(Parent):


    def __init__(self):

        # self.name='child'

        Parent.__init__(self)

        self.salary=100


    def get_salary(self):

        return self.salary


obj = Child()

obj.run()
obj.run调用的是parent里面的方法。
而parent的run里面调用一个hasattr, 来判断self 是否有get_salary这个函数。
因为self是从子类传进去的,所以self实际是 child的实例。
因为child里面是有get_salary方法(属性)的,所以hasatrr 是返回true, 然后调用子类的self.get_salary
从而程序没有报错。打印正确的返回数据
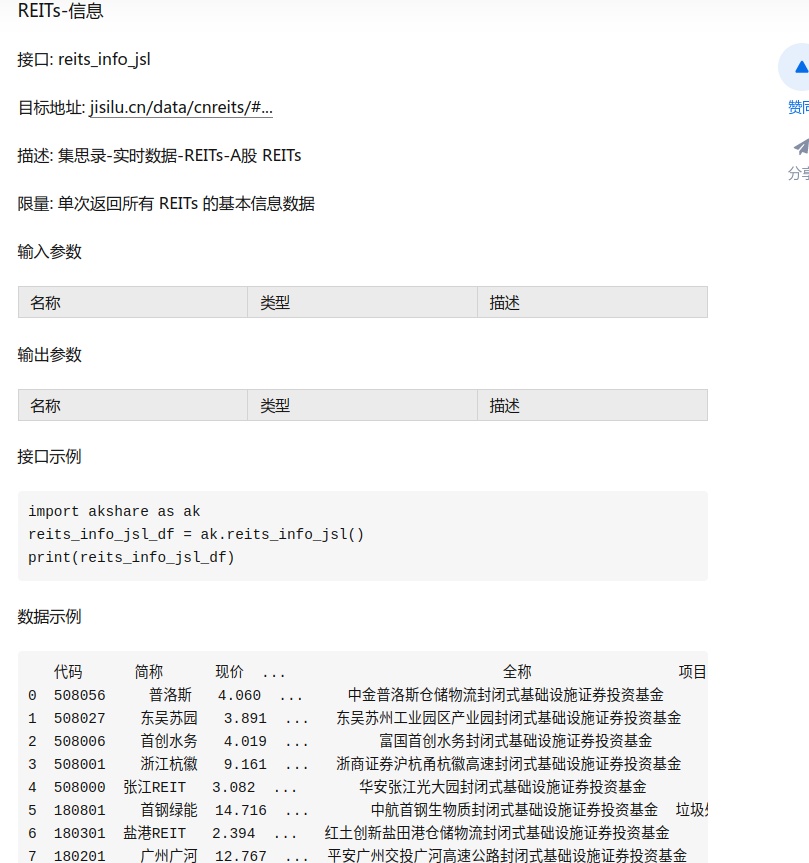
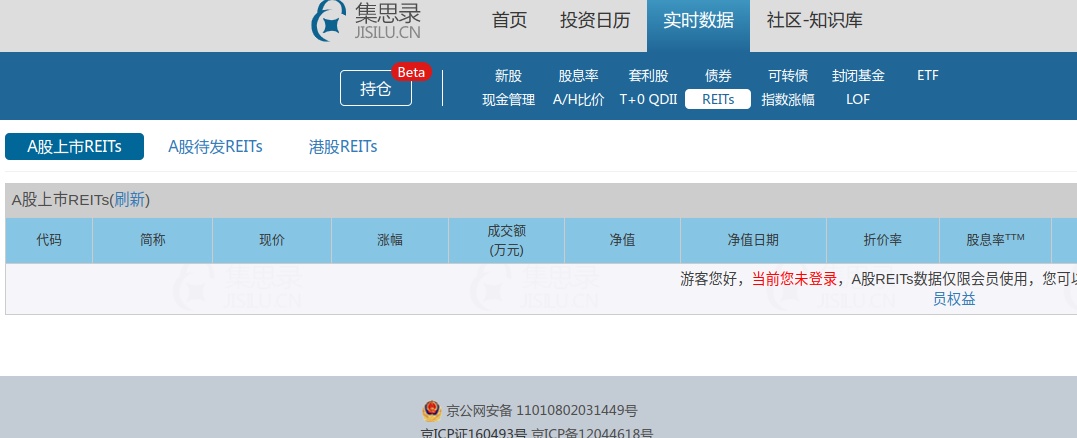
akshare获取reits数据,搞笑,数据源测试过没有呀,没有集思录会员还没获取?
python爬虫 • 李魔佛 发表了文章 • 0 个评论 • 2812 次浏览 • 2022-11-07 21:52
限量: 单次返回所有 REITs 的基本信息数据
估计是旧的,以前游客就可以获取到数据的了。现在就不行了。
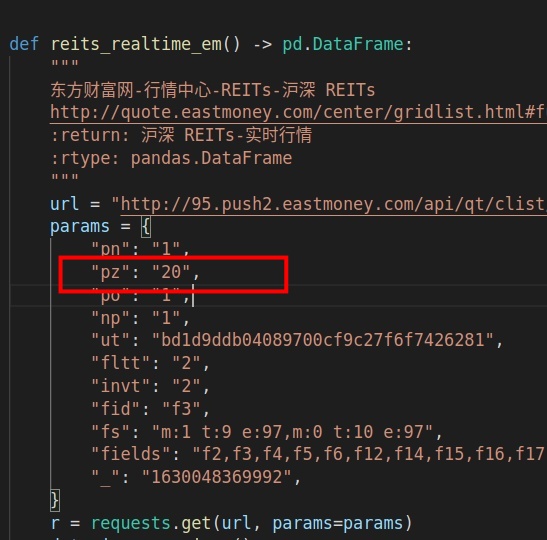
然后另外一个获取东财的函数,获取了20个就完事了。
结果人间现在超过20家,获取的数据都不全的。
akshare,用的还是有点糟心。长期来看,还是自己写靠谱,有些坑,你第一次用就可以发现,但是有些坑,却是埋在那里,像个定时炸弹。
akshare的代码:
查看全部
国庆节 微信头像红旗 制作 附 python代码 和 红旗素材
马化云 发表了文章 • 0 个评论 • 3576 次浏览 • 2022-09-23 10:31
给自己制作国旗头像,是一件很有意义的事。微信官方就曾经举办过活动。
制作国旗头像的方法有很多,本文给大家介绍用Python制作渐变的微信国旗头像。
渐变的国旗头像效果非常好看。
制作方式也很简单,下面介绍实现方法,可以复制本文的代码,制作属于自己的国旗头像。
1.准备国旗图片
声明:严禁非法使用国旗图片。在国旗图片下载页面下方有《国旗法》等相关规定。
本文使用1024像素的图片。
2.准备头像图片
登录自己的微信,打开个人信息,点击头像,点击右上角的三个点,将图片保存到手机,
然后将图片传到电脑上。
为了不失一般性,本文使用的图片是我从网络上获取的一张600*600像素的头像图片。
准备好后,将国旗图片和头像图片拷贝到代码同一个目录下。
代码实现
先安装Python中用于处理图片的pillow库。
pip install pillow
安装完成后,使用pillow库来制作国旗头像。
只需要十几行代码就能实现。完整代码如下。
# coding=utf-8

from PIL import Image

import math


key = 3.2# 修改key值可以调整国旗的范围,推荐2~4之间的数字,支持小数

motherland_flag = Image.open('flag-1024.png')

head_picture = Image.open('mmexport1663893338571.png')

# 截图国旗上的五颗五角星

flag_width, flag_height = motherland_flag.size

crop_flag = motherland_flag.crop((66, 0, flag_height+66, flag_height))

# 将国旗截图处理成颜色渐变

for i in range(flag_height):

    for j in range(flag_height):

            color = crop_flag.getpixel((i, j))

            distance = int(math.sqrt(i*i + j*j))

            alpha = 255 - int(distance//key)

            new_color = (*color[0:-1], alpha if alpha > 0 else 0)

            crop_flag.putpixel((i, j), new_color)

# 修改渐变图片的尺寸,适应头像大小,粘贴到头像上

new_crop_flag = crop_flag.resize(head_picture.size)

head_picture.paste(new_crop_flag, (0, 0), new_crop_flag)

# 保存自己的国旗头像

head_picture.save('国旗头像.png')
到此为止,已经制作好了国旗头像了。
下面是代码的详细结束:
代码介绍:代码介绍:
导入需要使用的Python库,pillow库用于对图片进行截取、大小修改、粘贴等处理。math库用于计算像素点的距离。
使用Image.open()方法,读取准备好的国旗图片和头像图片到代码中。
对国旗图片进行截取,获取一张正方形的图片,截取时调整截取位置,保证5颗五角星完整展示在截图中。
crop()方法中传入的是一个(left, upper, right, lower)的元组,分别是截图的左、上、右、下像素位置。
将正方形国旗截图设置成透明度渐变的图片。国旗图片的模式默认是RGBA,本文需要的刚好是RGBA(red,green,blue,alpha)模式的图片,RGBA模式的图片颜色值是一个长度为4的元组,我们修改不同像素点的A值即可将图片设置成渐变。
本文是以国旗左上角为圆心,离圆心越远的像素点A值越小,像素点越透明。使用getpixel()和putpixel()两个方法来获取和重设像素点的颜色值,使用math.sqrt()计算像素点距离。
将渐变图片的大小转换成和头像的大小一样,然后粘贴到图片顶层。使用resize()方法重设图片大小,使用paste()方法粘贴图片。
保存图片,此时的微信头像图片上已经粘贴了透明渐变的国旗图片,微信国旗头像制作完成。
本文介绍了用Python制作微信国旗头像的方法。在本文的代码中,以左上角为圆心,离圆心越远越透明,可以修改key值,调整国旗透明变化的范围。
如果需要制作其他渐变类型,如以右上角为圆心逐渐透明、从左侧向右侧逐渐透明、从上到下逐渐透明等,可以修改国旗渐变部分的代码、翻转图片等。
查看全部
给自己制作国旗头像,是一件很有意义的事。微信官方就曾经举办过活动。
制作国旗头像的方法有很多,本文给大家介绍用Python制作渐变的微信国旗头像。
渐变的国旗头像效果非常好看。
制作方式也很简单,下面介绍实现方法,可以复制本文的代码,制作属于自己的国旗头像。
1.准备国旗图片
声明:严禁非法使用国旗图片。在国旗图片下载页面下方有《国旗法》等相关规定。
本文使用1024像素的图片。
2.准备头像图片
登录自己的微信,打开个人信息,点击头像,点击右上角的三个点,将图片保存到手机,
然后将图片传到电脑上。
为了不失一般性,本文使用的图片是我从网络上获取的一张600*600像素的头像图片。
准备好后,将国旗图片和头像图片拷贝到代码同一个目录下。
代码实现
先安装Python中用于处理图片的pillow库。
pip install pillow
安装完成后,使用pillow库来制作国旗头像。
只需要十几行代码就能实现。完整代码如下。
# coding=utf-8
from PIL import Image
import math
key = 3.2# 修改key值可以调整国旗的范围,推荐2~4之间的数字,支持小数
motherland_flag = Image.open('flag-1024.png')
head_picture = Image.open('mmexport1663893338571.png')
# 截图国旗上的五颗五角星
flag_width, flag_height = motherland_flag.size
crop_flag = motherland_flag.crop((66, 0, flag_height+66, flag_height))
# 将国旗截图处理成颜色渐变
for i in range(flag_height):
for j in range(flag_height):
color = crop_flag.getpixel((i, j))
distance = int(math.sqrt(i*i + j*j))
alpha = 255 - int(distance//key)
new_color = (*color[0:-1], alpha if alpha > 0 else 0)
crop_flag.putpixel((i, j), new_color)
# 修改渐变图片的尺寸,适应头像大小,粘贴到头像上
new_crop_flag = crop_flag.resize(head_picture.size)
head_picture.paste(new_crop_flag, (0, 0), new_crop_flag)
# 保存自己的国旗头像
head_picture.save('国旗头像.png')
到此为止,已经制作好了国旗头像了。
下面是代码的详细结束:
代码介绍:
代码介绍:


导入需要使用的Python库,pillow库用于对图片进行截取、大小修改、粘贴等处理。math库用于计算像素点的距离。


使用Image.open()方法,读取准备好的国旗图片和头像图片到代码中。


对国旗图片进行截取,获取一张正方形的图片,截取时调整截取位置,保证5颗五角星完整展示在截图中。


crop()方法中传入的是一个(left, upper, right, lower)的元组,分别是截图的左、上、右、下像素位置。

将正方形国旗截图设置成透明度渐变的图片。国旗图片的模式默认是RGBA,本文需要的刚好是RGBA(red,green,blue,alpha)模式的图片,RGBA模式的图片颜色值是一个长度为4的元组,我们修改不同像素点的A值即可将图片设置成渐变。


本文是以国旗左上角为圆心,离圆心越远的像素点A值越小,像素点越透明。使用getpixel()和putpixel()两个方法来获取和重设像素点的颜色值,使用math.sqrt()计算像素点距离。


将渐变图片的大小转换成和头像的大小一样,然后粘贴到图片顶层。使用resize()方法重设图片大小,使用paste()方法粘贴图片。


保存图片,此时的微信头像图片上已经粘贴了透明渐变的国旗图片,微信国旗头像制作完成。
本文介绍了用Python制作微信国旗头像的方法。在本文的代码中,以左上角为圆心,离圆心越远越透明,可以修改key值,调整国旗透明变化的范围。
如果需要制作其他渐变类型,如以右上角为圆心逐渐透明、从左侧向右侧逐渐透明、从上到下逐渐透明等,可以修改国旗渐变部分的代码、翻转图片等。
ciso8601 性能对比 datetime 默认库
李魔佛 发表了文章 • 0 个评论 • 2336 次浏览 • 2022-07-22 12:04
In [2]: ds = u'2014-01-09T21:48:00.921000'
In [3]: %timeit ciso8601.parse_datetime(ds)
1000000 loops, best of 3: 204 ns per loop
In [4]: %timeit datetime.datetime.strptime(ds, "%Y-%m-%dT%H:%M:%S.%f")
100000 loops, best of 3: 15 µs per loop
In [5]: %timeit dateutil.parser.parse(ds)
10000 loops, best of 3: 122 µs per loop
In [6]: %timeit aniso8601.parse_datetime(ds)
10000 loops, best of 3: 28.9 µs per loop
In [7]: %timeit iso8601.parse_date(ds)
10000 loops, best of 3: 42 µs per loop
In [8]: %timeit isodate.parse_datetime(ds)
10000 loops, best of 3: 69.4 µs per loop
In [9]: %timeit arrow.get(ds).datetime
10000 loops, best of 3: 87 µs per loopIn [1]: import datetime, aniso8601, iso8601, isodate, dateutil.parser, arrow, ciso8601
In [2]: ds = u'2014-01-09T21:48:00.921000+05:30'
In [3]: %timeit ciso8601.parse_datetime(ds)
1000000 loops, best of 3: 525 ns per loop
In [4]: %timeit dateutil.parser.parse(ds)
10000 loops, best of 3: 162 µs per loop
In [5]: %timeit aniso8601.parse_datetime(ds)
10000 loops, best of 3: 36.8 µs per loop
In [6]: %timeit iso8601.parse_date(ds)
10000 loops, best of 3: 53.5 µs per loop
In [7]: %timeit isodate.parse_datetime(ds)
10000 loops, best of 3: 82.6 µs per loop
In [8]: %timeit arrow.get(ds).datetime
10000 loops, best of 3: 104 µs per loop
Even with time zone information, ciso8601 is 70x as fast as aniso8601.
Tested on Python 2.7.10 on macOS 10.12.6 using the following modules:
ciso8601 是纳秒级别的,如果要对上千万的数据操作,建议使用ciso这个C库。
查看全部
In [1]: import datetime, aniso8601, iso8601, isodate, dateutil.parser, arrow, ciso8601


In [2]: ds = u'2014-01-09T21:48:00.921000'


In [3]: %timeit ciso8601.parse_datetime(ds)

1000000 loops, best of 3: 204 ns per loop


In [4]: %timeit datetime.datetime.strptime(ds, "%Y-%m-%dT%H:%M:%S.%f")

100000 loops, best of 3: 15 µs per loop


In [5]: %timeit dateutil.parser.parse(ds)

10000 loops, best of 3: 122 µs per loop


In [6]: %timeit aniso8601.parse_datetime(ds)

10000 loops, best of 3: 28.9 µs per loop


In [7]: %timeit iso8601.parse_date(ds)

10000 loops, best of 3: 42 µs per loop


In [8]: %timeit isodate.parse_datetime(ds)

10000 loops, best of 3: 69.4 µs per loop


In [9]: %timeit arrow.get(ds).datetime

10000 loops, best of 3: 87 µs per loop
In [1]: import datetime, aniso8601, iso8601, isodate, dateutil.parser, arrow, ciso8601


In [2]: ds = u'2014-01-09T21:48:00.921000+05:30'


In [3]: %timeit ciso8601.parse_datetime(ds)

1000000 loops, best of 3: 525 ns per loop


In [4]: %timeit dateutil.parser.parse(ds)

10000 loops, best of 3: 162 µs per loop


In [5]: %timeit aniso8601.parse_datetime(ds)

10000 loops, best of 3: 36.8 µs per loop


In [6]: %timeit iso8601.parse_date(ds)

10000 loops, best of 3: 53.5 µs per loop


In [7]: %timeit isodate.parse_datetime(ds)

10000 loops, best of 3: 82.6 µs per loop


In [8]: %timeit arrow.get(ds).datetime

10000 loops, best of 3: 104 µs per loop
Even with time zone information, ciso8601 is 70x as fast as aniso8601.
Tested on Python 2.7.10 on macOS 10.12.6 using the following modules:
ciso8601 是纳秒级别的,如果要对上千万的数据操作,建议使用ciso这个C库。
python的 influxdb-client 和 influxdb这两个库有什么区别?
回复李魔佛 回复了问题 • 1 人关注 • 1 个回复 • 4041 次浏览 • 2022-07-20 23:48
python sqlite3 多线程 批量写入 【代码】
李魔佛 发表了文章 • 0 个评论 • 4117 次浏览 • 2022-07-09 18:55
2. 在多线程里面批量插入数据
几个关注点:
sqlite3.connect(_type, check_same_thread=False) 要设置为False
批量写的时候,记得要加锁
import datetime

import random

import sqlite3

import threading

import logging as log

import time


lock = threading.Lock()

class SQLiteDBCls:


    def __init__(self, cache=True):

        _type = ":memory:"


        self.db = sqlite3.connect(_type, check_same_thread=False)


        self.table_name = 'tick_data'


    def create_index(self):


        cmd = 'CREATE INDEX code_ix ON {} (current)'.format(self.table_name)

        with lock:

            try:


                cursor = self.db.cursor()

                cursor.execute(cmd)

            except Exception as e:

                log.info(e)

                self.db.rollback()

            else:

                self.db.commit()


    def create_table(self):

        # cursor = self.db.cursor()

        cmd = 'create table if not exists {} (id INTEGER PRIMARY KEY AUTOINCREMENT,code text,open double,current time)'.format(

            self.table_name)

        with lock:

            try:

                cursor = self.db.cursor()

                cursor.execute(cmd)

            except Exception as e:

                log.info(e)

                self.db.rollback()

            else:

                self.db.commit()


    def add(self, code, price, t):

        cmd = 'insert into {} (code,open,current) values (?,?,?);'.format(self.table_name)

        with lock:

            try:

                cursor = self.db.cursor()

                cursor.execute(cmd, (code, price, t))

            except Exception as e:

                log.info(e)

                self.db.rollback()

            else:

                self.db.commit()


    def batch_add(self, data):


        # 批量加入

        print('===========',threading.current_thread().getName())

        # log.info(threading.current_thread().getName())

        cmd = 'insert into {} (code,open,current) values (?,?,?)'.format(self.table_name)

        with lock:

            try:

                cursor = self.db.cursor()

                cursor.executemany(cmd, data)

            except Exception as e:

                log.info(e)

                self.db.rollback()

            else:

                self.db.commit()


    def result(self):

        cmd = 'select count(*) from `{}`'.format(self.table_name)


        with lock:


            try:

                cursor = self.db.cursor()

                cursor.execute(cmd)

            except Exception as e:

                log.info(e)

                self.db.rollback()

            else:

                return cursor.fetchone()


def data_gen():

    minute = 6000

    code = ['123011.SS','110010.SS','112111.SS']

    for i in range(minute):

        current = (datetime.datetime.now()+datetime.timedelta(minutes=i)).strftime('%H:%M:%D')

        data_list =

        for c in code:

            price = 5+random.random()+120

            data = (c,price,current)

            data_list.append(data)

        yield data_list

        # time.sleep(0.5)


app = SQLiteDBCls(cache=True)

app.create_table()

app.create_index()


def data_validation():

    print(app.result())

    app.sync_up()


def multithread_mode():

    total_count = 0

    thread_list =

    for d in data_gen():

        print(d)

        total_count+=len(d)

        # app.batch_add(d)

        t=threading.Thread(target=app.batch_add,args=(d,))

        thread_list.append(t)

    for t in thread_list:

        t.start()


    for t in thread_list:

        t.join()


    print(total_count)


if __name__=='__main__':

    multithread_mode()

    data_validation()
假如不加锁会出错:
File "/home/xda/miniconda3/envs/cpy/lib/python3.9/threading.py", line 910, in run

    self._target(*self._args, **self._kwargs)

  File "/home/xda/github/stock_strategy/sqlite_issue_debug.py", line 77, in batch_add

    self.db.commit()

Exception in thread Thread-3824:

Exception in thread Thread-3826:

Traceback (most recent call last):

  File "/home/xda/miniconda3/envs/cpy/lib/python3.9/threading.py", line 973, in _bootstrap_inner

sqlite3.OperationalError: cannot commit - no transaction is activeTraceback (most recent call last):

  File "/home/xda/github/stock_strategy/sqlite_issue_debug.py", line 72, in batch_add


    cursor.executemany(cmd, data)

sqlite3.InterfaceError: Error binding parameter 0 - probably unsupported type.
查看全部
2. 在多线程里面批量插入数据
几个关注点:
sqlite3.connect(_type, check_same_thread=False) 要设置为False
批量写的时候,记得要加锁
import datetime
import random
import sqlite3
import threading
import logging as log
import time
lock = threading.Lock()
class SQLiteDBCls:
def __init__(self, cache=True):
_type = ":memory:"
self.db = sqlite3.connect(_type, check_same_thread=False)
self.table_name = 'tick_data'
def create_index(self):
cmd = 'CREATE INDEX code_ix ON {} (current)'.format(self.table_name)
with lock:
try:
cursor = self.db.cursor()
cursor.execute(cmd)
except Exception as e:
log.info(e)
self.db.rollback()
else:
self.db.commit()
def create_table(self):
# cursor = self.db.cursor()
cmd = 'create table if not exists {} (id INTEGER PRIMARY KEY AUTOINCREMENT,code text,open double,current time)'.format(
self.table_name)
with lock:
try:
cursor = self.db.cursor()
cursor.execute(cmd)
except Exception as e:
log.info(e)
self.db.rollback()
else:
self.db.commit()
def add(self, code, price, t):
cmd = 'insert into {} (code,open,current) values (?,?,?);'.format(self.table_name)
with lock:
try:
cursor = self.db.cursor()
cursor.execute(cmd, (code, price, t))
except Exception as e:
log.info(e)
self.db.rollback()
else:
self.db.commit()
def batch_add(self, data):
# 批量加入
print('===========',threading.current_thread().getName())
# log.info(threading.current_thread().getName())
cmd = 'insert into {} (code,open,current) values (?,?,?)'.format(self.table_name)
with lock:
try:
cursor = self.db.cursor()
cursor.executemany(cmd, data)
except Exception as e:
log.info(e)
self.db.rollback()
else:
self.db.commit()
def result(self):
cmd = 'select count(*) from `{}`'.format(self.table_name)
with lock:
try:
cursor = self.db.cursor()
cursor.execute(cmd)
except Exception as e:
log.info(e)
self.db.rollback()
else:
return cursor.fetchone()
def data_gen():
minute = 6000
code = ['123011.SS','110010.SS','112111.SS']
for i in range(minute):
current = (datetime.datetime.now()+datetime.timedelta(minutes=i)).strftime('%H:%M:%D')
data_list =
for c in code:
price = 5+random.random()+120
data = (c,price,current)
data_list.append(data)
yield data_list
# time.sleep(0.5)
app = SQLiteDBCls(cache=True)
app.create_table()
app.create_index()
def data_validation():
print(app.result())
app.sync_up()
def multithread_mode():
total_count = 0
thread_list =
for d in data_gen():
print(d)
total_count+=len(d)
# app.batch_add(d)
t=threading.Thread(target=app.batch_add,args=(d,))
thread_list.append(t)
for t in thread_list:
t.start()
for t in thread_list:
t.join()
print(total_count)
if __name__=='__main__':
multithread_mode()
data_validation()
假如不加锁会出错:
File "/home/xda/miniconda3/envs/cpy/lib/python3.9/threading.py", line 910, in run
self._target(*self._args, **self._kwargs)
File "/home/xda/github/stock_strategy/sqlite_issue_debug.py", line 77, in batch_add
self.db.commit()
Exception in thread Thread-3824:
Exception in thread Thread-3826:
Traceback (most recent call last):
File "/home/xda/miniconda3/envs/cpy/lib/python3.9/threading.py", line 973, in _bootstrap_inner
sqlite3.OperationalError: cannot commit - no transaction is activeTraceback (most recent call last):
File "/home/xda/github/stock_strategy/sqlite_issue_debug.py", line 72, in batch_add
cursor.executemany(cmd, data)
sqlite3.InterfaceError: Error binding parameter 0 - probably unsupported type.
控制pymysql的链接超时
李魔佛 发表了文章 • 0 个评论 • 2746 次浏览 • 2022-06-14 23:39
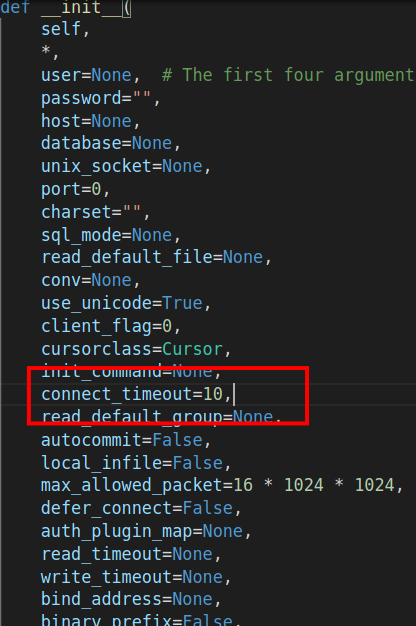
conn = pymysql.connect(host=host, port=port, user=user, password=password, db=db, charset='utf8',timeout=3)
结果运行的时候直接报错的。好家伙。
难道都是东家抄西家,西家抄东家?
直接点进去源码:
这里直接有一个connect_timeout 的参数,这个才是最新的常数名。 查看全部
python安装demjson报错:error in setup command: use_2to3 is invalid.
李魔佛 发表了文章 • 0 个评论 • 3671 次浏览 • 2022-06-06 19:23
随便整一个
pip install setuptools==57.5.0
原因:在setuptools 58之后的版本已经废弃了use_2to3所以安装一个旧版本的setuptools就可以了
随便整一个
pip install setuptools==57.5.0
星球文章 获取所有文章 爬虫
python爬虫 • 李魔佛 发表了文章 • 0 个评论 • 3115 次浏览 • 2022-06-03 13:49
群里没有人没有吐槽过这个搜索功能的。
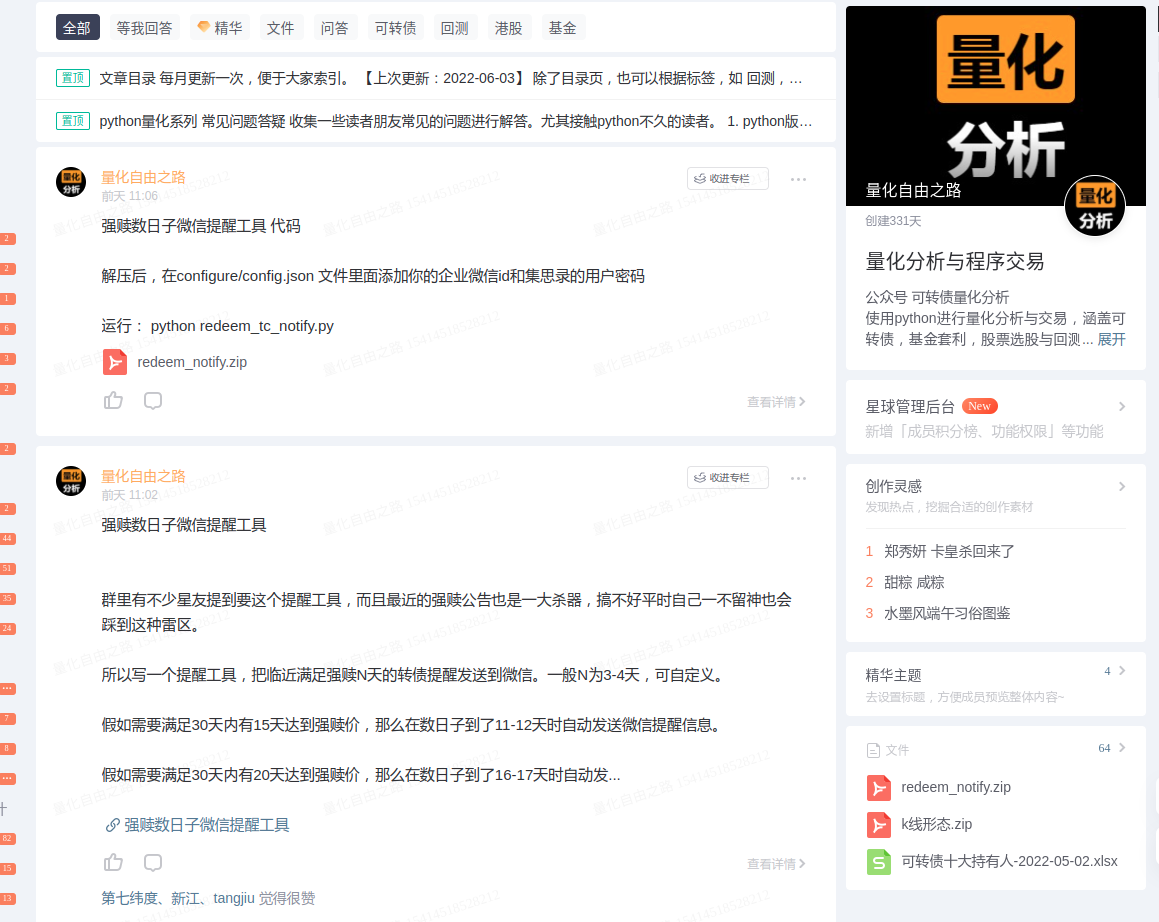
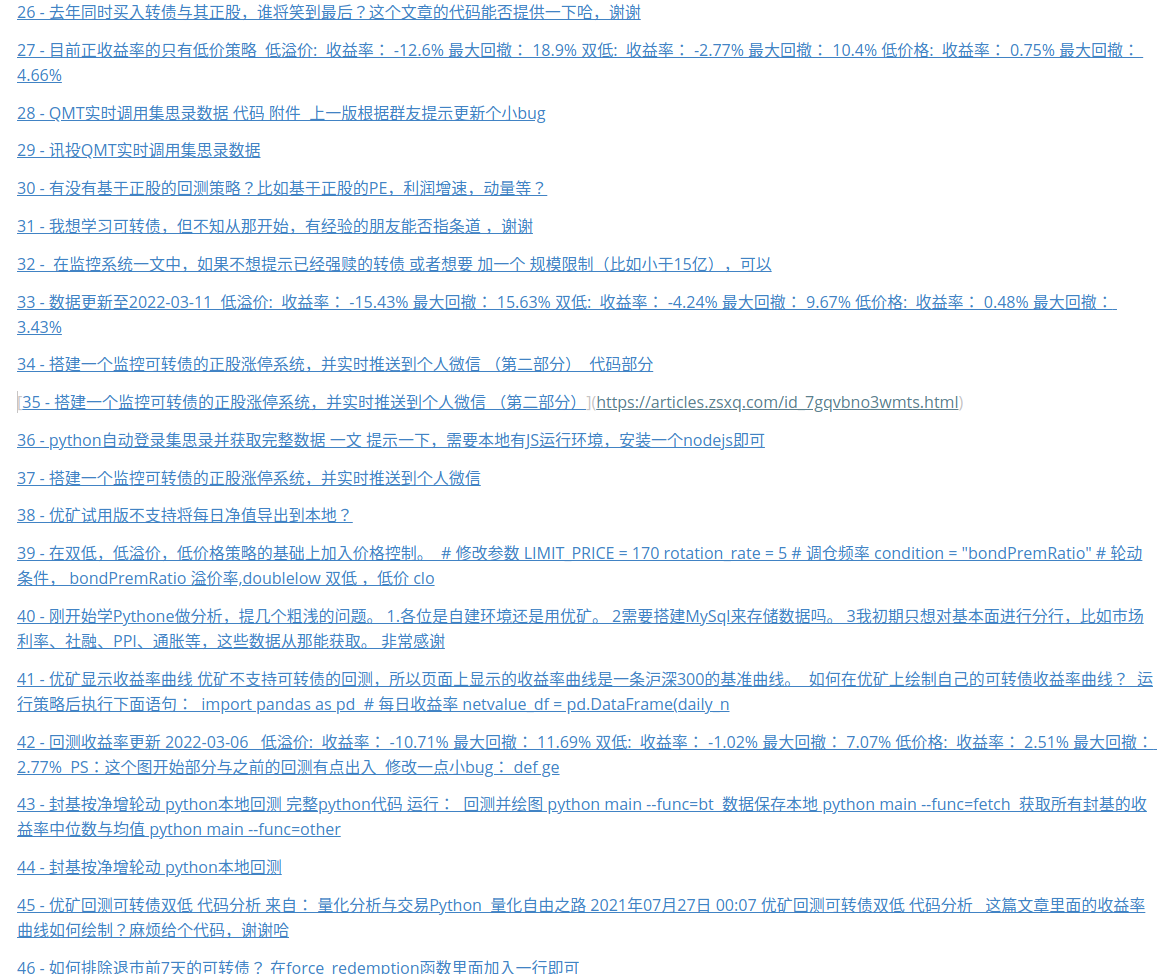
所以只好自己写个程序把自己的文章抓下来,作为文章目录:
生成的markdown文件
每次只需要运行python main.py 就可以拿到最新的星球文章链接了。
需要源码可以在公众号联系~
查看全部
python seo 小工具 查询百度权重,备案信息
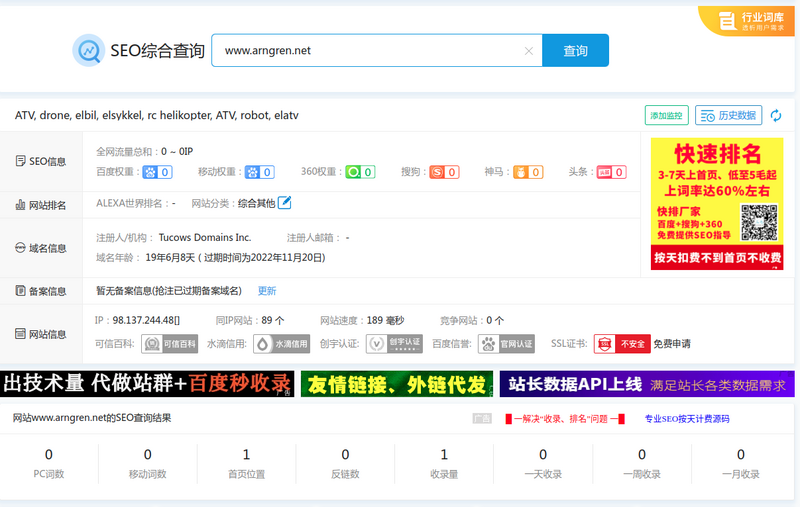
李魔佛 发表了文章 • 0 个评论 • 2501 次浏览 • 2022-05-28 14:29
还有百度的收录情况:
对于经常操作的朋友,需要使用程序查询,还可以批量查询,并保存到excel或者数据库。
上图为入库到mongodb的数据
源码实现:
main.py 入口函数:from baidu_collection import baidu_site_collect
from seo_info import crawl_info
from configure.settings import DBSelector
import datetime
import argparse
client = DBSelector().mongo('qq')
doc = client['db_parker']['seo']
def main():
parser = argparse.ArgumentParser()
'''
Command line options
'''
parser.add_argument(
'-n',
'--name', type=str,
help='input web domain'
)
parser.add_argument(
'-f',
'--file', type=str,
help='input web site domain file name'
)
FLAGS = parser.parse_args()
site_list=
if FLAGS.name:
print(FLAGS.name)
if '.' in FLAGS.name:
site_list.append(FLAGS.name)
elif FLAGS.file:
print(FLAGS.file)
with open(FLAGS.file,'r') as fp:
webs=fp.readlines()
site_list.extend(list(map(lambda x:x.strip(),webs)))
if site_list:
run(site_list=site_list)
else:
print("please input correct web domain")
def run(site_list):
# TODO: 改为命令行形式
for site in site_list:
count = baidu_site_collect(site)
info = crawl_info(site)
print(info)
print(count)
info['site'] = site
info['baidu_count'] = count
info['update_time'] = datetime.datetime.now()
doc.insert_one(info)
if __name__ == '__main__':
main()
其他具体实现的文件:
baidu_collection.py from parsel import Selector
import requests
def baidu_site_collect(site):
# 百度收录
headers = {'User-Agent': 'Chrome Google FireFox IE'}
url = 'https://www.baidu.com/s?wd=site:{}&rsv_spt=1&rsv_iqid=0xf8b7b7e50006c034&issp=1&f=8&rsv_bp=1&rsv_idx=2&ie=utf-8&tn=baiduhome_pg&rsv_enter=0&rsv_dl=ib&rsv_sug3=14&rsv_sug1=7&rsv_sug7=100&rsv_n=2&rsv_btype=i&inputT=8238&rsv_sug4=8238'.format(site)
resp = requests.get(
url=url,
headers=headers
)
resp.encoding='utf8'
html = resp.text
selector = Selector(text=html)
count = selector.xpath('//div[@class="op_site_domain c-row"]/div/p/span/b/text()').extract_first()
if count:
count=int(count.replace(',',''))
return count
if __name__=='__main__':
site='30daydo.com'
print(baidu_site_collect(site))
seo_info.pyimport argparse
from atexit import register
import sys
import requests
import re
from parsel import Selector
#参数自定义
# parser = argparse.ArgumentParser()
# parser.add_argument('-r', dest='read', help='path file')
# parser.add_argument('-u',dest='read',help='targetdomain')
# parser_args = parser.parse_args()
#爬虫模块查询
VERBOSE = True
def askurl(target_url):
headers = {
'User-Agent': 'Mozilla/5.0 (Macintosh; Intel Mac OS X 10_15_7) AppleWebKit/537.36 (KHTML, like Gecko) Chrome/91.0.4472.106 Safari/537.36'
}
#baidu权重
baidu_url=f"https://rank.chinaz.com/{target_url}"
baidu_txt=requests.get(url=baidu_url,headers=headers)
baidu_html=baidu_txt.content.decode('utf-8')
baidu_PC=re.findall('PC端</i><img src="//csstools.chinaz.com/tools/images/rankicons/baidu(.*?).png"></a></li>',baidu_html,re.S)
baidu_moblie=re.findall('移动端</i><img src="//csstools.chinaz.com/tools/images/rankicons/bd(.*?).png"></a></li>',baidu_html,re.S)
#分割线
print("*"*60)
#如果查询html中有正则出来到权重关键字就输出,否则将不输出
result={}
baidu_pc_weight = None
baidu_mobile_weight = None
if len(baidu_PC) > 0:
print('百度_PC:', baidu_PC[0])
baidu_pc_weight=baidu_PC[0]
if len(baidu_moblie) > 0:
print('百度_moblie:', baidu_moblie[0])
baidu_mobile_weight = baidu_moblie[0]
else:
print("百度无权重")
result['baidu_pc_weight']=baidu_pc_weight
result['baidu_mobile_weight']=baidu_mobile_weight
#360权重
url=f"https://rank.chinaz.com/sorank/{target_url}/"
text = requests.get(url=url,headers=headers)
html=text.content.decode('utf-8')
sorank360_PC=re.findall('PC端</i><img src="//csstools.chinaz.com/tools/images/rankicons/360(.*?).png"></a><',html,re.S)
sorank360_Mobile=re.findall('移动端</i><img src="//csstools.chinaz.com/tools/images/rankicons/360(.*?).png"',html,re.S)
_360_pc_weight=None
_360_mobile_weight=None
# 如果查询html中有正则出来到权重关键字就输出,否则将不输出
if len(sorank360_PC) > 0:
_360_pc_weight=sorank360_PC[0]
print("360_PC:", sorank360_PC[0])
if len(sorank360_Mobile) > 0:
_360_mobile_weight=sorank360_Mobile[0]
print("360_moblie:", sorank360_Mobile[0])
else:
print("360无权重")
result['360_pc_weight']=_360_pc_weight
result['360_mobile_weight']=_360_mobile_weight
#搜狗权重
sogou_pc_weight=None
sogou_mobile_weight=None
sogou_url = f"https://rank.chinaz.com/sogoupc/{target_url}"
sougou_txt = requests.get(url=sogou_url, headers=headers)
sougou_html = sougou_txt.content.decode('utf-8')
sougou_PC = re.findall('PC端</i><img src="//csstools.chinaz.com/tools/images/rankicons/sogou(.*?).png"></a></li>',sougou_html, re.S)
sougou_mobile = re.findall('移动端</i><img src="//csstools.chinaz.com/tools/images/rankicons/sogou(.*?).png"></a></li>',sougou_html, re.S)
# 如果查询html中有正则出来到权重关键字就输出,否则将不输出
if len(sougou_PC) > 0:
print('搜狗_PC:', sougou_PC[1])
sogou_pc_weight=sougou_PC[1]
if len(sougou_mobile) > 0 :
print('搜狗_moblie:', sougou_mobile[1])
sogou_mobile_weight=sougou_mobile[1]
else:
print('搜狗无权重')
result['sogou_pc_weight']=sogou_pc_weight
result['sogou_mobile_weight']=sogou_mobile_weight
#神马权重
shenma_pc_weight =None
shenma_url=f'https://rank.chinaz.com/smrank/{target_url}'
shenma_txt=requests.get(url=shenma_url,headers=headers)
shenma_html=shenma_txt.content.decode('utf-8')
shenma_PC=re.findall('class="tc mt5"><img src="//csstools.chinaz.com/tools/images/rankicons/shenma(.*?).png"></a></li>',shenma_html,re.S)
# 如果查询html中有正则出来到权重关键字就输出,否则将不输出
if len(shenma_PC) > 0:
print('神马权重为:', shenma_PC[1])
shenma_pc_weight=shenma_PC[1]
else:
print("神马无权重")
result['shenma_pc_weight']=shenma_pc_weight
# result['shenma_mobile_weight']=None
#头条权重
toutiao_pc_weight=None
toutiao_url=f'https://rank.chinaz.com/toutiao/{target_url}'
toutiao_txt=requests.get(url=toutiao_url,headers=headers)
toutiao_html=toutiao_txt.content.decode('utf-8')
toutiao_PC=re.findall('class="tc mt5"><img src="//csstools.chinaz.com/tools/images/rankicons/toutiao(.*?).png"></a></li>',toutiao_html,re.S)
# 如果查询html中有正则出来到权重关键字就输出,否则将不输出
if len(toutiao_PC) > 0:
print('头条权重为:', toutiao_PC[1])
toutiao_pc_weight=toutiao_PC[1]
else:
print("头条无权重")
result['toutiao_pc_weight']=toutiao_pc_weight
# result['toutiao_mobile_weight']=None
#备案信息、title、企业性质
beian_url=f"https://seo.chinaz.com/{target_url}"
beian_txt=requests.get(url=beian_url,headers=headers)
beian_html=beian_txt.content.decode('utf-8')
with open('beian_html.html','w') as fp:
fp.write(beian_html)
title,beian_no,name,ip,nature,register,years=parse_info(beian_html)
result['name']=name
result['title']=title
result['beian_no']=beian_no
result['ip']=ip
result['nature']=nature
result['register']=register
result['years']=years
try:
print("备案信息:",beian_no,"名称:",name,"网站首页Title:",title,"企业性质:",nature,"IP地址为:",ip)
print("*"*60)
except:
print("没有查询到有效信息!")
return result
strip_fun = lambda x:x.strip() if x is not None else ""
def parse_info(html):
resp = Selector(text=html)
title = strip_fun(resp.xpath('//div[@class="_chinaz-seo-t2l ellipsis"]/text()').extract_first())
table = resp.xpath('//table[@class="_chinaz-seo-newt"]/tbody')
if table[0].xpath('.//tr[4]/td[2]/span[1]/i'):
beian_num=strip_fun(table[0].xpath('.//tr[4]/td[2]/span[1]/i/a/text()').extract_first())
else:
beian_num=strip_fun(table[0].xpath('.//tr[4]/td[2]/span[1]/a/text()').extract_first())
name=strip_fun(table[0].xpath('.//tr[4]/td[2]/span[2]/i/text()').extract_first())
if not name:
print('---->',name)
name=strip_fun(table[0].xpath('.//tr[4]/td[2]/span[2]/i/a/text()').extract_first())
nature=strip_fun(table[0].xpath('.//tr[4]/td[2]/span[3]/i/text()').extract_first())
ip=strip_fun(table[0].xpath('.//tr[5]/td[2]/div/span[1]/i/a/text()').extract_first())
register=strip_fun(table[0].xpath('.//tr[3]/td[2]/div[1]/span[1]/i/text()').extract_first())
years=strip_fun(table[0].xpath('.//tr[3]/td[2]/div[2]/span[1]/i/text()').extract_first())
return title,beian_num,name,ip,nature,register,years
def crawl_info(site):
return askurl(site)
if __name__ == '__main__':
main()
运行效果:
需要完整代码,可关注公众号联系: 查看全部
还有百度的收录情况:
对于经常操作的朋友,需要使用程序查询,还可以批量查询,并保存到excel或者数据库。
上图为入库到mongodb的数据
源码实现:
main.py 入口函数:
from baidu_collection import baidu_site_collect

from seo_info import crawl_info

from configure.settings import DBSelector

import datetime

import argparse


client = DBSelector().mongo('qq')

doc = client['db_parker']['seo']


def main():


    parser = argparse.ArgumentParser()

    '''

    Command line options

    '''

    parser.add_argument(

        '-n',

        '--name', type=str,

        help='input web domain'

    )


    parser.add_argument(

        '-f',

        '--file', type=str,

        help='input web site domain file name'

    )


    FLAGS = parser.parse_args()

    site_list=

    if FLAGS.name:

        print(FLAGS.name)

        if '.' in FLAGS.name:

            site_list.append(FLAGS.name)


    elif FLAGS.file:

        print(FLAGS.file)

        with open(FLAGS.file,'r') as fp:

            webs=fp.readlines()


        site_list.extend(list(map(lambda x:x.strip(),webs)))


    if site_list:


        run(site_list=site_list)

    else:

        print("please input correct web domain")


def run(site_list):


    # TODO: 改为命令行形式


    for site in site_list:

        count = baidu_site_collect(site)

        info = crawl_info(site)

        print(info)

        print(count)

        info['site'] = site

        info['baidu_count'] = count

        info['update_time'] = datetime.datetime.now()

        doc.insert_one(info)


if __name__ == '__main__':

    main()
其他具体实现的文件:
baidu_collection.py
from parsel import Selector

import requests


def baidu_site_collect(site):

    # 百度收录

    headers = {'User-Agent': 'Chrome Google FireFox IE'}

    url = 'https://www.baidu.com/s?wd=site:{}&rsv_spt=1&rsv_iqid=0xf8b7b7e50006c034&issp=1&f=8&rsv_bp=1&rsv_idx=2&ie=utf-8&tn=baiduhome_pg&rsv_enter=0&rsv_dl=ib&rsv_sug3=14&rsv_sug1=7&rsv_sug7=100&rsv_n=2&rsv_btype=i&inputT=8238&rsv_sug4=8238'.format(site)

    resp = requests.get(

        url=url,

        headers=headers

    )


    resp.encoding='utf8'

    html = resp.text

    selector = Selector(text=html)


    count = selector.xpath('//div[@class="op_site_domain c-row"]/div/p/span/b/text()').extract_first()

    if count:

        count=int(count.replace(',',''))

    return count


if __name__=='__main__':

    site='30daydo.com'

    print(baidu_site_collect(site))
seo_info.py
import argparse

from atexit import register

import sys

import requests

import re

from parsel import Selector


#参数自定义


# parser = argparse.ArgumentParser()

# parser.add_argument('-r', dest='read', help='path file')

# parser.add_argument('-u',dest='read',help='targetdomain')

# parser_args = parser.parse_args()

#爬虫模块查询


VERBOSE = True


def askurl(target_url):

    headers = {

        'User-Agent': 'Mozilla/5.0 (Macintosh; Intel Mac OS X 10_15_7) AppleWebKit/537.36 (KHTML, like Gecko) Chrome/91.0.4472.106 Safari/537.36'

    }


    #baidu权重

    baidu_url=f"https://rank.chinaz.com/{target_url}"

    baidu_txt=requests.get(url=baidu_url,headers=headers)

    baidu_html=baidu_txt.content.decode('utf-8')

    baidu_PC=re.findall('PC端</i><img src="//csstools.chinaz.com/tools/images/rankicons/baidu(.*?).png"></a></li>',baidu_html,re.S)

    baidu_moblie=re.findall('移动端</i><img src="//csstools.chinaz.com/tools/images/rankicons/bd(.*?).png"></a></li>',baidu_html,re.S)

    #分割线

    print("*"*60)


    #如果查询html中有正则出来到权重关键字就输出,否则将不输出

    result={}


    baidu_pc_weight = None

    baidu_mobile_weight = None


    if len(baidu_PC) > 0:

        print('百度_PC:', baidu_PC[0])

        baidu_pc_weight=baidu_PC[0]

    if len(baidu_moblie) > 0:

        print('百度_moblie:', baidu_moblie[0])

        baidu_mobile_weight = baidu_moblie[0]

    else:

        print("百度无权重")


    result['baidu_pc_weight']=baidu_pc_weight

    result['baidu_mobile_weight']=baidu_mobile_weight


    #360权重

    url=f"https://rank.chinaz.com/sorank/{target_url}/"

    text = requests.get(url=url,headers=headers)

    html=text.content.decode('utf-8')

    sorank360_PC=re.findall('PC端</i><img src="//csstools.chinaz.com/tools/images/rankicons/360(.*?).png"></a><',html,re.S)

    sorank360_Mobile=re.findall('移动端</i><img src="//csstools.chinaz.com/tools/images/rankicons/360(.*?).png"',html,re.S)


    _360_pc_weight=None

    _360_mobile_weight=None


    # 如果查询html中有正则出来到权重关键字就输出,否则将不输出

    if len(sorank360_PC) > 0:

        _360_pc_weight=sorank360_PC[0]

        print("360_PC:", sorank360_PC[0])

    if len(sorank360_Mobile) > 0:

        _360_mobile_weight=sorank360_Mobile[0]

        print("360_moblie:", sorank360_Mobile[0])

    else:

        print("360无权重")


    result['360_pc_weight']=_360_pc_weight

    result['360_mobile_weight']=_360_mobile_weight


    #搜狗权重


    sogou_pc_weight=None

    sogou_mobile_weight=None


    sogou_url = f"https://rank.chinaz.com/sogoupc/{target_url}"

    sougou_txt = requests.get(url=sogou_url, headers=headers)

    sougou_html = sougou_txt.content.decode('utf-8')

    sougou_PC = re.findall('PC端</i><img src="//csstools.chinaz.com/tools/images/rankicons/sogou(.*?).png"></a></li>',sougou_html, re.S)

    sougou_mobile = re.findall('移动端</i><img src="//csstools.chinaz.com/tools/images/rankicons/sogou(.*?).png"></a></li>',sougou_html, re.S)


    # 如果查询html中有正则出来到权重关键字就输出,否则将不输出

    if len(sougou_PC) > 0:

        print('搜狗_PC:', sougou_PC[1])

        sogou_pc_weight=sougou_PC[1]


    if len(sougou_mobile) > 0 :

        print('搜狗_moblie:', sougou_mobile[1])

        sogou_mobile_weight=sougou_mobile[1]


    else:

        print('搜狗无权重')


    result['sogou_pc_weight']=sogou_pc_weight

    result['sogou_mobile_weight']=sogou_mobile_weight


    #神马权重

    shenma_pc_weight =None

    shenma_url=f'https://rank.chinaz.com/smrank/{target_url}'

    shenma_txt=requests.get(url=shenma_url,headers=headers)

    shenma_html=shenma_txt.content.decode('utf-8')

    shenma_PC=re.findall('class="tc mt5"><img src="//csstools.chinaz.com/tools/images/rankicons/shenma(.*?).png"></a></li>',shenma_html,re.S)


    # 如果查询html中有正则出来到权重关键字就输出,否则将不输出

    if len(shenma_PC) > 0:

        print('神马权重为:', shenma_PC[1])

        shenma_pc_weight=shenma_PC[1]

    else:

        print("神马无权重")


    result['shenma_pc_weight']=shenma_pc_weight

    # result['shenma_mobile_weight']=None


    #头条权重


    toutiao_pc_weight=None

    toutiao_url=f'https://rank.chinaz.com/toutiao/{target_url}'

    toutiao_txt=requests.get(url=toutiao_url,headers=headers)

    toutiao_html=toutiao_txt.content.decode('utf-8')

    toutiao_PC=re.findall('class="tc mt5"><img src="//csstools.chinaz.com/tools/images/rankicons/toutiao(.*?).png"></a></li>',toutiao_html,re.S)


    # 如果查询html中有正则出来到权重关键字就输出,否则将不输出

    if len(toutiao_PC) > 0:

        print('头条权重为:', toutiao_PC[1])

        toutiao_pc_weight=toutiao_PC[1]

    else:

        print("头条无权重")


    result['toutiao_pc_weight']=toutiao_pc_weight

    # result['toutiao_mobile_weight']=None


    #备案信息、title、企业性质

    beian_url=f"https://seo.chinaz.com/{target_url}"

    beian_txt=requests.get(url=beian_url,headers=headers)

    beian_html=beian_txt.content.decode('utf-8')


    with open('beian_html.html','w') as fp:

        fp.write(beian_html)


    title,beian_no,name,ip,nature,register,years=parse_info(beian_html)


    result['name']=name

    result['title']=title

    result['beian_no']=beian_no

    result['ip']=ip

    result['nature']=nature

    result['register']=register

    result['years']=years


    try:

        print("备案信息:",beian_no,"名称:",name,"网站首页Title:",title,"企业性质:",nature,"IP地址为:",ip)

        print("*"*60)

    except:

        print("没有查询到有效信息!")


    return result


strip_fun = lambda x:x.strip() if x is not None else ""


def parse_info(html):


    resp = Selector(text=html)

    title = strip_fun(resp.xpath('//div[@class="_chinaz-seo-t2l ellipsis"]/text()').extract_first())

    table = resp.xpath('//table[@class="_chinaz-seo-newt"]/tbody')


    if table[0].xpath('.//tr[4]/td[2]/span[1]/i'):

        beian_num=strip_fun(table[0].xpath('.//tr[4]/td[2]/span[1]/i/a/text()').extract_first())

    else:

        beian_num=strip_fun(table[0].xpath('.//tr[4]/td[2]/span[1]/a/text()').extract_first())


    name=strip_fun(table[0].xpath('.//tr[4]/td[2]/span[2]/i/text()').extract_first())

    if not name:

        print('---->',name)

        name=strip_fun(table[0].xpath('.//tr[4]/td[2]/span[2]/i/a/text()').extract_first())


    nature=strip_fun(table[0].xpath('.//tr[4]/td[2]/span[3]/i/text()').extract_first())

    ip=strip_fun(table[0].xpath('.//tr[5]/td[2]/div/span[1]/i/a/text()').extract_first())

    register=strip_fun(table[0].xpath('.//tr[3]/td[2]/div[1]/span[1]/i/text()').extract_first())

    years=strip_fun(table[0].xpath('.//tr[3]/td[2]/div[2]/span[1]/i/text()').extract_first())


    return title,beian_num,name,ip,nature,register,years


def crawl_info(site):

    return askurl(site)


if __name__ == '__main__':

    main()
运行效果:
需要完整代码,可关注公众号联系:

B站批量下载某个UP主的所有视频
李魔佛 发表了文章 • 0 个评论 • 4768 次浏览 • 2022-05-21 18:48
使用python实现
https://github.com/Rockyzsu/bilibili
B站视频下载

自动批量下载B站一个系列的视频


下载某个UP主的所有视频


使用:


下载you-get库,git clone https://github.com/soimort/you-get.git 复制其本地路径,比如/root/you-get/you-get


初次运行,删除history.db 文件, 修改配置文件config.py


START=1 # 下载系列视频的 第一个

END=1 # 下载系列视频的最后一个 , 比如一个系列教程有30个视频, start=5 ,end = 20 下载从第5个到第20个

ID='BV1oK411L7au' # 视频的ID

YOU_GET_PATH='/home/xda/othergit/you-get/you-get' # 你的you-get路径

MINS=1 # 每次循环等待1分钟

user_id = '518973111' # UP主的ID

total_page = 3 # up主的视频的页数

执行 python downloader.py ,进行下载循环


python people.py ,把某个up主的视频链接加入到待下载队列


python add_data.py --id=BV1oK411L7au --start=4 --end=8 下载视频id为BV1oK411L7au的系列教程,从第4开始,到第8个结束,如果只有一个的话,start和end设为1即可。


可以不断地往队列里面添加下载链接。
主要代码:
# @Time : 2019/1/28 14:19

# @File : youtube_downloader.py


import logging

import os

import subprocess

import datetime

import sqlite3

import time

from config import YOU_GET_PATH,MINS

CMD = 'python {} {}'

filename = 'url.txt'


class SQLite():

    def __init__(self):

        self.conn = sqlite3.connect('history.db')

        self.cursor = self.conn.cursor()

        self.create_table()


    def create_table(self):

        create_sql = 'create table if not exists tb_download (url varchar(100),status tinyint,crawltime datetime)'

        create_record_tb = 'create table if not exists tb_record (idx varchar(100) PRIMARY KEY,start tinyint,end tinyint,status tinyint)'

        self.cursor.execute(create_record_tb)

        self.conn.commit()

        self.cursor.execute(create_sql)

        self.conn.commit()


    def exists(self,url):

        querySet = 'select * from tb_download where url = ? and status = 1'

        self.cursor.execute(querySet,(url,))

        ret = self.cursor.fetchone()

        return True if ret else False


    def insert_history(self,url,status):

        query = 'select * from tb_download where url=?'

        self.cursor.execute(query,(url,))

        ret = self.cursor.fetchone()

        current = datetime.datetime.now()


        if ret:

            insert_sql='update tb_download set status=?,crawltime=? where url = ?'

            args=(status,status,current,url)

        else:

            insert_sql = 'insert into tb_download values(?,?,?)'

            args=(url,status,current)


        try:

            self.cursor.execute(insert_sql,args)

        except:

            self.conn.rollback()

            return False

        else:

            self.conn.commit()

            return True


    def get(self):

        sql = 'select idx,start,end from tb_record where status=0'

        self.cursor.execute(sql)

        ret= self.cursor.fetchone()

        return ret


    def set(self,idx):

        print('set status =1')

        sql='update tb_record set status=1 where idx=?'

        self.cursor.execute(sql,(idx,))

        self.conn.commit()


def llogger(filename):

    logger = logging.getLogger(filename)  # 不加名称设置root logger


    logger.setLevel(logging.DEBUG)  # 设置输出级别


    formatter = logging.Formatter(

        '[%(asctime)s][%(filename)s][line: %(lineno)d]\[%(levelname)s] ## %(message)s)',

        datefmt='%Y-%m-%d %H:%M:%S')


    # 使用FileHandler输出到文件

    prefix = os.path.splitext(filename)[0]

    fh = logging.FileHandler(prefix + '.log')

    fh.setLevel(logging.DEBUG)

    fh.setFormatter(formatter)


    # 使用StreamHandler输出到屏幕

    ch = logging.StreamHandler()

    ch.setLevel(logging.DEBUG)

    ch.setFormatter(formatter)


    # 添加两个Handler

    logger.addHandler(ch)

    logger.addHandler(fh)

    return logger


logger = llogger('download.log')

sql_obj = SQLite()


def run():

    while 1:

        result = sql_obj.get()

        print(result)

        if result:

            idx=result[0]

            start=result[1]

            end=result[2]

            try:

                download_bilibili(idx,start,end)

            except:

                pass

            else:

                sql_obj.set(idx)

        else:

            time.sleep(MINS*60)


def download_bilibili(id,start_page,total_page):

    global doc


    bilibili_url = 'https://www.bilibili.com/video/{}?p={}'

    for i in range(start_page, total_page+1):


        next_url = bilibili_url.format(id, i)

        if sql_obj.exists(next_url):

            print('have download')

            continue


        try:

            command = CMD.format(YOU_GET_PATH, next_url)

            p = subprocess.Popen(command, stdout=subprocess.PIPE, stderr=subprocess.PIPE,

                                 shell=True)


            output, error = p.communicate()


        except Exception as e:

            print('has execption')

            sql_obj.insert_history(next_url,status=0)

            logger.error(e)

            continue

        else:

            output_str = output.decode()

            if len(output_str) == 0:

                sql_obj.insert_history(next_url,status=0)

                logger.info('下载失败')

                continue


            logger.info('{} has been downloaded !'.format(next_url))

            sql_obj.insert_history(next_url,status=1)


run()
查看全部

使用python实现
https://github.com/Rockyzsu/bilibili
B站视频下载
自动批量下载B站一个系列的视频
下载某个UP主的所有视频
使用:
下载you-get库,git clone https://github.com/soimort/you-get.git 复制其本地路径,比如/root/you-get/you-get
初次运行,删除history.db 文件, 修改配置文件config.py
START=1 # 下载系列视频的 第一个
END=1 # 下载系列视频的最后一个 , 比如一个系列教程有30个视频, start=5 ,end = 20 下载从第5个到第20个
ID='BV1oK411L7au' # 视频的ID
YOU_GET_PATH='/home/xda/othergit/you-get/you-get' # 你的you-get路径
MINS=1 # 每次循环等待1分钟
user_id = '518973111' # UP主的ID
total_page = 3 # up主的视频的页数
执行 python downloader.py ,进行下载循环
python people.py ,把某个up主的视频链接加入到待下载队列
python add_data.py --id=BV1oK411L7au --start=4 --end=8 下载视频id为BV1oK411L7au的系列教程,从第4开始,到第8个结束,如果只有一个的话,start和end设为1即可。
可以不断地往队列里面添加下载链接。
主要代码:
# @Time : 2019/1/28 14:19
# @File : youtube_downloader.py
import logging
import os
import subprocess
import datetime
import sqlite3
import time
from config import YOU_GET_PATH,MINS
CMD = 'python {} {}'
filename = 'url.txt'
class SQLite():
def __init__(self):
self.conn = sqlite3.connect('history.db')
self.cursor = self.conn.cursor()
self.create_table()
def create_table(self):
create_sql = 'create table if not exists tb_download (url varchar(100),status tinyint,crawltime datetime)'
create_record_tb = 'create table if not exists tb_record (idx varchar(100) PRIMARY KEY,start tinyint,end tinyint,status tinyint)'
self.cursor.execute(create_record_tb)
self.conn.commit()
self.cursor.execute(create_sql)
self.conn.commit()
def exists(self,url):
querySet = 'select * from tb_download where url = ? and status = 1'
self.cursor.execute(querySet,(url,))
ret = self.cursor.fetchone()
return True if ret else False
def insert_history(self,url,status):
query = 'select * from tb_download where url=?'
self.cursor.execute(query,(url,))
ret = self.cursor.fetchone()
current = datetime.datetime.now()
if ret:
insert_sql='update tb_download set status=?,crawltime=? where url = ?'
args=(status,status,current,url)
else:
insert_sql = 'insert into tb_download values(?,?,?)'
args=(url,status,current)
try:
self.cursor.execute(insert_sql,args)
except:
self.conn.rollback()
return False
else:
self.conn.commit()
return True
def get(self):
sql = 'select idx,start,end from tb_record where status=0'
self.cursor.execute(sql)
ret= self.cursor.fetchone()
return ret
def set(self,idx):
print('set status =1')
sql='update tb_record set status=1 where idx=?'
self.cursor.execute(sql,(idx,))
self.conn.commit()
def llogger(filename):
logger = logging.getLogger(filename) # 不加名称设置root logger
logger.setLevel(logging.DEBUG) # 设置输出级别
formatter = logging.Formatter(
'[%(asctime)s][%(filename)s][line: %(lineno)d]\[%(levelname)s] ## %(message)s)',
datefmt='%Y-%m-%d %H:%M:%S')
# 使用FileHandler输出到文件
prefix = os.path.splitext(filename)[0]
fh = logging.FileHandler(prefix + '.log')
fh.setLevel(logging.DEBUG)
fh.setFormatter(formatter)
# 使用StreamHandler输出到屏幕
ch = logging.StreamHandler()
ch.setLevel(logging.DEBUG)
ch.setFormatter(formatter)
# 添加两个Handler
logger.addHandler(ch)
logger.addHandler(fh)
return logger
logger = llogger('download.log')
sql_obj = SQLite()
def run():
while 1:
result = sql_obj.get()
print(result)
if result:
idx=result[0]
start=result[1]
end=result[2]
try:
download_bilibili(idx,start,end)
except:
pass
else:
sql_obj.set(idx)
else:
time.sleep(MINS*60)
def download_bilibili(id,start_page,total_page):
global doc
bilibili_url = 'https://www.bilibili.com/video/{}?p={}'
for i in range(start_page, total_page+1):
next_url = bilibili_url.format(id, i)
if sql_obj.exists(next_url):
print('have download')
continue
try:
command = CMD.format(YOU_GET_PATH, next_url)
p = subprocess.Popen(command, stdout=subprocess.PIPE, stderr=subprocess.PIPE,
shell=True)
output, error = p.communicate()
except Exception as e:
print('has execption')
sql_obj.insert_history(next_url,status=0)
logger.error(e)
continue
else:
output_str = output.decode()
if len(output_str) == 0:
sql_obj.insert_history(next_url,status=0)
logger.info('下载失败')
continue
logger.info('{} has been downloaded !'.format(next_url))
sql_obj.insert_history(next_url,status=1)
run()
python3的map是迭代器,不用for循环或者next触发是不会执行的
李魔佛 发表了文章 • 0 个评论 • 2514 次浏览 • 2022-05-21 17:59
def update_data(id,start,end):

    status=0

    conn = sqlite3.connect('history.db')

    cursor = conn.cursor()

    insert_sql ='insert into tb_record values(?,?,?,?)'


    try:

        cursor.execute(insert_sql,(id,start,end,status))

    except Exception as e:

        print(e)

        print('Error')

    else:

        conn.commit()

        print("successfully insert")
bv_list = []

for i in range(1, total_page + 1):

    bv_list.extend(visit(i))

    print(bv_list)

map(lambda x:update_data(x,1,1),bv_list)
作用很简单,就是拿到列表后用map放入到sqlite里面。
但是上面的代码并不起作用。
因为map只是定义了一个迭代器,并没有被触发。
可以加一个list(map(lambda x:update_data(x,1,1),bv_list))
这样就可以执行了。 查看全部
def update_data(id,start,end):
status=0
conn = sqlite3.connect('history.db')
cursor = conn.cursor()
insert_sql ='insert into tb_record values(?,?,?,?)'
try:
cursor.execute(insert_sql,(id,start,end,status))
except Exception as e:
print(e)
print('Error')
else:
conn.commit()
print("successfully insert")
bv_list = []
for i in range(1, total_page + 1):
bv_list.extend(visit(i))
print(bv_list)
map(lambda x:update_data(x,1,1),bv_list)
作用很简单,就是拿到列表后用map放入到sqlite里面。
但是上面的代码并不起作用。
因为map只是定义了一个迭代器,并没有被触发。
可以加一个list(map(lambda x:update_data(x,1,1),bv_list))
这样就可以执行了。
dataframe如何 遍历所有的列?
李魔佛 发表了文章 • 0 个评论 • 3333 次浏览 • 2022-05-21 02:16
可以使用df.items()
Python pandas.DataFrame.items用法及代码示例

用法:

DataFrame.items()

迭代(列名,系列)对。


遍历 DataFrame 列,返回一个包含列名和内容的元组作为一个系列。


生成(Yield):

label:对象

被迭代的 DataFrame 的列名。


content:Series

属于每个标签的列条目,作为一个系列。


例子:

>>> df = pd.DataFrame({'species':['bear', 'bear', 'marsupial'],

...                   'population':[1864, 22000, 80000]},

...                   index=['panda', 'polar', 'koala'])

>>> df

        species   population

panda   bear      1864

polar   bear      22000

koala   marsupial 80000

>>> for label, content in df.items():

...     print(f'label:{label}')

...     print(f'content:{content}', sep='\n')

...

label:species

content:

panda         bear

polar         bear

koala    marsupial

Name:species, dtype:object

label:population

content:

panda     1864

polar    22000

koala    80000

Name:population, dtype:int64 查看全部
可以使用df.items()
Python pandas.DataFrame.items用法及代码示例
用法:
DataFrame.items()
迭代(列名,系列)对。
遍历 DataFrame 列,返回一个包含列名和内容的元组作为一个系列。
生成(Yield):
label:对象
被迭代的 DataFrame 的列名。
content:Series
属于每个标签的列条目,作为一个系列。
例子:
>>> df = pd.DataFrame({'species':['bear', 'bear', 'marsupial'],
... 'population':[1864, 22000, 80000]},
... index=['panda', 'polar', 'koala'])
>>> df
species population
panda bear 1864
polar bear 22000
koala marsupial 80000
>>> for label, content in df.items():
... print(f'label:{label}')
... print(f'content:{content}', sep='\n')
...
label:species
content:
panda bear
polar bear
koala marsupial
Name:species, dtype:object
label:population
content:
panda 1864
polar 22000
koala 80000
Name:population, dtype:int64
python对视频添加水印 调整帧率
李魔佛 发表了文章 • 0 个评论 • 2619 次浏览 • 2022-05-07 11:37
FFmpeg是一套可以用来记录、转换数字音频、视频,并能将其转化为流的开源计算机程序。采用LGPL或GPL许可证。 它提供了录制、转换以及流化音视频的完整解决方案。它包含了非常先进的音频/视频编解码库libavcodec,为了保证高可移植性和编解码质量,libavcodec里很多code都是从头开发的。 FFmpeg在Linux平台下开发,但它同样也可以在其它操作系统环境中编译运行,包括Windows、Mac OS X等。 这个项目最早由Fabrice Bellard发起,2004年至2015年间由Michael Niedermayer主要负责维护。 许多FFmpeg的开发人员都来自MPlayer项目,而且当前FFmpeg也是放在MPlayer项目组的服务器上。 项目的名称来自MPEG视频编码标准,前面的"FF"代表"Fast Forward"。
# coding=utf-8

import os

import subprocess

import datetime

import json, pprint

import re, time

import threading

import random

import shutil


class FFmpeg:


    def __init__(self, editvdo, addlogo=None, addmusic=None,

                 addvdohead=None, addvdotail=None):

        self.editvdo = editvdo

        self.addlogo = addlogo

        self.addmusic = addmusic

        self.addvdohead = addvdohead

        self.addvdotail = addvdotail

        self.vdo_time, self.vdo_width, self.vdo_height, self.attr_dict = self.get_attr()

        self.editvdo_path = os.path.dirname(editvdo)

        self.editvdo_name = os.path.basename(editvdo)


    def get_attr(self):

        """

        获取视频属性参数

        :return:

        """

        strcmd = r'ffprobe -print_format json -show_streams -i "{}"'.format(self.editvdo)

        status, output = subprocess.getstatusoutput(strcmd)

        agrs = eval(re.search('{.*}', output, re.S).group().replace("\n", "").replace(" ", ''))

        streams = agrs.get('streams', )

        agrs_dict = dict()

        [agrs_dict.update(x) for x in streams]

        vdo_time = agrs_dict.get('duration')

        vdo_width = agrs_dict.get('width')

        vdo_height = agrs_dict.get('height')

        attr = (vdo_time, vdo_width, vdo_height, agrs_dict)

        return attr


    def edit_head(self, start_time, end_time, deposit=None):

        """

        截取指定长度视频

        :param second: 去除开始的多少秒

        :param deposit: 另存为文件

        :return: True/Flase

        """

        if None == deposit:

            deposit = self.editvdo_path+'/'+'edit_head'+self.editvdo_name

        start = time.strftime('%H:%M:%S', time.gmtime(start_time))

        end = time.strftime('%H:%M:%S', time.gmtime(end_time))

        strcmd = 'ffmpeg  -i "{}" -vcodec copy -acodec copy -ss {} -to {} "{}" -y'.format(

            self.editvdo, start, end, deposit)

        result = subprocess.run(args=strcmd, stdout=subprocess.PIPE, shell=True)

        if os.path.exists(deposit):

            os.remove(self.editvdo)

            os.rename(deposit, self.editvdo)

            return True

        else:

            return False


    def edit_logo(self, deposit=None):

        """

        添加水印

        :param deposit:添加水印后另存为路径,为空则覆盖

        :return: True/False

        """

        if None == deposit:

            deposit = self.editvdo_path+'/'+'edit_logo'+self.editvdo_name

        strcmd = r'ffmpeg -i "{}" -vf "movie=\'{}\' [watermark];[in] ' \

                 r'[watermark] overlay=main_w-overlay_w-10:10 [out]"  "{}"'.format(

                    self.editvdo, self.addlogo, deposit)

        result = subprocess.run(args=strcmd, stdout=subprocess.PIPE, shell=True)

        if os.path.exists(deposit):

            os.remove(self.editvdo)

            os.rename(deposit, self.editvdo)

            return True

        else:

            return False


    def edit_music(self, deposit=None):

        if None == deposit:

            deposit = self.editvdo_path+'/'+'edit_music'+self.editvdo_name

        strcmd = r'ffmpeg -y -i "{}" -i "{}" -filter_complex "[0:a] ' \

                 r'pan=stereo|c0=1*c0|c1=1*c1 [a1], [1:a] ' \

                 r'pan=stereo|c0=1*c0|c1=1*c1 [a2],[a1][a2]amix=duration=first,' \

                 r'pan=stereo|c0<c0+c1|c1<c2+c3,pan=mono|c0=c0+c1[a]" ' \

                 r'-map "[a]" -map 0:v -c:v libx264 -c:a aac ' \

                 r'-strict -2 -ac 2 "{}"'.format(self.editvdo, self.addmusic, deposit)

        result = subprocess.run(args=strcmd, stdout=subprocess.PIPE, shell=True)

        if os.path.exists(deposit):

            os.remove(self.editvdo)

            os.rename(deposit, self.editvdo)

            return True

        else:

            return False


    def edit_rate(self, rete=30, deposit=None):

        """

        改变帧率

        :param rete: 修改大小帧率

        :param deposit: 修改后保存路径

        :return:

        """

        if None == deposit:

            deposit = self.editvdo_path+'/'+'edit_music'+self.editvdo_name

        strcmd = r'ffmpeg -i "{}" -r {} "{}"' % (self.editvdo, rete, deposit)

        result = subprocess.run(args=strcmd, stdout=subprocess.PIPE, shell=True)

        if os.path.exists(deposit):

            os.remove(self.editvdo)

            os.rename(deposit, self.editvdo)

            return True

        else:

            return False


    def edit_power(self, power='1280x720', deposit=None):

        """

        修改分辨率

        :param power: 分辨率

        :param deposit: 修改后保存路径,为空则覆盖

        :return:

        """

        if None == deposit:

            deposit = self.editvdo_path+'/'+'edit_power'+self.editvdo_name

        strcmd = r'ffmpeg -i "{}" -s {} "{}"'.format(self.editvdo, power, deposit)

        result = subprocess.run(args=strcmd, stdout=subprocess.PIPE, shell=True)

        if os.path.exists(deposit):

            os.remove(self.editvdo)

            os.rename(deposit, self.editvdo)

            return True

        else:

            return False


    def rdit_marge(self, vdo_head, vdo_tail, deposit=None):

        if None == deposit:

            deposit = self.editvdo_path+'/'+'rdit_marge'+self.editvdo_name

        with open(self.editvdo_path+'/'+'rdit_marge.txt', 'w', encoding='utf-8') as f:

            f.write("file '{}' \nfile '{}' \nfile '{}'" .format(

                vdo_head, self.editvdo, vdo_tail))

        strcmd = r'ffmpeg -f concat -safe 0 -i "{}" -c copy "{}"'.format(

            self.editvdo_path + '/' + 'rdit_marge.txt', deposit)

        result = subprocess.run(args=strcmd, stdout=subprocess.PIPE, shell=True)

        if os.path.exists(deposit):

            os.remove(self.editvdo)

            os.rename(deposit, self.editvdo)

            return True

        else:

            return False


    # ffmpeg - i input.mkv - filter_complex "[0:v]setpts=0.5*PTS[v];[0:a]atempo=2.0[a]" - map"[v]" - map"[a]"  output.mkv


test = FFmpeg(r"D:\vdio\4.mp4")
PS:需要电脑把ffmpeg的可执行文件放到环境变量中 查看全部
FFmpeg是一套可以用来记录、转换数字音频、视频,并能将其转化为流的开源计算机程序。采用LGPL或GPL许可证。 它提供了录制、转换以及流化音视频的完整解决方案。它包含了非常先进的音频/视频编解码库libavcodec,为了保证高可移植性和编解码质量,libavcodec里很多code都是从头开发的。 FFmpeg在Linux平台下开发,但它同样也可以在其它操作系统环境中编译运行,包括Windows、Mac OS X等。 这个项目最早由Fabrice Bellard发起,2004年至2015年间由Michael Niedermayer主要负责维护。 许多FFmpeg的开发人员都来自MPlayer项目,而且当前FFmpeg也是放在MPlayer项目组的服务器上。 项目的名称来自MPEG视频编码标准,前面的"FF"代表"Fast Forward"。
# coding=utf-8
import os
import subprocess
import datetime
import json, pprint
import re, time
import threading
import random
import shutil
class FFmpeg:
def __init__(self, editvdo, addlogo=None, addmusic=None,
addvdohead=None, addvdotail=None):
self.editvdo = editvdo
self.addlogo = addlogo
self.addmusic = addmusic
self.addvdohead = addvdohead
self.addvdotail = addvdotail
self.vdo_time, self.vdo_width, self.vdo_height, self.attr_dict = self.get_attr()
self.editvdo_path = os.path.dirname(editvdo)
self.editvdo_name = os.path.basename(editvdo)
def get_attr(self):
"""
获取视频属性参数
:return:
"""
strcmd = r'ffprobe -print_format json -show_streams -i "{}"'.format(self.editvdo)
status, output = subprocess.getstatusoutput(strcmd)
agrs = eval(re.search('{.*}', output, re.S).group().replace("\n", "").replace(" ", ''))
streams = agrs.get('streams', )
agrs_dict = dict()
[agrs_dict.update(x) for x in streams]
vdo_time = agrs_dict.get('duration')
vdo_width = agrs_dict.get('width')
vdo_height = agrs_dict.get('height')
attr = (vdo_time, vdo_width, vdo_height, agrs_dict)
return attr
def edit_head(self, start_time, end_time, deposit=None):
"""
截取指定长度视频
:param second: 去除开始的多少秒
:param deposit: 另存为文件
:return: True/Flase
"""
if None == deposit:
deposit = self.editvdo_path+'/'+'edit_head'+self.editvdo_name
start = time.strftime('%H:%M:%S', time.gmtime(start_time))
end = time.strftime('%H:%M:%S', time.gmtime(end_time))
strcmd = 'ffmpeg -i "{}" -vcodec copy -acodec copy -ss {} -to {} "{}" -y'.format(
self.editvdo, start, end, deposit)
result = subprocess.run(args=strcmd, stdout=subprocess.PIPE, shell=True)
if os.path.exists(deposit):
os.remove(self.editvdo)
os.rename(deposit, self.editvdo)
return True
else:
return False
def edit_logo(self, deposit=None):
"""
添加水印
:param deposit:添加水印后另存为路径,为空则覆盖
:return: True/False
"""
if None == deposit:
deposit = self.editvdo_path+'/'+'edit_logo'+self.editvdo_name
strcmd = r'ffmpeg -i "{}" -vf "movie=\'{}\' [watermark];[in] ' \
r'[watermark] overlay=main_w-overlay_w-10:10 [out]" "{}"'.format(
self.editvdo, self.addlogo, deposit)
result = subprocess.run(args=strcmd, stdout=subprocess.PIPE, shell=True)
if os.path.exists(deposit):
os.remove(self.editvdo)
os.rename(deposit, self.editvdo)
return True
else:
return False
def edit_music(self, deposit=None):
if None == deposit:
deposit = self.editvdo_path+'/'+'edit_music'+self.editvdo_name
strcmd = r'ffmpeg -y -i "{}" -i "{}" -filter_complex "[0:a] ' \
r'pan=stereo|c0=1*c0|c1=1*c1 [a1], [1:a] ' \
r'pan=stereo|c0=1*c0|c1=1*c1 [a2],[a1][a2]amix=duration=first,' \
r'pan=stereo|c0<c0+c1|c1<c2+c3,pan=mono|c0=c0+c1[a]" ' \
r'-map "[a]" -map 0:v -c:v libx264 -c:a aac ' \
r'-strict -2 -ac 2 "{}"'.format(self.editvdo, self.addmusic, deposit)
result = subprocess.run(args=strcmd, stdout=subprocess.PIPE, shell=True)
if os.path.exists(deposit):
os.remove(self.editvdo)
os.rename(deposit, self.editvdo)
return True
else:
return False
def edit_rate(self, rete=30, deposit=None):
"""
改变帧率
:param rete: 修改大小帧率
:param deposit: 修改后保存路径
:return:
"""
if None == deposit:
deposit = self.editvdo_path+'/'+'edit_music'+self.editvdo_name
strcmd = r'ffmpeg -i "{}" -r {} "{}"' % (self.editvdo, rete, deposit)
result = subprocess.run(args=strcmd, stdout=subprocess.PIPE, shell=True)
if os.path.exists(deposit):
os.remove(self.editvdo)
os.rename(deposit, self.editvdo)
return True
else:
return False
def edit_power(self, power='1280x720', deposit=None):
"""
修改分辨率
:param power: 分辨率
:param deposit: 修改后保存路径,为空则覆盖
:return:
"""
if None == deposit:
deposit = self.editvdo_path+'/'+'edit_power'+self.editvdo_name
strcmd = r'ffmpeg -i "{}" -s {} "{}"'.format(self.editvdo, power, deposit)
result = subprocess.run(args=strcmd, stdout=subprocess.PIPE, shell=True)
if os.path.exists(deposit):
os.remove(self.editvdo)
os.rename(deposit, self.editvdo)
return True
else:
return False
def rdit_marge(self, vdo_head, vdo_tail, deposit=None):
if None == deposit:
deposit = self.editvdo_path+'/'+'rdit_marge'+self.editvdo_name
with open(self.editvdo_path+'/'+'rdit_marge.txt', 'w', encoding='utf-8') as f:
f.write("file '{}' \nfile '{}' \nfile '{}'" .format(
vdo_head, self.editvdo, vdo_tail))
strcmd = r'ffmpeg -f concat -safe 0 -i "{}" -c copy "{}"'.format(
self.editvdo_path + '/' + 'rdit_marge.txt', deposit)
result = subprocess.run(args=strcmd, stdout=subprocess.PIPE, shell=True)
if os.path.exists(deposit):
os.remove(self.editvdo)
os.rename(deposit, self.editvdo)
return True
else:
return False
# ffmpeg - i input.mkv - filter_complex "[0:v]setpts=0.5*PTS[v];[0:a]atempo=2.0[a]" - map"[v]" - map"[a]" output.mkv
test = FFmpeg(r"D:\vdio\4.mp4")
PS:需要电脑把ffmpeg的可执行文件放到环境变量中
格式工厂去除视频水印logo效果不好
李魔佛 发表了文章 • 0 个评论 • 2773 次浏览 • 2022-05-07 10:53
试了一下,结果效果不理想,格式工厂只是把logo区域进行模糊处理,也就是logo区域变得不可再阅读。

python3 安装demjson 报错 use_2to3 is invalid
李魔佛 发表了文章 • 0 个评论 • 6412 次浏览 • 2022-04-18 20:19
Collecting demjson==2.2.4
Downloading https://pypi.doubanio.com/pack ... ar.gz (131 kB)
|████████████████████████████████| 131 kB 985 kB/s
ERROR: Command errored out with exit status 1:
command: /root/miniconda3/envs/py37/bin/python -c 'import io, os, sys, setuptools, tokenize; sys.argv[0] = '"'"'/tmp/pip-install-pj0ajcpl/demjson_86a1bab6643c4ed7a7b0c6bb6d3a43a2/setup.py'"'"'; __file__='"'"'/tmp/pip-install-pj0ajcpl/demjson_86a1bab6643c4ed7a7b0c6bb6d3a43a2/setup.py'"'"';f = getattr(tokenize, '"'"'open'"'"', open)(__file__) if os.path.exists(__file__) else io.StringIO('"'"'from setuptools import setup; setup()'"'"');code = f.read().replace('"'"'\r\n'"'"', '"'"'\n'"'"');f.close();exec(compile(code, __file__, '"'"'exec'"'"'))' egg_info --egg-base /tmp/pip-pip-egg-info-7ve4tu87
cwd: /tmp/pip-install-pj0ajcpl/demjson_86a1bab6643c4ed7a7b0c6bb6d3a43a2/
Complete output (3 lines):
/root/miniconda3/envs/py37/lib/python3.7/site-packages/setuptools/dist.py:760: UserWarning: Usage of dash-separated 'index-url' will not be supported in future versions. Please use the underscore name 'index_url' instead
% (opt, underscore_opt)
error in demjson setup command: use_2to3 is invalid.
记录一下解决办法:
setuptools 降级:
pip install --upgrade setuptools==57.5.0
然后再pip install demjson 即可
如果担心setuptools 修改到系统的其他库,可以创建一个虚拟环境。
然后在虚拟环境里面对setuptools 降级,再安装demjson
来个养眼图: 查看全部
ooking in indexes: https://pypi.douban.com/simple

Collecting demjson==2.2.4

  Downloading https://pypi.doubanio.com/pack ... ar.gz (131 kB)

     |████████████████████████████████| 131 kB 985 kB/s

    ERROR: Command errored out with exit status 1:

     command: /root/miniconda3/envs/py37/bin/python -c 'import io, os, sys, setuptools, tokenize; sys.argv[0] = '"'"'/tmp/pip-install-pj0ajcpl/demjson_86a1bab6643c4ed7a7b0c6bb6d3a43a2/setup.py'"'"'; __file__='"'"'/tmp/pip-install-pj0ajcpl/demjson_86a1bab6643c4ed7a7b0c6bb6d3a43a2/setup.py'"'"';f = getattr(tokenize, '"'"'open'"'"', open)(__file__) if os.path.exists(__file__) else io.StringIO('"'"'from setuptools import setup; setup()'"'"');code = f.read().replace('"'"'\r\n'"'"', '"'"'\n'"'"');f.close();exec(compile(code, __file__, '"'"'exec'"'"'))' egg_info --egg-base /tmp/pip-pip-egg-info-7ve4tu87

         cwd: /tmp/pip-install-pj0ajcpl/demjson_86a1bab6643c4ed7a7b0c6bb6d3a43a2/

    Complete output (3 lines):

    /root/miniconda3/envs/py37/lib/python3.7/site-packages/setuptools/dist.py:760: UserWarning: Usage of dash-separated 'index-url' will not be supported in future versions. Please use the underscore name 'index_url' instead

      % (opt, underscore_opt)

    error in demjson setup command: use_2to3 is invalid.
记录一下解决办法:
setuptools 降级:
pip install --upgrade setuptools==57.5.0
然后再pip install demjson 即可
如果担心setuptools 修改到系统的其他库,可以创建一个虚拟环境。
然后在虚拟环境里面对setuptools 降级,再安装demjson
来个养眼图:

mongodb python同步两个数据库数据
李魔佛 发表了文章 • 0 个评论 • 2900 次浏览 • 2022-04-07 02:44
所以自己动手写代码完成:
# -*- coding: utf-8 -*-

# @Time : 2022/4/6 4:41

# @File : database_migrate.py

# @Author : Rocky C@www.30daydo.com

import time

from loguru import logger

import pymongo


ignore_db = ['admin', 'config', 'local',

             ] # 忽略更新的库


ignore_col = [('db_stock','dfcf_list_full')]


logger.add('mongo.log')


#  数据库同步

def get_client(user, password, host, port):

    connect_uri = f'mongodb://{user}:{password}@{host}:{port}'

    client = pymongo.MongoClient(connect_uri)

    return client


def origin():

    return get_client('admin', 'password', '127.0.0.1', '27017')


def target():

    return get_client('root', 'password', '127.0.0.1', '27017')


def transfer():

    origin_client = origin()

    target_client = target()

    dbs = get_db_name(origin_client)

    for db in dbs:

        for col in get_collection_name(origin_client, db):


            if (db,col) in ignore_col:

                continue

            items = []

            logger.info(f'正在更新{db} {col}')

            for i in get_item(origin_client, db, col):

                items.append(i)


            insert_item(target_client, db, col, items)

            logger.info(f'更新数据库 {db} {col}')

            # time.sleep(0.5)


def get_item(client, db_name, col):

    return client[db_name][col].find()


def insert_item(client, db_name, col, data):

    batch = 1000

    count = len(data)//batch + 1

    for i in range(count):

        item = data[i*batch:(i+1)*batch]


        if len(item)==0:

            continue


        try:

            client[db_name][col].insert_many(item)

        except Exception as e:

            logger.error(e)

            logger.error(f'{db_name} {col} 插入出错')


def get_db_name(client):

    db_name = client.list_database_names()

    dbs = []

    for db in db_name:

        if db not in ignore_db:

            dbs.append(db)

    return dbs


def delete_col(client,db,col):

    try:

        client[db][col].delete_many({})

    except Exception as e:

        logger.error(e)

        logger.error(db)

        logger.error(col)

        return False

    else:

        return True


def server_compare():

    '''

    比较2个数据库是否相同,只是单纯比较条数

    '''

    origin_client = origin()

    target_client = target()

    dbs = get_db_name(origin_client)


    for db in dbs:

        for col in get_collection_name(origin_client, db):

            origin_count = origin_client[db][col].count_documents({})

            target_count = target_client[db][col].count_documents({})

            if origin_count!=target_count:

                logger.info(f'collection {db} {col}有区别')

                #

                if delete_col(target_client,db,col):

                    items = []

                    logger.info(f'正在更新{db} {col}')

                    for i in get_item(origin_client, db, col):

                        items.append(i)


                    insert_item(target_client, db, col, items)

                    logger.info(f'更新数据库 {db} {col}')

                    time.sleep(1)


def get_collection_name(client, db_name):

    collection_names = client[db_name].list_collection_names(session=None)

    return collection_names


def main():

    server_compare()


if __name__ == '__main__':

    main()
原理就是不断迭代,不同的数据库,里面的不同的collection。
对于同名collection,通过条数是否一致,来决定是否要把原数据复制过来。
保存上面文件为main.py
执行 python main.py
就可以进行数据同步工作啦。 查看全部
所以自己动手写代码完成:
# -*- coding: utf-8 -*-
# @Time : 2022/4/6 4:41
# @File : database_migrate.py
# @Author : Rocky C@www.30daydo.com
import time
from loguru import logger
import pymongo
ignore_db = ['admin', 'config', 'local',
] # 忽略更新的库
ignore_col = [('db_stock','dfcf_list_full')]
logger.add('mongo.log')
# 数据库同步
def get_client(user, password, host, port):
connect_uri = f'mongodb://{user}:{password}@{host}:{port}'
client = pymongo.MongoClient(connect_uri)
return client
def origin():
return get_client('admin', 'password', '127.0.0.1', '27017')
def target():
return get_client('root', 'password', '127.0.0.1', '27017')
def transfer():
origin_client = origin()
target_client = target()
dbs = get_db_name(origin_client)
for db in dbs:
for col in get_collection_name(origin_client, db):
if (db,col) in ignore_col:
continue
items = []
logger.info(f'正在更新{db} {col}')
for i in get_item(origin_client, db, col):
items.append(i)
insert_item(target_client, db, col, items)
logger.info(f'更新数据库 {db} {col}')
# time.sleep(0.5)
def get_item(client, db_name, col):
return client[db_name][col].find()
def insert_item(client, db_name, col, data):
batch = 1000
count = len(data)//batch + 1
for i in range(count):
item = data[i*batch:(i+1)*batch]
if len(item)==0:
continue
try:
client[db_name][col].insert_many(item)
except Exception as e:
logger.error(e)
logger.error(f'{db_name} {col} 插入出错')
def get_db_name(client):
db_name = client.list_database_names()
dbs = []
for db in db_name:
if db not in ignore_db:
dbs.append(db)
return dbs
def delete_col(client,db,col):
try:
client[db][col].delete_many({})
except Exception as e:
logger.error(e)
logger.error(db)
logger.error(col)
return False
else:
return True
def server_compare():
'''
比较2个数据库是否相同,只是单纯比较条数
'''
origin_client = origin()
target_client = target()
dbs = get_db_name(origin_client)
for db in dbs:
for col in get_collection_name(origin_client, db):
origin_count = origin_client[db][col].count_documents({})
target_count = target_client[db][col].count_documents({})
if origin_count!=target_count:
logger.info(f'collection {db} {col}有区别')
#
if delete_col(target_client,db,col):
items = []
logger.info(f'正在更新{db} {col}')
for i in get_item(origin_client, db, col):
items.append(i)
insert_item(target_client, db, col, items)
logger.info(f'更新数据库 {db} {col}')
time.sleep(1)
def get_collection_name(client, db_name):
collection_names = client[db_name].list_collection_names(session=None)
return collection_names
def main():
server_compare()
if __name__ == '__main__':
main()
原理就是不断迭代,不同的数据库,里面的不同的collection。
对于同名collection,通过条数是否一致,来决定是否要把原数据复制过来。
保存上面文件为main.py
执行 python main.py
就可以进行数据同步工作啦。
知识星球获取文章链接与数据
python爬虫 • 李魔佛 发表了文章 • 0 个评论 • 2896 次浏览 • 2022-03-21 20:15
既然官方不提供这个功能,只能自己使用爬虫手段获取了,额。

既然官方不提供这个功能,只能自己使用爬虫手段获取了,额。
python AES 加密 windows和linux平台的不同
李魔佛 发表了文章 • 0 个评论 • 3112 次浏览 • 2022-03-19 11:18
实际两个平台使用pip install安装的aes库不一样。
windows报错
  File "C:\anaconda\lib\site-packages\Crypto\Cipher\__init__.py", line 77, in _create_cipher

    raise TypeError("IV is not meaningful for the ECB mode")

TypeError: IV is not meaningful for the ECB mode
只需要把AES.new() 的参数里面的iv给去掉就可以了。
查看全部
实际两个平台使用pip install安装的aes库不一样。
windows报错
File "C:\anaconda\lib\site-packages\Crypto\Cipher\__init__.py", line 77, in _create_cipher
raise TypeError("IV is not meaningful for the ECB mode")
TypeError: IV is not meaningful for the ECB mode
只需要把AES.new() 的参数里面的iv给去掉就可以了。

ASGI 'lifespan' protocol appears unsupported
李魔佛 发表了文章 • 0 个评论 • 5172 次浏览 • 2022-01-18 23:12
实际原因并不是真的不支持。
可能只是在lifespan部分的代码里面出现了错误而无法打印出来。
启动的时候加入:--lifespan on
uvicorn --host 0.0.0.0 asgi_lc:app --lifespan on
这样就知道你的代码那里出错了,只要把错误的地方修复了,那么这个提示就会消失了。 查看全部
实际原因并不是真的不支持。
可能只是在lifespan部分的代码里面出现了错误而无法打印出来。
启动的时候加入:--lifespan on
uvicorn --host 0.0.0.0 asgi_lc:app --lifespan on
这样就知道你的代码那里出错了,只要把错误的地方修复了,那么这个提示就会消失了。
不是所有的bytes都可以转换为string
李魔佛 发表了文章 • 0 个评论 • 2693 次浏览 • 2022-01-14 14:56
b.decode('utf8')
如果报错:UnicodeDecodeError: 'utf-8' codec can't decode byte 0xe4 in position 1: invalid continuation byte
说明字节无法字节转为string,
上面的字节是可以正常decode为utf8
而改下字节数据
所以你试下decode下面的字节:c=b'\x1e\xe4\xd5\x97\x9a#\x99kC\xadD\x7f\x9a\xc2G\x92'
是无法解析的。
这个是没有办法的,如果要硬刚 。
可以加入参数errors = ‘replace’
b.decode('utf8',errors='replace')
这样就不会报错。但是这也只是输出的乱码。
正确的姿势是要看看你的字节的最原始编码格式。如果是gbk,那么就应该使用b.decode('gbk')
查看全部
b.decode('utf8')
如果报错:
UnicodeDecodeError: 'utf-8' codec can't decode byte 0xe4 in position 1: invalid continuation byte
说明字节无法字节转为string,
上面的字节是可以正常decode为utf8
而改下字节数据
所以你试下decode下面的字节:
c=b'\x1e\xe4\xd5\x97\x9a#\x99kC\xadD\x7f\x9a\xc2G\x92'
是无法解析的。
这个是没有办法的,如果要硬刚 。
可以加入参数errors = ‘replace’
b.decode('utf8',errors='replace')这样就不会报错。但是这也只是输出的乱码。
正确的姿势是要看看你的字节的最原始编码格式。如果是gbk,那么就应该使用b.decode('gbk')
vs code 无法启动jupyter notebook 修复 亲测
李魔佛 发表了文章 • 0 个评论 • 4752 次浏览 • 2021-12-16 12:12
之前一直运行得好好的。不知道安装了什么依赖库后就这样了。。
在国外网站找了一通后,找到了解决办法:
pip install traitlets==4.3.3
不得不感慨,国外大神多,国内csdn乱ctrl cv.
查看全部
failed to start INotebook in kernel, UI Disabled = false s [Error]: Unable to start Kernel 'base (Python 3.8.3)' due to connection timeout. View Jupyter [log](command:jupyter.viewOutput) for further detail
之前一直运行得好好的。不知道安装了什么依赖库后就这样了。。
在国外网站找了一通后,找到了解决办法:
pip install traitlets==4.3.3
不得不感慨,国外大神多,国内csdn乱ctrl cv.
想用python爬虫批量下载数据,下载下来的数据是excel表格形式,但是源码下载的链接如下,请问这样可以爬吗?
python爬虫 • 低调的哥哥 回复了问题 • 2 人关注 • 1 个回复 • 3734 次浏览 • 2021-11-26 13:20
