通知设置 新通知
5 个在线 AI 字幕生成器,让字幕生成变得更简单
马化云 发表了文章 • 0 个评论 • 6453 次浏览 • 2023-08-08 18:29
磨刀不误砍柴工,现在chatGPT等AI工具逐渐在每一个领域里面,慢慢地替代人类的繁琐工作,添加字幕的任务也不例外。本文分享5款在线的字幕AI生成工具,能够大大地提高用户的视频编辑效率。
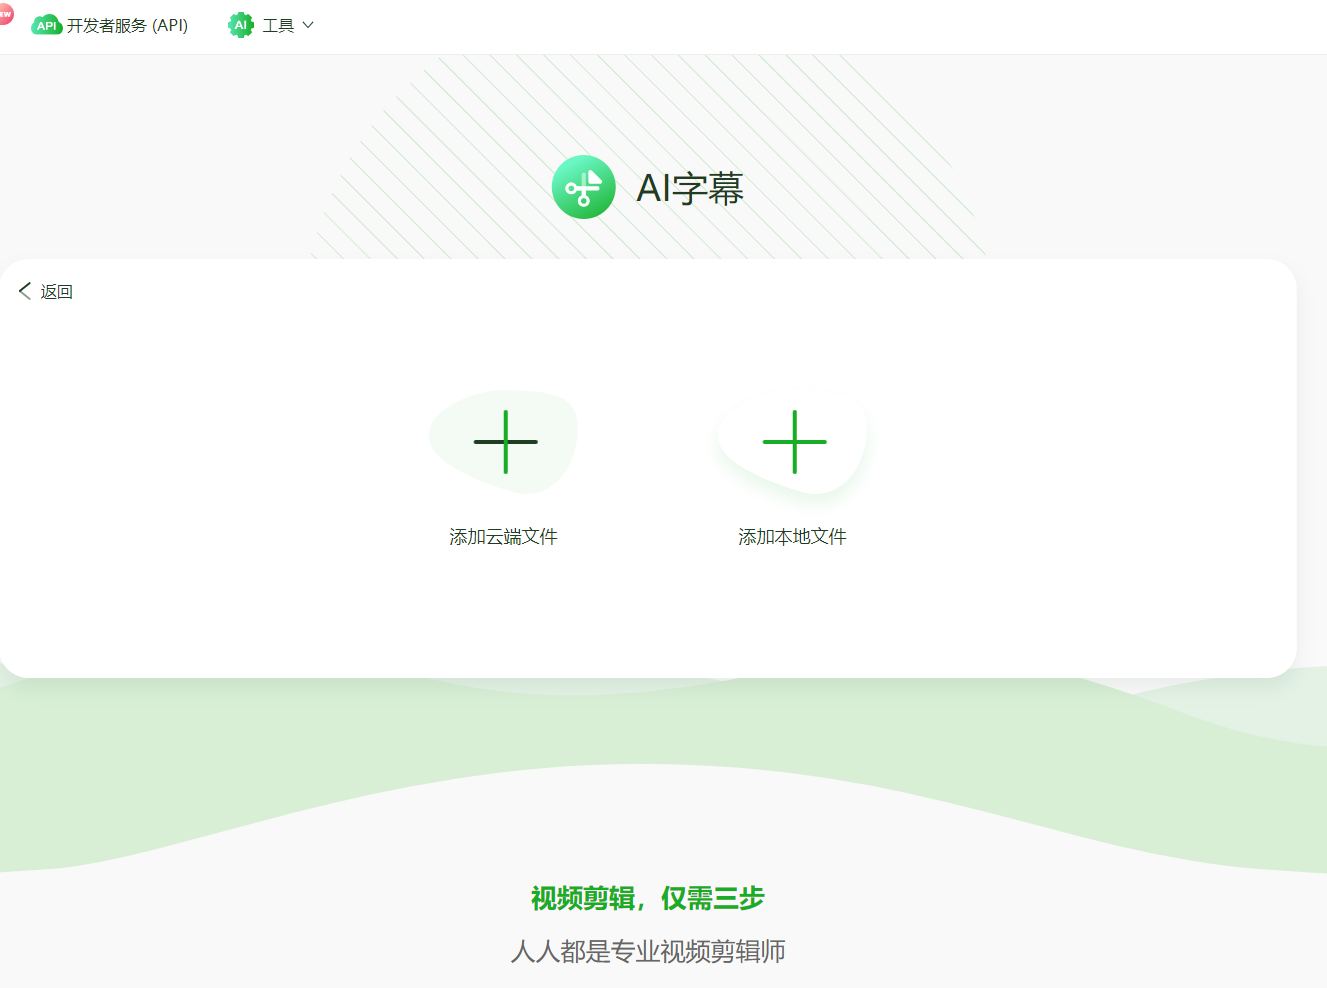
一、录咖-AI 字幕
https://reccloud.cn/ai-subtitle
第一个字幕生成器是录咖-AI 字幕。它的主要功能是在线使用、操作简单、精准识别,并支持 AI 生成和 AI 翻译双语字幕。
下面是使用录咖-AI 字幕的简单步骤:
打开录咖-AI 字幕的官方网站。
添加您要为其生成字幕的视频文件。
等待录咖-AI 字幕完成语音识别和字幕生成的过程。
如果需要双语字幕,您可以选择 AI 翻译功能,将生成的字幕自动翻译为另一种语言。
您可以选择导出字幕或直接保存字幕到视频中。
优势:
● 操作简单:无需复杂的设置和技术要求,用户可以轻松上手。
● 精准识别:采用先进的语音识别技术,能够准确地将语音内容转换为文字。
● 支持 AI 生成:支持使用 AI 生成字幕,可以快速生成准确的字幕内容。
● 支持 AI 翻译:支持将生成的字幕自动翻译为另一种语言,提供双语字幕的功能。
劣势:
● 依赖网络:由于是在线使用,录咖-AI 字幕的使用需要保持网络连接。
二、EasySub
https://easyssub.com/zh/
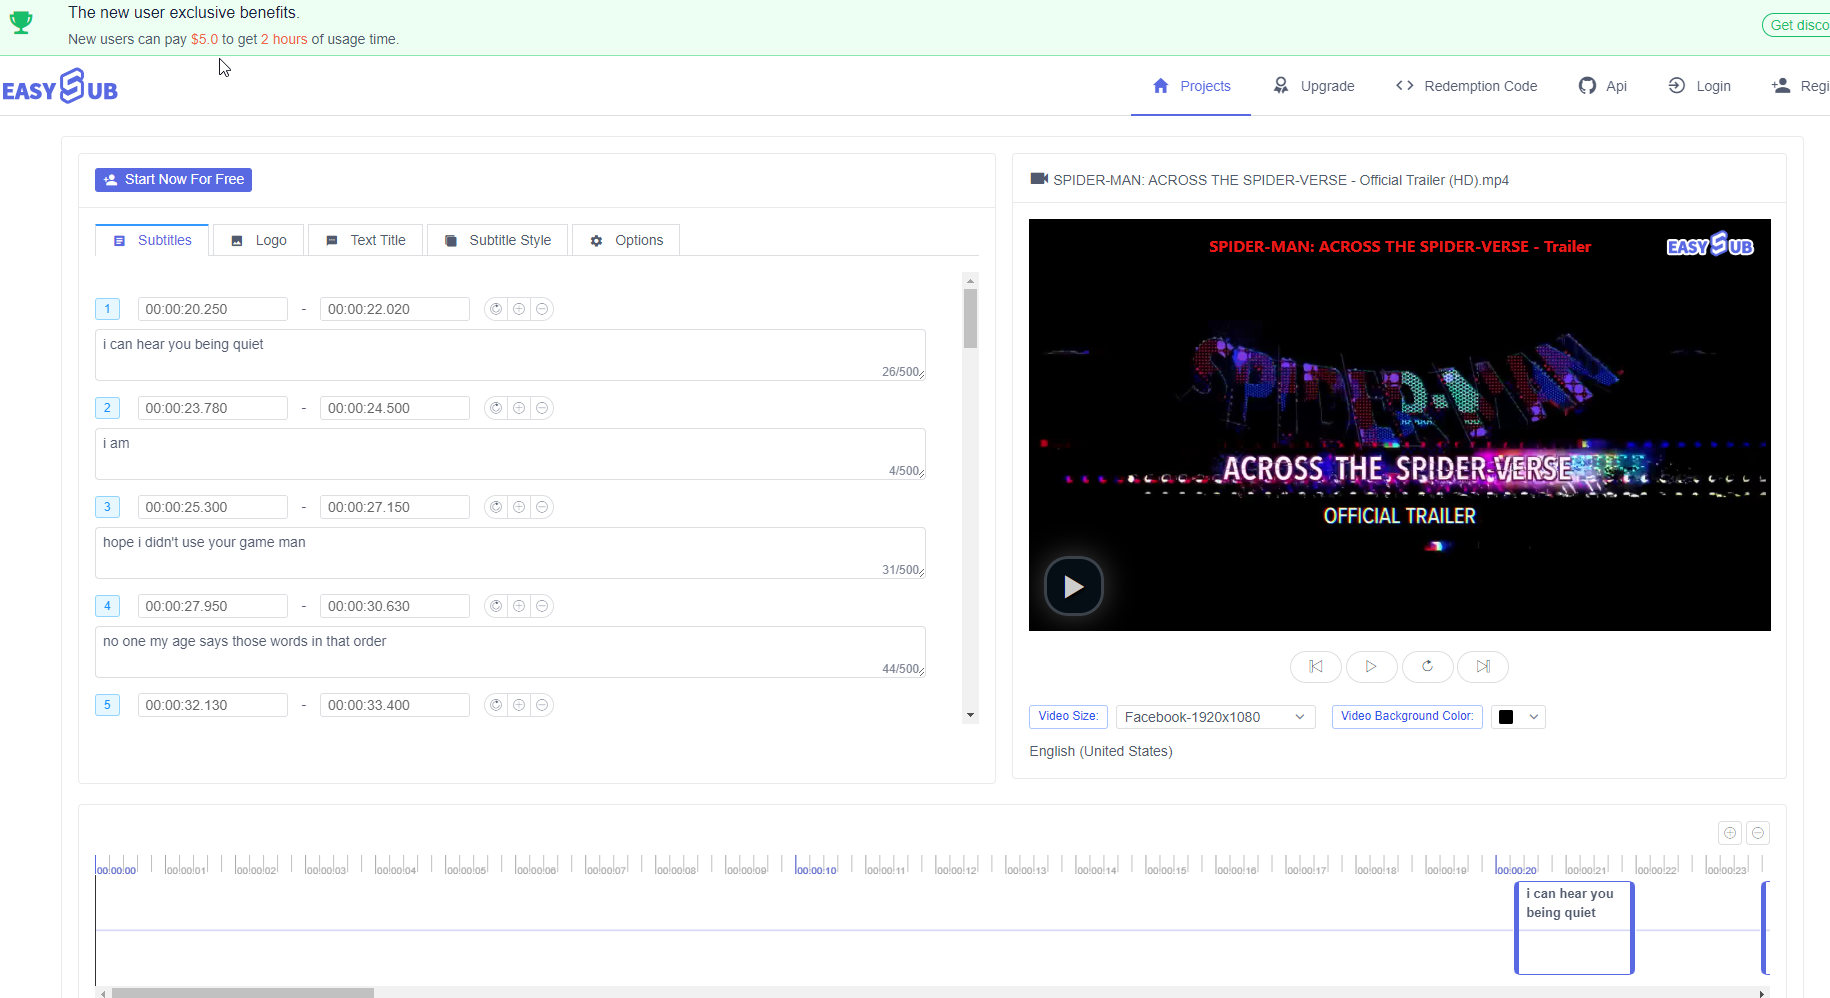
第二个字幕生成器是 EasySub 。EasySub 是一个在线字幕生成器,提供免费试用选项,但并非完全免费。免费试用仅限于 30 分钟内生成字幕,超过时限则需要付费。EasySub 支持多语言,但处理速度较慢。
使用步骤:
1. 打开 EasySub 的官方网站。
2. 创建账户。
3. 上传视频文件或提供视频的 URL 。
4. 等待 EasySub 完成语音识别和字幕生成。
5. 对生成的字幕进行基本的编辑和调整。
6. 选择合适的视频格式然后导出视频。
优势:
● 多语言支持:EasySub 可以为不同语种的视频生成对应的字幕。
● 免费试用:虽然不是完全免费,但 30 分钟内可以免费生成字幕。
劣势:
● 处理速度较慢:EasySub 生成字幕的速度相对较慢。
● 需要付费:超过 30 分钟的使用时限后,需要付费继续使用。
三、FlexClip
https://www.flexclip.com/cn/tools/auto-subtitle/
第三个字幕生成器是 FlexClip 。FlexClip 是一个免费在线使用的字幕生成器,它支持翻译多语言,但处理速度较慢,加载时间较长,并且有广告显示。使用 FlexClip 需要登录账号,免费账户可以使用 5 分钟时长。需要注意的是,新生成的字幕会覆盖当前字幕,而且 FlexClip 不支持双语字幕。此外,FlexClip 的界面不太易用,而且识别精准度方面可能存在一定的问题。
使用步骤:
1. 打开 FlexClip 的官方网站并登录账号。
2. 上传视频文件。
3. 等待 FlexClip 完成语音识别和字幕生成的过程。
4. 编辑和调整生成的字幕内容。
5. 将字幕保存或导出到视频中。
优势:
- 免费在线使用:FlexClip 提供免费的在线字幕生成服务。
- 多语言翻译:支持将字幕翻译为多种语言,满足不同语言需求。
劣势:
- 处理速度较慢:FlexClip 的处理速度相对较慢,可能需要较长的等待时间。
- 广告显示:使用 FlexClip 时会显示广告,可能对用户体验造成一定影响。
识别精准度较低:由于识别技术的限制,FlexClip 的识别精准度可能不如其他字幕生成器。
四、Sonix
https://sonix.ai/zh/automated-subtitles-and-captions
第四个字幕生成器是 Sonix 。Sonix 是一个提供 30 分钟内免费使用的字幕生成器,用户可以自定义、拆分和编辑字幕,并支持导出到 SRT 和 VTT 格式。然而,Sonix 的注册过程相对较复杂。
使用步骤:
1. 在 Sonix 的官方网站上注册账号并登录。
2. 上传音频或视频文件。
3. Sonix 会对文件进行语音识别,生成相应的字幕文本。
4. 对生成的字幕进行自定义编辑,可以进行拆分、合并、修正等操作。
5. 在编辑完成后,选择导出字幕的格式,如 SRT 或 VTT 。 6. 完成导出后,可以将字幕应用到相应的视频或使用在其他平台上。
优势:
- 30 分钟内免费使用:Sonix 提供了 30 分钟内的免费使用,方便用户进行快速的字幕生成和编辑。
- 自定义编辑:用户可以对生成的字幕进行自定义编辑,以满足个性化的需求。
- 多种导出格式:Sonix 支持将字幕导出为常见的 SRT 和 VTT 格式,方便在不同平台和播放器上使用。 劣势:
注册过程较复杂:Sonix 的注册过程可能相对复杂,可能需要填写一些个人信息或进行身份验证。
五、Auris
https://aurisai.io/zh/add-subtitles-to-video/
第五个字幕生成器是 Auris 。Auris 是一个在线使用的字幕生成器,提供 30 分钟内的免费使用。它支持翻译多种语言,并且可以处理多种视频格式。
使用步骤:
1. 打开 Auris 的官方网站。
2. 选择音频语言,即选择你要生成字幕的音频语言。
3. 点击上传按钮,选择你要生成字幕的视频文件。
4. 等待一段时间,直到字幕生成完成。
5. 在字幕生成完成后,你可以看到生成的字幕文本。
优势:
- 在线使用:Auris 是一个在线字幕生成器,无需下载和安装额外的软件。
- 多语言翻译:支持将字幕文本进行多语言翻译,满足不同语种之间的转换需求。 - 支持 Facebook 和 Google 账号登陆:用户可以通过自己的 Facebook 或 Google 账号登录 Auris ,方便快捷。
劣势:
- 30 分钟内免费限制:Auris 的免费使用时长限制为 30 分钟,超过时长需要购买付费账户或进行其他付费方式。 查看全部
磨刀不误砍柴工,现在chatGPT等AI工具逐渐在每一个领域里面,慢慢地替代人类的繁琐工作,添加字幕的任务也不例外。本文分享5款在线的字幕AI生成工具,能够大大地提高用户的视频编辑效率。
一、录咖-AI 字幕
https://reccloud.cn/ai-subtitle
第一个字幕生成器是录咖-AI 字幕。它的主要功能是在线使用、操作简单、精准识别,并支持 AI 生成和 AI 翻译双语字幕。
下面是使用录咖-AI 字幕的简单步骤:
打开录咖-AI 字幕的官方网站。
添加您要为其生成字幕的视频文件。
等待录咖-AI 字幕完成语音识别和字幕生成的过程。
如果需要双语字幕,您可以选择 AI 翻译功能,将生成的字幕自动翻译为另一种语言。
您可以选择导出字幕或直接保存字幕到视频中。
优势:
● 操作简单:无需复杂的设置和技术要求,用户可以轻松上手。
● 精准识别:采用先进的语音识别技术,能够准确地将语音内容转换为文字。
● 支持 AI 生成:支持使用 AI 生成字幕,可以快速生成准确的字幕内容。
● 支持 AI 翻译:支持将生成的字幕自动翻译为另一种语言,提供双语字幕的功能。
劣势:
● 依赖网络:由于是在线使用,录咖-AI 字幕的使用需要保持网络连接。
二、EasySub
https://easyssub.com/zh/
第二个字幕生成器是 EasySub 。EasySub 是一个在线字幕生成器,提供免费试用选项,但并非完全免费。免费试用仅限于 30 分钟内生成字幕,超过时限则需要付费。EasySub 支持多语言,但处理速度较慢。
使用步骤:
1. 打开 EasySub 的官方网站。
2. 创建账户。
3. 上传视频文件或提供视频的 URL 。
4. 等待 EasySub 完成语音识别和字幕生成。
5. 对生成的字幕进行基本的编辑和调整。
6. 选择合适的视频格式然后导出视频。
优势:
● 多语言支持:EasySub 可以为不同语种的视频生成对应的字幕。
● 免费试用:虽然不是完全免费,但 30 分钟内可以免费生成字幕。
劣势:
● 处理速度较慢:EasySub 生成字幕的速度相对较慢。
● 需要付费:超过 30 分钟的使用时限后,需要付费继续使用。
三、FlexClip
https://www.flexclip.com/cn/tools/auto-subtitle/
第三个字幕生成器是 FlexClip 。FlexClip 是一个免费在线使用的字幕生成器,它支持翻译多语言,但处理速度较慢,加载时间较长,并且有广告显示。使用 FlexClip 需要登录账号,免费账户可以使用 5 分钟时长。需要注意的是,新生成的字幕会覆盖当前字幕,而且 FlexClip 不支持双语字幕。此外,FlexClip 的界面不太易用,而且识别精准度方面可能存在一定的问题。
使用步骤:
1. 打开 FlexClip 的官方网站并登录账号。
2. 上传视频文件。
3. 等待 FlexClip 完成语音识别和字幕生成的过程。
4. 编辑和调整生成的字幕内容。
5. 将字幕保存或导出到视频中。
优势:
- 免费在线使用:FlexClip 提供免费的在线字幕生成服务。
- 多语言翻译:支持将字幕翻译为多种语言,满足不同语言需求。
劣势:
- 处理速度较慢:FlexClip 的处理速度相对较慢,可能需要较长的等待时间。
- 广告显示:使用 FlexClip 时会显示广告,可能对用户体验造成一定影响。
识别精准度较低:由于识别技术的限制,FlexClip 的识别精准度可能不如其他字幕生成器。
四、Sonix
https://sonix.ai/zh/automated-subtitles-and-captions
第四个字幕生成器是 Sonix 。Sonix 是一个提供 30 分钟内免费使用的字幕生成器,用户可以自定义、拆分和编辑字幕,并支持导出到 SRT 和 VTT 格式。然而,Sonix 的注册过程相对较复杂。
使用步骤:
1. 在 Sonix 的官方网站上注册账号并登录。
2. 上传音频或视频文件。
3. Sonix 会对文件进行语音识别,生成相应的字幕文本。
4. 对生成的字幕进行自定义编辑,可以进行拆分、合并、修正等操作。
5. 在编辑完成后,选择导出字幕的格式,如 SRT 或 VTT 。 6. 完成导出后,可以将字幕应用到相应的视频或使用在其他平台上。
优势:
- 30 分钟内免费使用:Sonix 提供了 30 分钟内的免费使用,方便用户进行快速的字幕生成和编辑。
- 自定义编辑:用户可以对生成的字幕进行自定义编辑,以满足个性化的需求。
- 多种导出格式:Sonix 支持将字幕导出为常见的 SRT 和 VTT 格式,方便在不同平台和播放器上使用。 劣势:
注册过程较复杂:Sonix 的注册过程可能相对复杂,可能需要填写一些个人信息或进行身份验证。
五、Auris
https://aurisai.io/zh/add-subtitles-to-video/
第五个字幕生成器是 Auris 。Auris 是一个在线使用的字幕生成器,提供 30 分钟内的免费使用。它支持翻译多种语言,并且可以处理多种视频格式。
使用步骤:
1. 打开 Auris 的官方网站。
2. 选择音频语言,即选择你要生成字幕的音频语言。
3. 点击上传按钮,选择你要生成字幕的视频文件。
4. 等待一段时间,直到字幕生成完成。
5. 在字幕生成完成后,你可以看到生成的字幕文本。
优势:
- 在线使用:Auris 是一个在线字幕生成器,无需下载和安装额外的软件。
- 多语言翻译:支持将字幕文本进行多语言翻译,满足不同语种之间的转换需求。 - 支持 Facebook 和 Google 账号登陆:用户可以通过自己的 Facebook 或 Google 账号登录 Auris ,方便快捷。
劣势:
- 30 分钟内免费限制:Auris 的免费使用时长限制为 30 分钟,超过时长需要购买付费账户或进行其他付费方式。
ChatGPT开启GPT4不限次数使用插件
马化云 发表了文章 • 0 个评论 • 3340 次浏览 • 2023-06-07 17:50
一个ChatGPT开启GPT4不限次数使用插件:
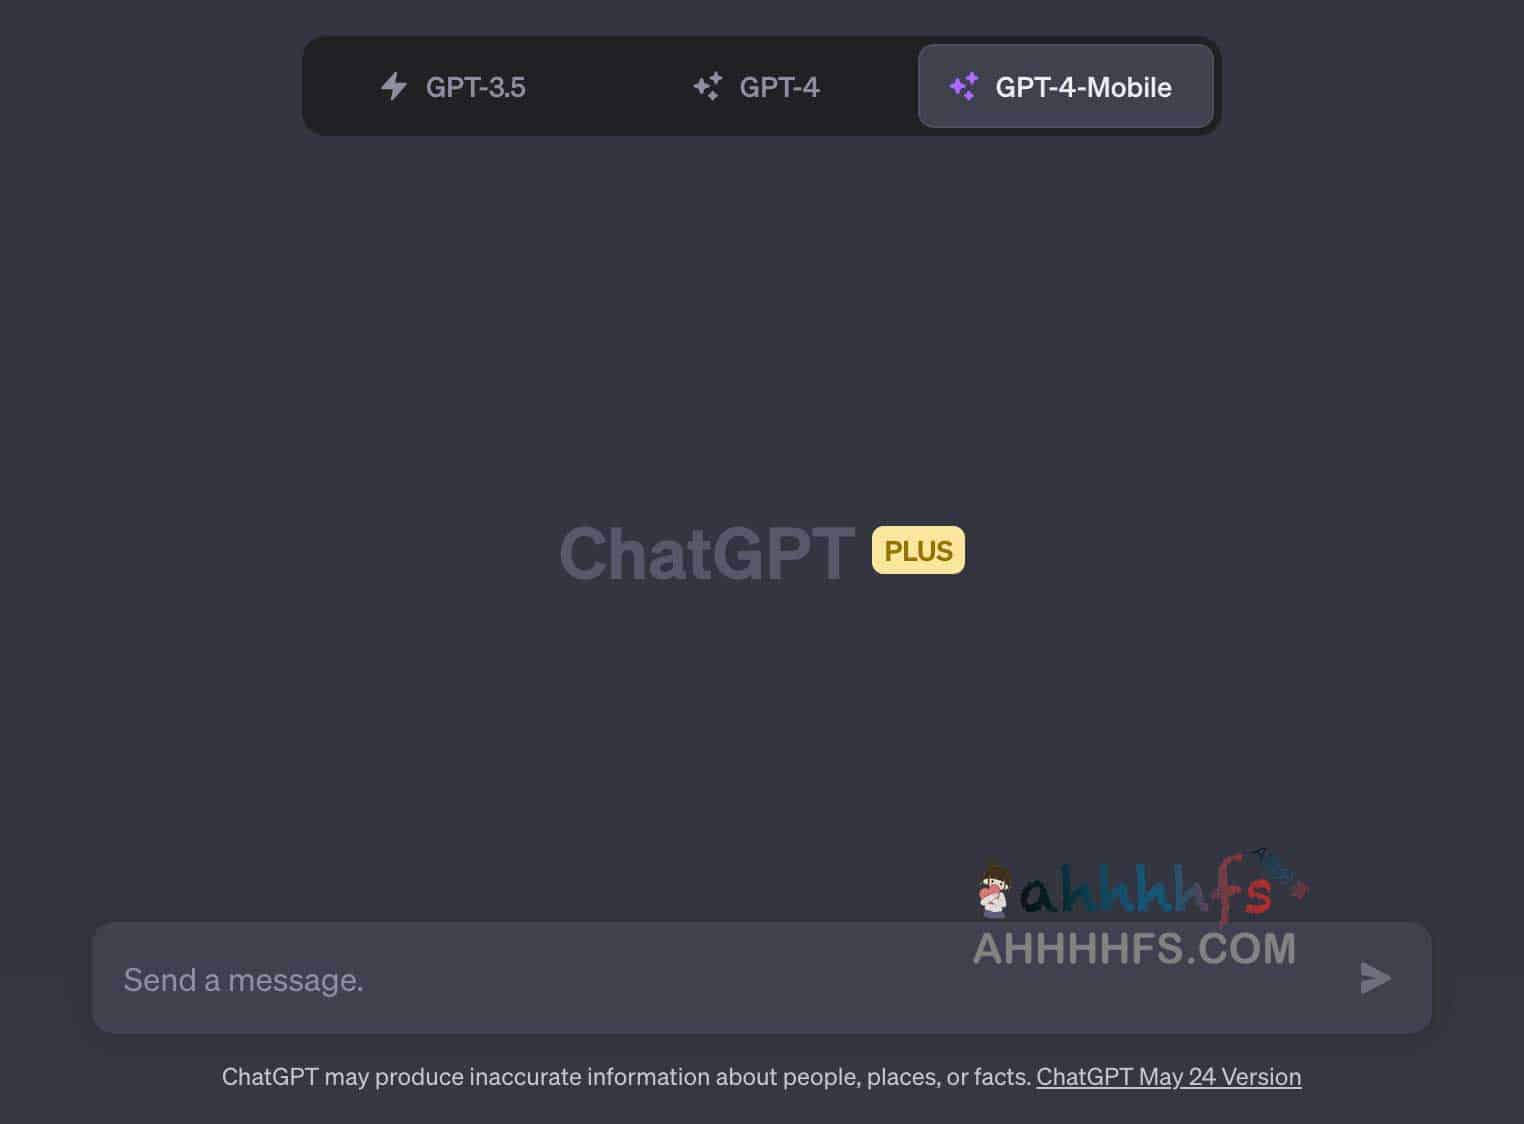
ChatGPT开启不限次数的GPT4-Mobile,是一个油猴插件,取自iOS客户端的GPT4模型,
因为目前iOS上的客户端GPT4使用次数没有限制,而这个插件就是利用了这个特性实现的GPT4不限次数使用,
不过前提是你也是开通ChatGPT Plus的用户才可以的,不过目前插件无法和ChatGPT增强插件:KeepChatGPT同时启用。
感兴趣的同学可以下载体验。
ChatGPT开启GPT4不限次数使用插件下载
地址:ChatGPT开启不限次数的GPT4-Mobile
其他ChatGPT插件
1、ChatGPT增强插件 解决各种报错-KeepChatGPT
2、更多ChatGPT工具资源
查看全部
一个ChatGPT开启GPT4不限次数使用插件:
ChatGPT开启不限次数的GPT4-Mobile,是一个油猴插件,取自iOS客户端的GPT4模型,
因为目前iOS上的客户端GPT4使用次数没有限制,而这个插件就是利用了这个特性实现的GPT4不限次数使用,
不过前提是你也是开通ChatGPT Plus的用户才可以的,不过目前插件无法和ChatGPT增强插件:KeepChatGPT同时启用。
感兴趣的同学可以下载体验。
ChatGPT开启GPT4不限次数使用插件下载
地址:ChatGPT开启不限次数的GPT4-Mobile
其他ChatGPT插件
1、ChatGPT增强插件 解决各种报错-KeepChatGPT
2、更多ChatGPT工具资源
本地CPU部署的stable diffusion webui 环境,本地不受限,还可以生成色图黄图
马化云 发表了文章 • 0 个评论 • 7354 次浏览 • 2023-04-17 00:27
需要不断调节词汇(英语),打造你想要的人物设定
由于本地使用的词汇不限制,还能够生成细节丰富的黄图。(宅男福音)
提供一个语法给你们用用:prompt: beautiful, masterpiece, best quality, extremely detailed face, perfect lighting, (1girl, solo, 1boy, 1girl, NemoNelly, Slight penetration, lying, on back, spread legs:1.5), street, crowd, ((skinny)), ((puffy eyes)), brown hair, medium hair, cowboy shot, medium breasts, swept bangs, walking, outdoors, sunshine, light_rays, fantasy, rococo, hair_flower,low tied hair, smile, half-closed eyes, dating, (nude), nsfw, (heavy breathing:1.5), tears, crying, blush, wet, sweat, <lora:koreanDollLikeness_v15:0.4>, <lora:povImminentPenetration_ipv1:0>, <lora:breastinclassBetter_v14:0.1>
整体来说,现在的AI技术和效果就像跃迁了一个台阶。
查看全部
需要不断调节词汇(英语),打造你想要的人物设定
由于本地使用的词汇不限制,还能够生成细节丰富的黄图。(宅男福音)
提供一个语法给你们用用:
prompt: beautiful, masterpiece, best quality, extremely detailed face, perfect lighting, (1girl, solo, 1boy, 1girl, NemoNelly, Slight penetration, lying, on back, spread legs:1.5), street, crowd, ((skinny)), ((puffy eyes)), brown hair, medium hair, cowboy shot, medium breasts, swept bangs, walking, outdoors, sunshine, light_rays, fantasy, rococo, hair_flower,low tied hair, smile, half-closed eyes, dating, (nude), nsfw, (heavy breathing:1.5), tears, crying, blush, wet, sweat, <lora:koreanDollLikeness_v15:0.4>, <lora:povImminentPenetration_ipv1:0>, <lora:breastinclassBetter_v14:0.1>
整体来说,现在的AI技术和效果就像跃迁了一个台阶。

Stable Diffusion WebUI 模型下载速度很慢,但挂上梯子后速度狂飙
马化云 发表了文章 • 0 个评论 • 5295 次浏览 • 2023-04-16 00:38
$ cd stable-diffusion-webui
$ git checkout 22bcc7be428c94e9408f589966c2040187245d81
# 我们需要 CPU 版本的 torch
$ export TORCH_COMMAND="pip install torch==1.13.1 torchvision==0.14.1 --index-url https: //download.pytorch.org/whl/cpu"
$ export USE_NNPACK=0
# 前 4 个参数是为了让其运行在 CPU 上, 最后一个参数是让 WebUI 可以远程访问
$ bash webui.sh --skip-torch-cuda-test --no-half --precision full --use-cpu all --listen
不过安装实在太慢了。而且安装好了之后,如果下载模型,还要单独下载,也是奇慢。
试了下把梯子代理挂上,模型下载就飞快了
除了模型,还有一些checkpoint文件
Stable diffusion v1.4
stable-diffusion-v-1-4-original/resolve/main/sd-v1-4.ckpt
Stable diffusion v1.5
stable-diffusion-v1-5/resolve/main/v1-5-pruned-emaonly.ckpt
lora模型
koreanDollLikeness_v15.safetensors
等等。
查看全部
$ git clone https ://github.com/AUTOMATIC1111/stable-diffusion-webui.git


$ cd stable-diffusion-webui


$ git checkout 22bcc7be428c94e9408f589966c2040187245d81


# 我们需要 CPU 版本的 torch

$ export TORCH_COMMAND="pip install torch==1.13.1 torchvision==0.14.1 --index-url https: //download.pytorch.org/whl/cpu"

$ export USE_NNPACK=0


# 前 4 个参数是为了让其运行在 CPU 上, 最后一个参数是让 WebUI 可以远程访问

$ bash webui.sh --skip-torch-cuda-test --no-half --precision full --use-cpu all --listen
不过安装实在太慢了。而且安装好了之后,如果下载模型,还要单独下载,也是奇慢。
试了下把梯子代理挂上,模型下载就飞快了
除了模型,还有一些checkpoint文件
Stable diffusion v1.4
stable-diffusion-v-1-4-original/resolve/main/sd-v1-4.ckpt
Stable diffusion v1.5
stable-diffusion-v1-5/resolve/main/v1-5-pruned-emaonly.ckpt
lora模型
koreanDollLikeness_v15.safetensors
等等。
没有显卡GPU,想用CPU玩Stable Diffusion 本地部署AI绘图吗? 手把手保姆教程
马化云 发表了文章 • 0 个评论 • 3964 次浏览 • 2023-04-15 13:16
在网上看到那些美cry的AI生成的美女图片 ,你是不是也蠢蠢欲动想要按照自己的想法生成一副属于自己的女神照呢?
什么?你的电脑显卡没有显卡? 没关系,今天笔者带大家手把手在本地电脑上使用CPU部署Stable Diffusion+Lora AI绘画 模型。
什么是Stable Diffusion ?
Stable Diffusion 是一种通过文字描述创造出图像的 AI 模型. 它是一个开源软件, 有许多人愿意在网络上免费分享他们的计算资源, 使得新手可以在线尝试.
安装
本地部署的 Stable Diffusion 有更高的可玩性, 例如允许您替换模型文件, 细致的调整参数, 以及突破线上服务的道德伦理检查等. 鉴于我目前没有可供霍霍的 GPU, 因此我将在一台本地ubuntu上部署,因为Stable Diffusion 在运行过程中大概需要吃掉 12G 内存。如果你的电脑或者服务器没有16GB以上的内存,需要配置一个虚拟内存来扩展你的内存容量,当然,性能也打个折扣,毕竟是在硬盘上扩展的内存空间。
如果你的电脑内存大小大于16GB,可以忽略以下的操作:$ dd if=/dev/zero of=/mnt/swap bs=64M count=256
$ chmod 0600 /mnt/swap
$ mkswap /mnt/swap
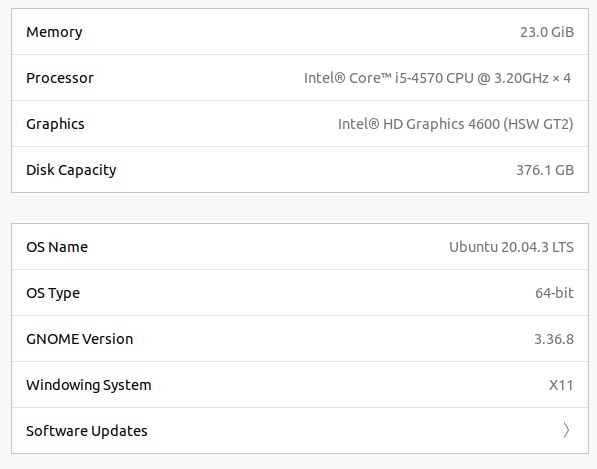
$ swapon /mnt/swap笔者的电脑配置:
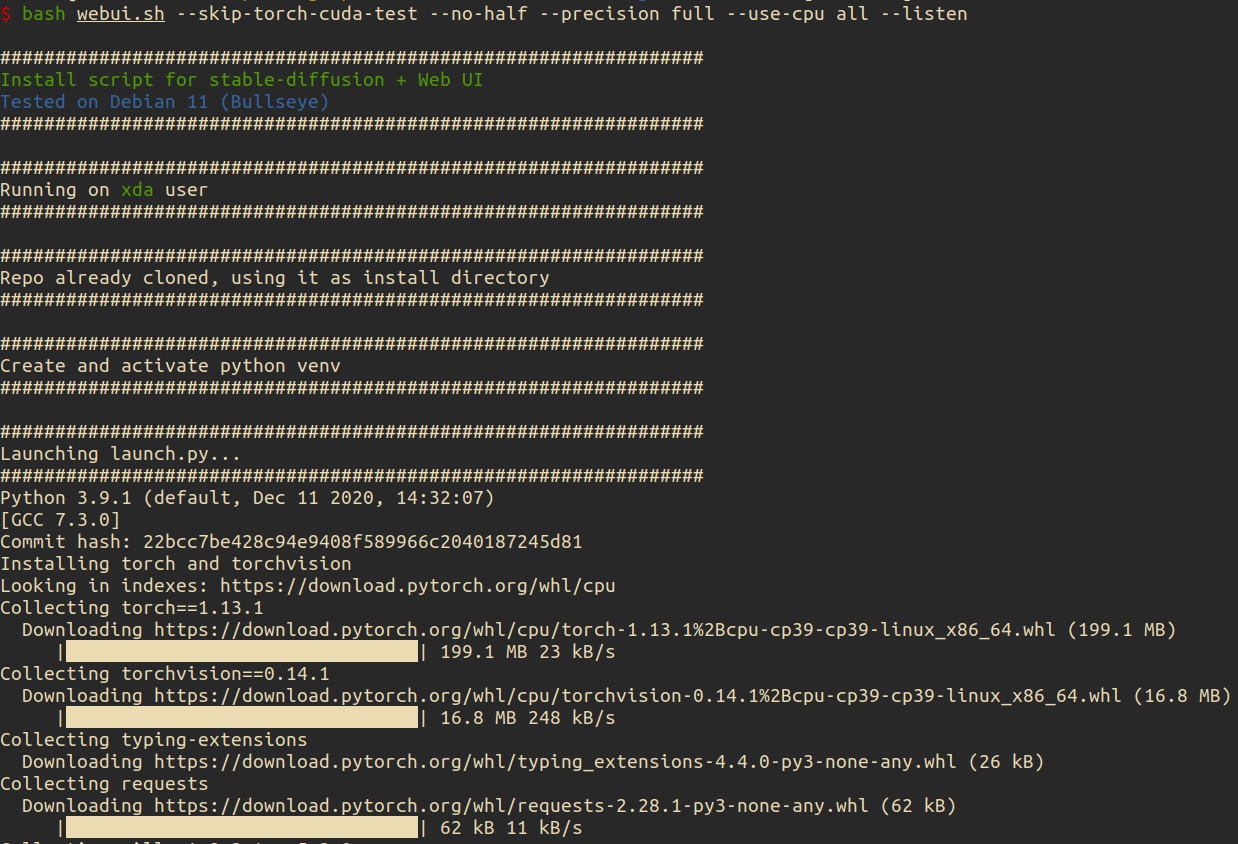
然后直接安装下载并安装 Stable Diffusion WebUI:
稍等片刻(依赖你的网速)
由于需要连接到github下载源码,所以如果网络不稳定掉线,需要重新运行安装命令就可以了。
重新运行:bash webui.sh --skip-torch-cuda-test --no-half --precision full --use-cpu all --listen
这个脚本会自动创建python的虚拟环境,并安装对应的pip依赖,一键到位,可谓贴心。果断要到github上给原作者加星
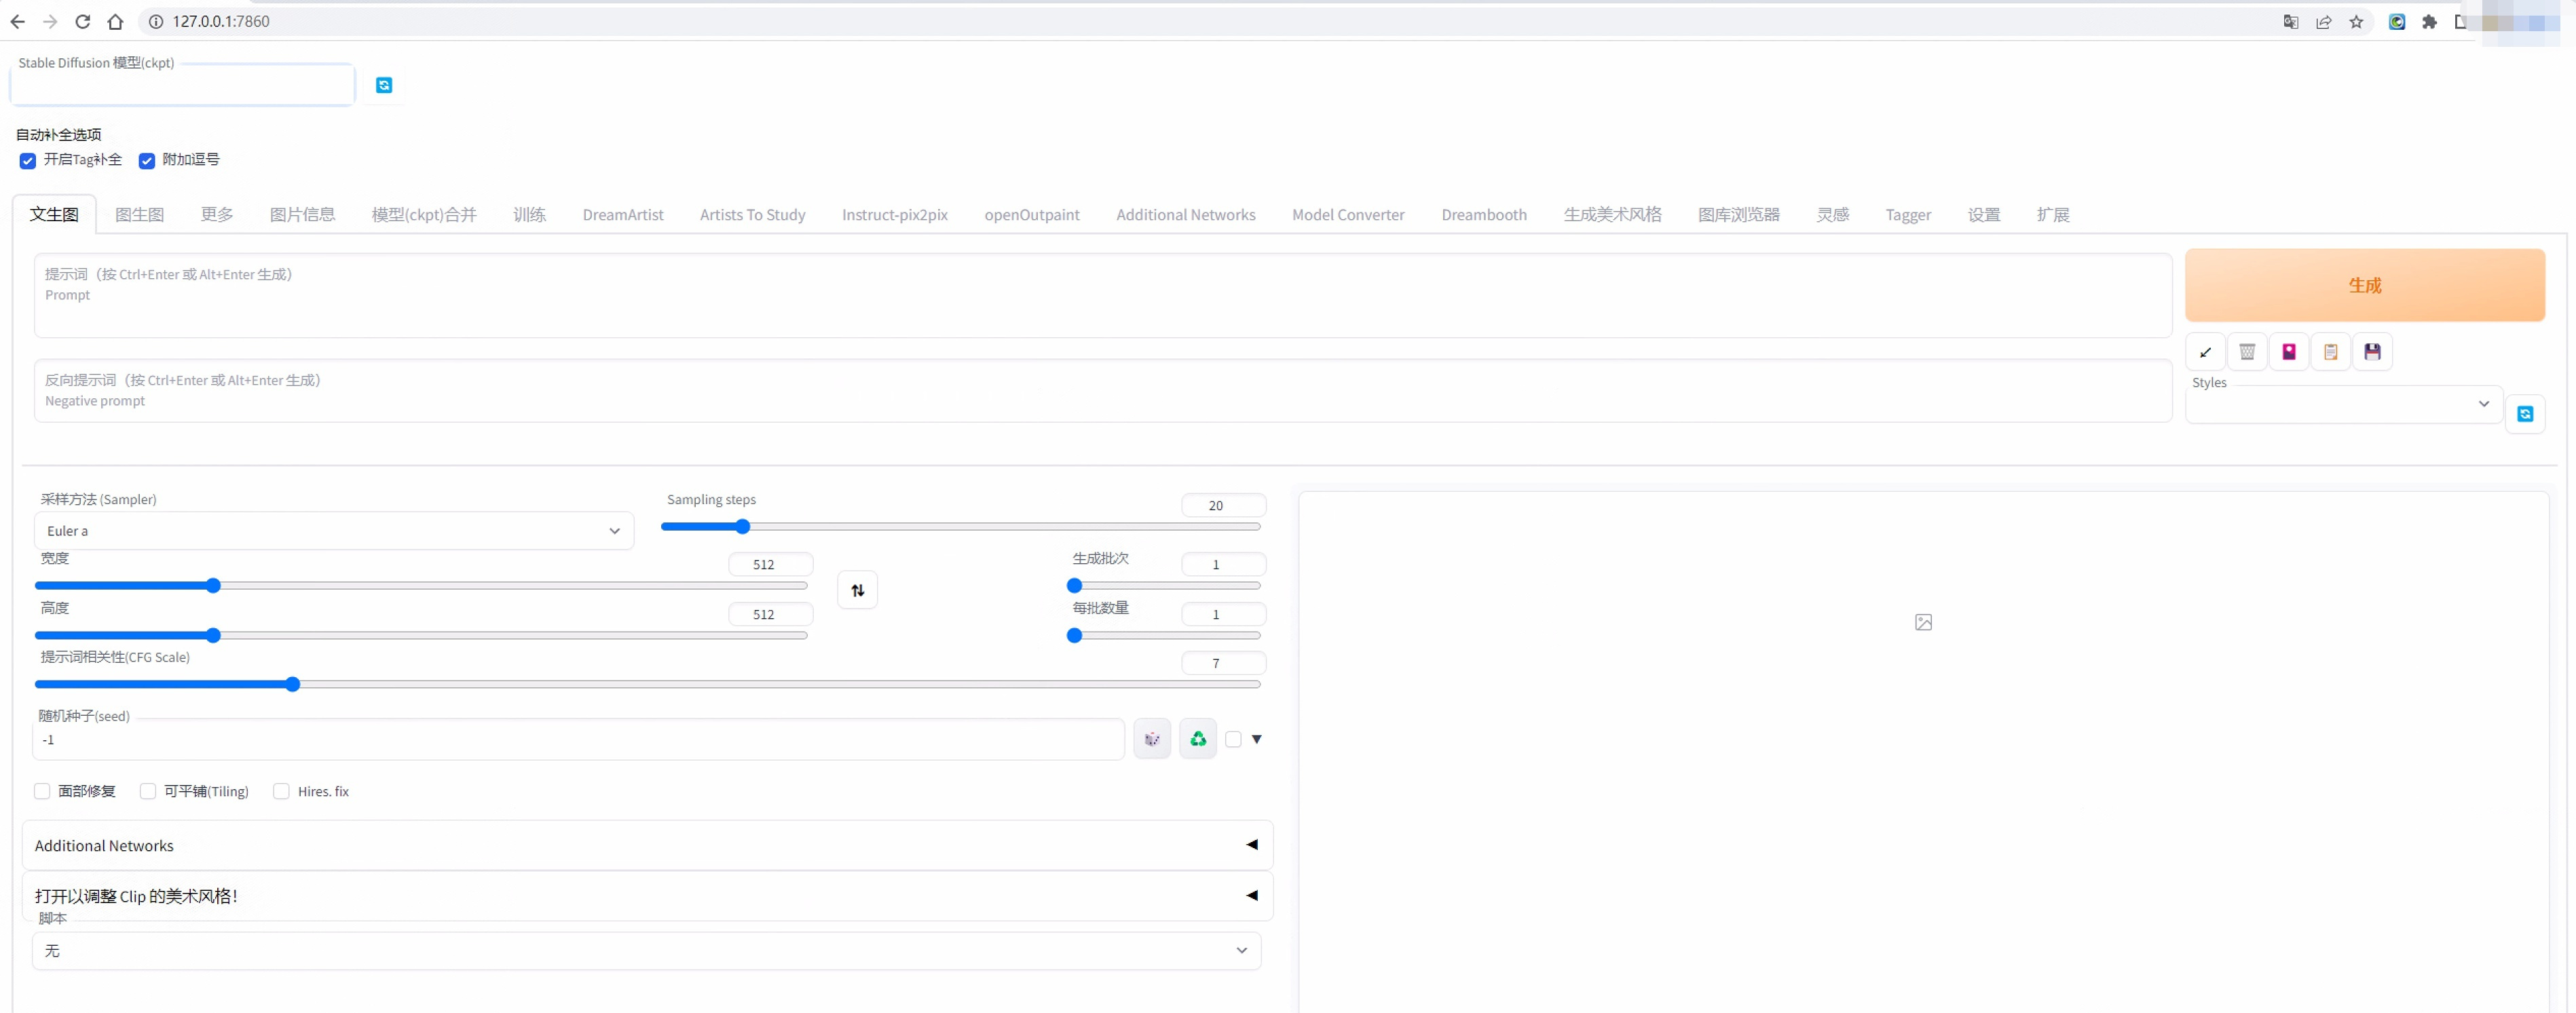
等待一段时间, 在浏览器中打开 127.0.0.1:7860 即可见到 UI 界面.
下载更多模型
模型, 有时称为检查点文件(checkpoint), 是预先训练的 Stable Diffusion 权重, 用于生成一般或特定的图像类型. 模型可以生成的图像取决于用于训练它们的数据. 如果训练数据中没有猫, 模型将无法产生猫的形象. 同样, 如果您仅使用猫图像训练模型, 则只会产生猫.
Stable Diffusion WebUI 运行时会自动下载 Stable Diffusion v1.5 模型. 下面提供了一些快速下载其它模型的命令.$ cd models/Stable-diffusion# Stable diffusion v1.4
# 下面的URL超链接过长有省略号,需要右键复制url$ wget https://huggingface.co/CompVis ... .ckpt
# Stable diffusion v1.5$ wget https://huggingface.co/runwaym ... .ckpt# F222$ wget https://huggingface.co/acheong ... .ckpt# Anything V3$ wget
https://huggingface.co/Linaqru ... nsors
# Open Journey$ wget https://huggingface.co/prompth ... .ckpt# DreamShaper$ wget https://civitai.com/api/download/models/5636 -O dreamshaper_331BakedVae.safetensors# ChilloutMix$ wget https://civitai.com/api/download/models/11745 -O chilloutmix_NiPrunedFp32Fix.safetensors# Robo Diffusion$ wget
https://huggingface.co/nousr/r ... .ckpt
# Mo-di-diffusion$ wget
https://huggingface.co/nitroso ... .ckpt
# Inkpunk Diffusion$ wget
https://huggingface.co/Envvi/I ... .ckpt
修改配置文件
ui-config.json 内包含众多的设置项, 可按照个人的习惯修改部分默认值. 例如我的配置部分如下:{
"txt2img/Batch size/value": 4,
"txt2img/Width/value": 480,
"txt2img/Height/value": 270
}提示语示例model: chilloutmix_NiPrunedFp32Fix.safetensors
prompt: beautiful, masterpiece, best quality, extremely detailed face, perfect lighting, (1girl, solo, 1boy, 1girl, NemoNelly, Slight penetration, lying, on back, spread legs:1.5), street, crowd, ((skinny)), ((puffy eyes)), brown hair, medium hair, cowboy shot, medium breasts, swept bangs, walking, outdoors, sunshine, light_rays, fantasy, rococo, hair_flower,low tied hair, smile, half-closed eyes, dating, (nude), nsfw, (heavy breathing:1.5), tears, crying, blush, wet, sweat, <lora:koreanDollLikeness_v15:0.4>, <lora:povImminentPenetration_ipv1:0>, <lora:breastinclassBetter_v14:0.1>
prompt: paintings, sketches, (worst quality:2), (low quality:2), (normal quality:2), lowres, normal quality, ((monochrome)), ((grayscale)), skin spots, acnes, skin blemishes, age spot, (ugly:1.331), (duplicate:1.331), (morbid:1.21), (mutilated:1.21), (tranny:1.331), mutated hands, (poorly drawn hands:1.331), blurry, (bad anatomy:1.21), (bad proportions:1.331), extra limbs, (disfigured:1.331), (missing arms:1.331), (extra legs:1.331), (fused fingers:1.61051), (too many fingers:1.61051), (unclear eyes:1.331), bad hands, missing fingers, extra digit, bad body, pubic
上述提示词结尾引用了 3 个 Lora 模型, 需提前下载至 models/Lora 目录.$ cd models/Lora
$ wget
https://huggingface.co/amornln ... nsors
$ wget
https://huggingface.co/samle/s ... nsors
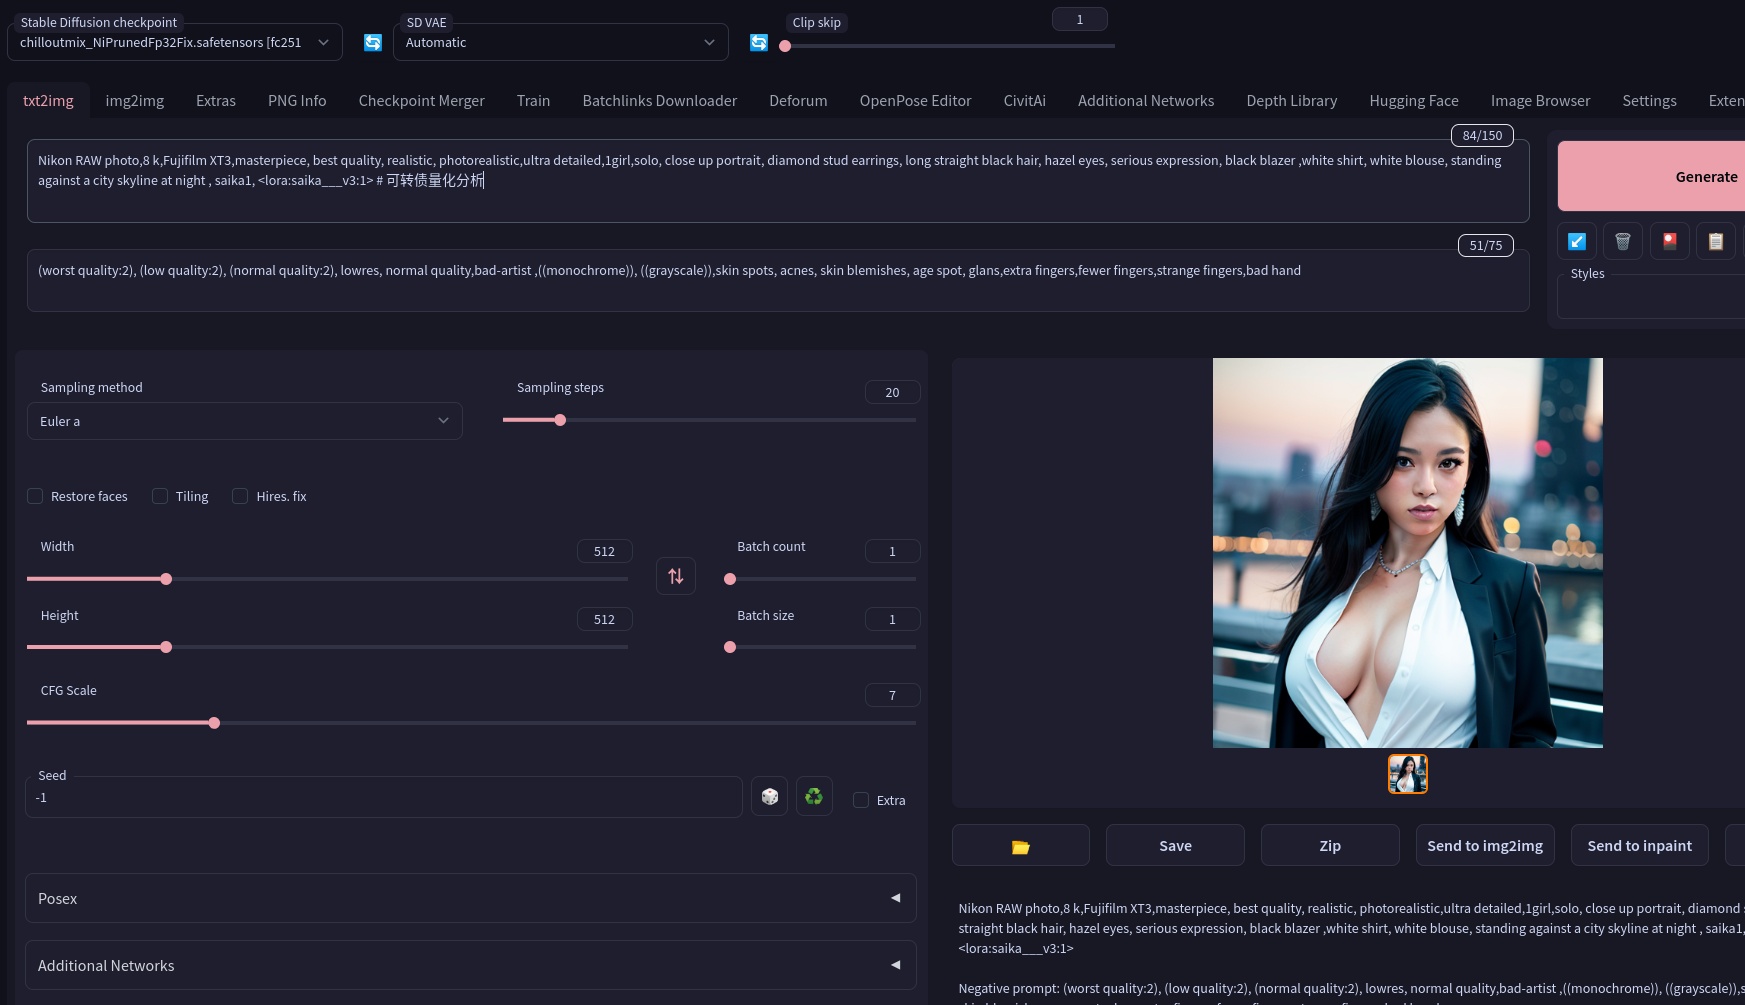
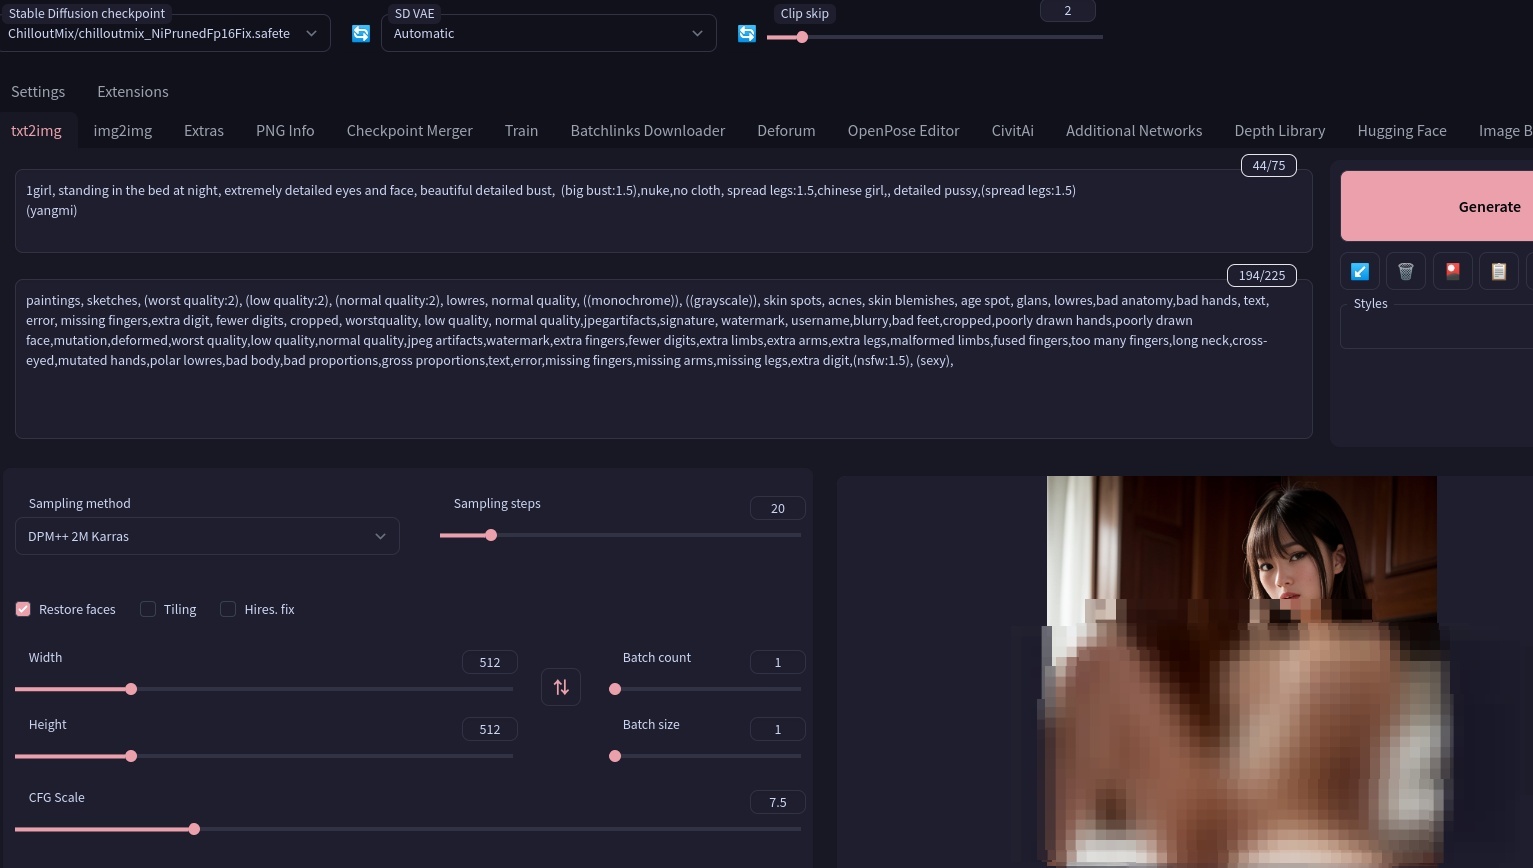
$ wget https://huggingface.co/jomcs/N ... nsors生成的效果图:
查看全部
在网上看到那些美cry的AI生成的美女图片 ,你是不是也蠢蠢欲动想要按照自己的想法生成一副属于自己的女神照呢?
什么?你的电脑显卡没有显卡? 没关系,今天笔者带大家手把手在本地电脑上使用CPU部署Stable Diffusion+Lora AI绘画 模型。
什么是Stable Diffusion ?
Stable Diffusion 是一种通过文字描述创造出图像的 AI 模型. 它是一个开源软件, 有许多人愿意在网络上免费分享他们的计算资源, 使得新手可以在线尝试.
安装
本地部署的 Stable Diffusion 有更高的可玩性, 例如允许您替换模型文件, 细致的调整参数, 以及突破线上服务的道德伦理检查等. 鉴于我目前没有可供霍霍的 GPU, 因此我将在一台本地ubuntu上部署,因为Stable Diffusion 在运行过程中大概需要吃掉 12G 内存。如果你的电脑或者服务器没有16GB以上的内存,需要配置一个虚拟内存来扩展你的内存容量,当然,性能也打个折扣,毕竟是在硬盘上扩展的内存空间。
如果你的电脑内存大小大于16GB,可以忽略以下的操作:
$ dd if=/dev/zero of=/mnt/swap bs=64M count=256笔者的电脑配置:
$ chmod 0600 /mnt/swap
$ mkswap /mnt/swap
$ swapon /mnt/swap
然后直接安装下载并安装 Stable Diffusion WebUI:
稍等片刻(依赖你的网速)
由于需要连接到github下载源码,所以如果网络不稳定掉线,需要重新运行安装命令就可以了。
重新运行:
bash webui.sh --skip-torch-cuda-test --no-half --precision full --use-cpu all --listen
这个脚本会自动创建python的虚拟环境,并安装对应的pip依赖,一键到位,可谓贴心。果断要到github上给原作者加星
等待一段时间, 在浏览器中打开 127.0.0.1:7860 即可见到 UI 界面.
下载更多模型
模型, 有时称为检查点文件(checkpoint), 是预先训练的 Stable Diffusion 权重, 用于生成一般或特定的图像类型. 模型可以生成的图像取决于用于训练它们的数据. 如果训练数据中没有猫, 模型将无法产生猫的形象. 同样, 如果您仅使用猫图像训练模型, 则只会产生猫.
Stable Diffusion WebUI 运行时会自动下载 Stable Diffusion v1.5 模型. 下面提供了一些快速下载其它模型的命令.
$ cd models/Stable-diffusion
# Stable diffusion v1.4

# 下面的URL超链接过长有省略号,需要右键复制url
$ wget https://huggingface.co/CompVis ... .ckpt
# Stable diffusion v1.5
$ wget https://huggingface.co/runwaym ... .ckpt
# F222
$ wget https://huggingface.co/acheong ... .ckpt
# Anything V3
$ wget

https://huggingface.co/Linaqru ... nsors
# Open Journey
$ wget https://huggingface.co/prompth ... .ckpt
# DreamShaper
$ wget https://civitai.com/api/download/models/5636 -O dreamshaper_331BakedVae.safetensors
# ChilloutMix
$ wget https://civitai.com/api/download/models/11745 -O chilloutmix_NiPrunedFp32Fix.safetensors
# Robo Diffusion
$ wget

https://huggingface.co/nousr/r ... .ckpt
# Mo-di-diffusion
$ wget

https://huggingface.co/nitroso ... .ckpt
# Inkpunk Diffusion
$ wget修改配置文件
https://huggingface.co/Envvi/I ... .ckpt
ui-config.json 内包含众多的设置项, 可按照个人的习惯修改部分默认值. 例如我的配置部分如下:
{

    "txt2img/Batch size/value": 4,

    "txt2img/Width/value": 480,

    "txt2img/Height/value": 270

}提示语示例model: chilloutmix_NiPrunedFp32Fix.safetensors
prompt: beautiful, masterpiece, best quality, extremely detailed face, perfect lighting, (1girl, solo, 1boy, 1girl, NemoNelly, Slight penetration, lying, on back, spread legs:1.5), street, crowd, ((skinny)), ((puffy eyes)), brown hair, medium hair, cowboy shot, medium breasts, swept bangs, walking, outdoors, sunshine, light_rays, fantasy, rococo, hair_flower,low tied hair, smile, half-closed eyes, dating, (nude), nsfw, (heavy breathing:1.5), tears, crying, blush, wet, sweat, <lora:koreanDollLikeness_v15:0.4>, <lora:povImminentPenetration_ipv1:0>, <lora:breastinclassBetter_v14:0.1>
prompt: paintings, sketches, (worst quality:2), (low quality:2), (normal quality:2), lowres, normal quality, ((monochrome)), ((grayscale)), skin spots, acnes, skin blemishes, age spot, (ugly:1.331), (duplicate:1.331), (morbid:1.21), (mutilated:1.21), (tranny:1.331), mutated hands, (poorly drawn hands:1.331), blurry, (bad anatomy:1.21), (bad proportions:1.331), extra limbs, (disfigured:1.331), (missing arms:1.331), (extra legs:1.331), (fused fingers:1.61051), (too many fingers:1.61051), (unclear eyes:1.331), bad hands, missing fingers, extra digit, bad body, pubic
上述提示词结尾引用了 3 个 Lora 模型, 需提前下载至 models/Lora 目录.
$ cd models/Lora


$ wget

https://huggingface.co/amornln ... nsors
$ wget

https://huggingface.co/samle/s ... nsors
$ wget https://huggingface.co/jomcs/N ... nsors生成的效果图:

python自然语言处理与开发 勘误
李魔佛 发表了文章 • 0 个评论 • 2708 次浏览 • 2021-07-01 16:44
【心情不好,一开始代码就错了】
P42:
代码:root = Node(word[0])
改为self.root
代码无语了,用的关键字作为参数,变量名,比如input
然后第一个程序就是错的,上机时无法运行。 查看全部
【心情不好,一开始代码就错了】
P42:
代码:root = Node(word[0])
改为self.root
代码无语了,用的关键字作为参数,变量名,比如input
然后第一个程序就是错的,上机时无法运行。
python 破解谷歌人机验证码 运用百度语音识别
李魔佛 发表了文章 • 0 个评论 • 5872 次浏览 • 2021-04-25 22:38
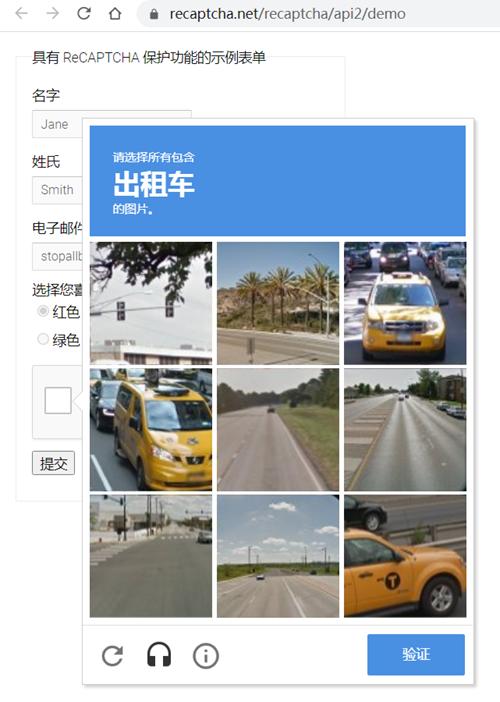
https://www.recaptcha.net/recaptcha/api2/demo
如果直接从图片肝,需要收集足够的图片,然后使用yolo或者pytorch进行训练,得到模型后再进行识别。
不过这个人机交互验证码有一个语音验证的功能。
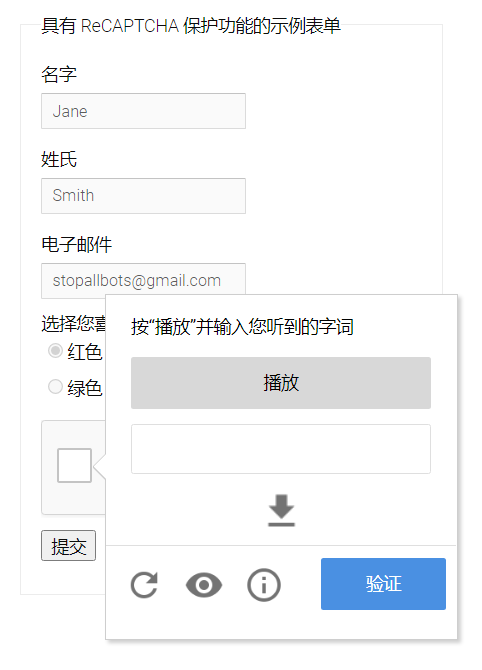
只要点击一个耳机的图标,然后就变成了语音识别。
播放一段录音,然后输入几个单词,如果单词对了,那么也可以通过。
那接下来的问题就简单了,拿到录音->识别录音,转化为文本,然后在输入框输入,就基本大功告成了。
英文转文本,网上有不少的AI平台可以白嫖,不过论效果,个人觉得百度的AI效果还不错,起码可以免费调用5W次。
完整代码如下:
这个是百度识别语音部分:
# -*- coding: utf-8 -*-

# @Time : 2021/4/24 20:50

# @File : baidu_voice_service.py

# @Author : Rocky C@www.30daydo.com


import os

import time


import requests

import sys

import pickle

sys.path.append('..')

from config import API_KEY,SECRET_KEY

from base64 import b64encode

from pathlib import PurePath

import subprocess


BASE = PurePath(__file__).parent


# 需要识别的文件

# 文件格式

# 文件后缀只支持 pcm/wav/amr 格式,极速版额外支持m4a 格式


CUID = '24057753' # 随意

# 采样率

RATE = 16000  # 固定值


ASR_URL = 'http://vop.baidu.com/server_api'


#测试自训练平台需要打开以下信息, 自训练平台模型上线后,您会看见 第二步:“”获取专属模型参数pid:8001,modelid:1234”,按照这个信息获取 dev_pid=8001,lm_id=1234

'''

http://vop.baidu.com/server_api

1537	普通话(纯中文识别)	输入法模型	有标点	支持自定义词库

1737	英语	英语模型	无标点	不支持自定义词库

1637	粤语	粤语模型	有标点	不支持自定义词库

1837	四川话	四川话模型	有标点	不支持自定义词库

1936	普通话远场

'''

DEV_PID = 1737


SCOPE = 'brain_enhanced_asr'  # 有此scope表示有asr能力,没有请在网页里开通极速版


class DemoError(Exception):

    pass


TOKEN_URL = 'http://openapi.baidu.com/oauth/2.0/token'


def fetch_token():


    params = {'grant_type': 'client_credentials',

              'client_id': API_KEY,

              'client_secret': SECRET_KEY}

    r = requests.post(

        url=TOKEN_URL,

        data=params

    )


    result = r.json()

    if ('access_token' in result.keys() and 'scope' in result.keys()):

        if SCOPE and (not SCOPE in result['scope'].split(' ')):  # SCOPE = False 忽略检查

            raise DemoError('scope is not correct')


        return result['access_token']


    else:

        raise DemoError('MAYBE API_KEY or SECRET_KEY not correct: access_token or scope not found in token response')


"""  TOKEN end """


def dump_token(token):

    with open(os.path.join(BASE,'token.pkl'),'wb') as fp:

        pickle.dump({'token':token},fp)


def load_token(filename):


    if not os.path.exists(filename):

        token=fetch_token()

        dump_token(token)

        return token

    else:

        with open(filename,'rb') as fp:

            token = pickle.load(fp)

            return token['token']


def recognize_service(token,filename):

    FORMAT = filename[-3:]

    with open(filename, 'rb') as speech_file:

        speech_data = speech_file.read()


    length = len(speech_data)

    if length == 0:

        raise DemoError('file %s length read 0 bytes' % filename)


    b64_data = b64encode(speech_data)

    params = {'cuid': CUID, 'token': token, 'dev_pid': DEV_PID,'speech':b64_data,'len':length,'format':FORMAT,'rate':RATE,'channel':1}


    headers = {

        'Content-Type':'application/json',

    }

    r = requests.post(url=ASR_URL,json=params,headers=headers)

    return r.json()


def rate_convertor(filename):

    filename = filename.split('.')[0]

    CMD=f'ffmpeg.exe -y -i {filename}.mp3 -ac 1 -ar 16000 {filename}.wav'

    try:

        p=subprocess.Popen(CMD, stdin=subprocess.PIPE)

        p.communicate()

        time.sleep(1)

    except Exception as e:

        print(e)

        return False,None

    else:

        return True,f'{filename}.wav'


def clear(file):

    try:

        os.remove(file)

    except Exception as e:

        print(e)


def get_voice_text(audio_file):


    filename = 'token.pkl'

    token = load_token(filename)

    convert_status,file = rate_convertor(audio_file)

    clear(file)

    if not convert_status:

        return None


    result = recognize_service(token,file)


    return result['result'][0]


if __name__ == '__main__':

    get_voice_text('1.mp3')
然后下面的是获取语音部分,并且点击输入结果。
# -*- coding: utf-8 -*-

# @Time : 2021/4/25 15:16

# @File : download_mp3.py

# @Author : Rocky C@www.30daydo.com


#!/usr/bin/env python3

import os

import subprocess

import time

import re

import requests

import urllib.request

import zipfile

import io

from google.cloud import speech_v1

from random import randint, uniform

from bs4 import BeautifulSoup

from selenium import webdriver

from selenium.common.exceptions import NoSuchElementException

from selenium.webdriver.common.by import By

from selenium.webdriver.common.action_chains import ActionChains

from selenium.webdriver.support import expected_conditions as EC

from selenium.webdriver.support.ui import WebDriverWait

from google_recaptcha.baidu_voice_service import get_voice_text,clear


class Gcaptcha:


    def __init__(self, url):

        self.response = None


        self.attempts = 0

        self.successful = 0

        self.failed = 0

        self.solved = 0


        self.mp3 = 'audio.mp3'

        # self.wav='audio.wav'


        # Set Chrome to run in headless mode and mute the audio

        opts = webdriver.ChromeOptions()

        # opts.headless = True

        opts.add_argument("--mute-audio")

        # opts.add_argument("--headless",)


        CHROME_PATH = r'C:\git\EZProject\bin\chromedriver.exe'

        self.driver = webdriver.Chrome(executable_path=CHROME_PATH,options=opts)

        self.driver.maximize_window()

        self.driver.get(url)

        self.__bypass_webdriver_check()


        # Initialize gcaptcha solver

        self.__initialize()


        while True:

            # Download MP3 file

            mp3_file = self.__download_mp3()


            # Transcribe MP3 file

            result = get_voice_text(self.mp3)


            # audio_transcription = transcribe(mp3_file)

            # self.transcription.attempts += 1


            # If the MP3 file is properly transcribed

            if result is not None:

                # self.transcription.successful += 1


                # Verify transcription

                verify = self.__submit_transcription(result)


                # Transcription successful with confidence >60%

                if verify:

                    gcaptcha_response = self.__get_response()

                    self.response = gcaptcha_response

                    # self.recaptcha.solved += 1


                    # Delete MP3 file


                    self.driver.close()

                    self.driver.quit()

                    break

                # Multiple correct solutions required. Solving again.

                else:

                    self.solved += 1

                    clear(self.mp3)


            # If the MP3 file could not be transcribed

            else:

                self.failed += 1

                clear(self.mp3)


                # Click on the "Get a new challenge" button to use a new MP3 file

                self.__refresh_mp3()

                # time.sleep(uniform(2, 4))


    def __initialize(self):

        # Access initial gcaptcha iframe

        self.driver.switch_to.frame(self.driver.find_element(By.CSS_SELECTOR, 'iframe[name^=a]'))

        self.__bypass_webdriver_check()


        # Click the gcaptcha checkbox

        checkbox = self.driver.find_element(By.CSS_SELECTOR, '#recaptcha-anchor')

        self.__mouse_click(checkbox)


        # Go back to original content to access second gcaptcha iframe

        self.driver.switch_to.default_content()


        # Wait roughly 3 seconds for second gcaptcha iframe to load

        time.sleep(uniform(2.5, 3))


        # Find second gcaptcha iframe

        gcaptcha = WebDriverWait(self.driver, 10).until(

            EC.presence_of_element_located((By.CSS_SELECTOR, 'iframe[name^=c]'))

        )


        # Access second gcaptcha iframe

        self.driver.switch_to.frame(gcaptcha)

        self.__bypass_webdriver_check()


        # Click the audio button

        audio_button = WebDriverWait(self.driver, 10).until(

            EC.presence_of_element_located((By.CSS_SELECTOR, '.rc-button-audio'))

        )

        self.__mouse_click(audio_button)

        time.sleep(0.5)


    def __mouse_click(self, element):

        cursor = ActionChains(self.driver)

        cursor.move_to_element(element)

        cursor.pause(uniform(0.3, 0.5))

        cursor.click()

        cursor.perform()


    def __bypass_webdriver_check(self):

        self.driver.execute_script(

            'const newProto = navigator.__proto__; delete newProto.webdriver; navigator.__proto__ = newProto;')


    def __download_mp3(self):

        self.driver.switch_to.default_content()

        self.driver.switch_to.frame(self.driver.find_element(By.CSS_SELECTOR, 'iframe[name^=c]'))

        self.__bypass_webdriver_check()


        # Check if the Google servers are blocking us

        if len(self.driver.find_elements(By.CSS_SELECTOR, '.rc-doscaptcha-body-text')) == 0:

            audio_file = WebDriverWait(self.driver, 10).until(

                EC.presence_of_element_located((By.CSS_SELECTOR, '.rc-audiochallenge-tdownload-link'))

            )


            # Click the play button

            play_button = WebDriverWait(self.driver, 10).until(

                EC.presence_of_element_located((By.CSS_SELECTOR, '.rc-audiochallenge-play-button > button'))

            )

            self.__mouse_click(play_button)


            # Get URL of MP3 file

            audio_url = audio_file.get_attribute('href')


            # Predefine the MP3 file name


            # Download the MP3 file

            try:

                urllib.request.urlretrieve(audio_url, self.mp3)

            except Exception as e:

                print(e)

                return None

            else:

                return self.mp3

        else:

            Error('Too many requests have been sent to Google. You are currently being blocked by their servers.')

            exit(-1)


    def __refresh_mp3(self):

        self.driver.switch_to.default_content()

        self.driver.switch_to.frame(self.driver.find_element(By.CSS_SELECTOR, 'iframe[name^=c]'))

        self.__bypass_webdriver_check()


        # Click on the refresh button to retrieve a new mp3 file

        refresh_button = self.driver.find_element(By.CSS_SELECTOR, '#recaptcha-reload-button')

        self.__mouse_click(refresh_button)


    def __submit_transcription(self, text):

        self.driver.switch_to.default_content()

        self.driver.switch_to.frame(self.driver.find_element(By.CSS_SELECTOR, 'iframe[name^=c]'))

        self.__bypass_webdriver_check()


        # Input field for response

        input_field = self.driver.find_element(By.CSS_SELECTOR, '#audio-response')


        # Instantly type the full text without delays because Google isn't checking delays between keystrokes

        input_field.send_keys(text)


        # Click "Verify" button

        verify_button = self.driver.find_element(By.CSS_SELECTOR, '#recaptcha-verify-button')

        self.__mouse_click(verify_button)


        # Wait roughly 3 seconds for verification to complete

        time.sleep(uniform(2, 3))


        self.driver.switch_to.default_content()

        self.driver.switch_to.frame(self.driver.find_element(By.CSS_SELECTOR, 'iframe[name^=a]'))

        self.__bypass_webdriver_check()


        # Check to see if verified by recaptcha

        try:

            self.driver.find_element(By.CSS_SELECTOR, '.recaptcha-checkbox-checked')

        except NoSuchElementException:

            return False

        else:

            return True


    def __get_response(self):

        # Switch back to main parent window and get gcaptcha response

        self.driver.switch_to.default_content()

        response = self.driver.find_element(By.CSS_SELECTOR, '#g-recaptcha-response').get_attribute('value')

        return response


class Error(Exception):

    def __init__(self, message):

        get_files = os.listdir()

        match_regex = re.compile(r'^audio\d+.mp3|chromedriver_\w+\d+.zip$')

        filtered_files = [f for f in get_files if match_regex.match(f)]


        for file in filtered_files:

            clear(file)


        raise Exception(f'ERROR: {message}')


if __name__=='__main__':

    gcaptcha = Gcaptcha('https://www.google.com/recaptcha/api2/demo')
代码里需要你申请一个百度AI的key以便生成token。
最终试了,效果还是达到98%的准确率。 查看全部
https://www.recaptcha.net/recaptcha/api2/demo
如果直接从图片肝,需要收集足够的图片,然后使用yolo或者pytorch进行训练,得到模型后再进行识别。
不过这个人机交互验证码有一个语音验证的功能。
只要点击一个耳机的图标,然后就变成了语音识别。
播放一段录音,然后输入几个单词,如果单词对了,那么也可以通过。
那接下来的问题就简单了,拿到录音->识别录音,转化为文本,然后在输入框输入,就基本大功告成了。
英文转文本,网上有不少的AI平台可以白嫖,不过论效果,个人觉得百度的AI效果还不错,起码可以免费调用5W次。
完整代码如下:
这个是百度识别语音部分:
# -*- coding: utf-8 -*-
# @Time : 2021/4/24 20:50
# @File : baidu_voice_service.py
# @Author : Rocky C@www.30daydo.com
import os
import time
import requests
import sys
import pickle
sys.path.append('..')
from config import API_KEY,SECRET_KEY
from base64 import b64encode
from pathlib import PurePath
import subprocess
BASE = PurePath(__file__).parent
# 需要识别的文件
# 文件格式
# 文件后缀只支持 pcm/wav/amr 格式,极速版额外支持m4a 格式
CUID = '24057753' # 随意
# 采样率
RATE = 16000 # 固定值
ASR_URL = 'http://vop.baidu.com/server_api'
#测试自训练平台需要打开以下信息, 自训练平台模型上线后,您会看见 第二步:“”获取专属模型参数pid:8001,modelid:1234”,按照这个信息获取 dev_pid=8001,lm_id=1234
'''
http://vop.baidu.com/server_api
1537 普通话(纯中文识别) 输入法模型 有标点 支持自定义词库
1737 英语 英语模型 无标点 不支持自定义词库
1637 粤语 粤语模型 有标点 不支持自定义词库
1837 四川话 四川话模型 有标点 不支持自定义词库
1936 普通话远场
'''
DEV_PID = 1737
SCOPE = 'brain_enhanced_asr' # 有此scope表示有asr能力,没有请在网页里开通极速版
class DemoError(Exception):
pass
TOKEN_URL = 'http://openapi.baidu.com/oauth/2.0/token'
def fetch_token():
params = {'grant_type': 'client_credentials',
'client_id': API_KEY,
'client_secret': SECRET_KEY}
r = requests.post(
url=TOKEN_URL,
data=params
)
result = r.json()
if ('access_token' in result.keys() and 'scope' in result.keys()):
if SCOPE and (not SCOPE in result['scope'].split(' ')): # SCOPE = False 忽略检查
raise DemoError('scope is not correct')
return result['access_token']
else:
raise DemoError('MAYBE API_KEY or SECRET_KEY not correct: access_token or scope not found in token response')
""" TOKEN end """
def dump_token(token):
with open(os.path.join(BASE,'token.pkl'),'wb') as fp:
pickle.dump({'token':token},fp)
def load_token(filename):
if not os.path.exists(filename):
token=fetch_token()
dump_token(token)
return token
else:
with open(filename,'rb') as fp:
token = pickle.load(fp)
return token['token']
def recognize_service(token,filename):
FORMAT = filename[-3:]
with open(filename, 'rb') as speech_file:
speech_data = speech_file.read()
length = len(speech_data)
if length == 0:
raise DemoError('file %s length read 0 bytes' % filename)
b64_data = b64encode(speech_data)
params = {'cuid': CUID, 'token': token, 'dev_pid': DEV_PID,'speech':b64_data,'len':length,'format':FORMAT,'rate':RATE,'channel':1}
headers = {
'Content-Type':'application/json',
}
r = requests.post(url=ASR_URL,json=params,headers=headers)
return r.json()
def rate_convertor(filename):
filename = filename.split('.')[0]
CMD=f'ffmpeg.exe -y -i {filename}.mp3 -ac 1 -ar 16000 {filename}.wav'
try:
p=subprocess.Popen(CMD, stdin=subprocess.PIPE)
p.communicate()
time.sleep(1)
except Exception as e:
print(e)
return False,None
else:
return True,f'{filename}.wav'
def clear(file):
try:
os.remove(file)
except Exception as e:
print(e)
def get_voice_text(audio_file):
filename = 'token.pkl'
token = load_token(filename)
convert_status,file = rate_convertor(audio_file)
clear(file)
if not convert_status:
return None
result = recognize_service(token,file)
return result['result'][0]
if __name__ == '__main__':
get_voice_text('1.mp3')
然后下面的是获取语音部分,并且点击输入结果。
# -*- coding: utf-8 -*-代码里需要你申请一个百度AI的key以便生成token。
# @Time : 2021/4/25 15:16
# @File : download_mp3.py
# @Author : Rocky C@www.30daydo.com
#!/usr/bin/env python3
import os
import subprocess
import time
import re
import requests
import urllib.request
import zipfile
import io
from google.cloud import speech_v1
from random import randint, uniform
from bs4 import BeautifulSoup
from selenium import webdriver
from selenium.common.exceptions import NoSuchElementException
from selenium.webdriver.common.by import By
from selenium.webdriver.common.action_chains import ActionChains
from selenium.webdriver.support import expected_conditions as EC
from selenium.webdriver.support.ui import WebDriverWait
from google_recaptcha.baidu_voice_service import get_voice_text,clear
class Gcaptcha:
def __init__(self, url):
self.response = None
self.attempts = 0
self.successful = 0
self.failed = 0
self.solved = 0
self.mp3 = 'audio.mp3'
# self.wav='audio.wav'
# Set Chrome to run in headless mode and mute the audio
opts = webdriver.ChromeOptions()
# opts.headless = True
opts.add_argument("--mute-audio")
# opts.add_argument("--headless",)
CHROME_PATH = r'C:\git\EZProject\bin\chromedriver.exe'
self.driver = webdriver.Chrome(executable_path=CHROME_PATH,options=opts)
self.driver.maximize_window()
self.driver.get(url)
self.__bypass_webdriver_check()
# Initialize gcaptcha solver
self.__initialize()
while True:
# Download MP3 file
mp3_file = self.__download_mp3()
# Transcribe MP3 file
result = get_voice_text(self.mp3)
# audio_transcription = transcribe(mp3_file)
# self.transcription.attempts += 1
# If the MP3 file is properly transcribed
if result is not None:
# self.transcription.successful += 1
# Verify transcription
verify = self.__submit_transcription(result)
# Transcription successful with confidence >60%
if verify:
gcaptcha_response = self.__get_response()
self.response = gcaptcha_response
# self.recaptcha.solved += 1
# Delete MP3 file
self.driver.close()
self.driver.quit()
break
# Multiple correct solutions required. Solving again.
else:
self.solved += 1
clear(self.mp3)
# If the MP3 file could not be transcribed
else:
self.failed += 1
clear(self.mp3)
# Click on the "Get a new challenge" button to use a new MP3 file
self.__refresh_mp3()
# time.sleep(uniform(2, 4))
def __initialize(self):
# Access initial gcaptcha iframe
self.driver.switch_to.frame(self.driver.find_element(By.CSS_SELECTOR, 'iframe[name^=a]'))
self.__bypass_webdriver_check()
# Click the gcaptcha checkbox
checkbox = self.driver.find_element(By.CSS_SELECTOR, '#recaptcha-anchor')
self.__mouse_click(checkbox)
# Go back to original content to access second gcaptcha iframe
self.driver.switch_to.default_content()
# Wait roughly 3 seconds for second gcaptcha iframe to load
time.sleep(uniform(2.5, 3))
# Find second gcaptcha iframe
gcaptcha = WebDriverWait(self.driver, 10).until(
EC.presence_of_element_located((By.CSS_SELECTOR, 'iframe[name^=c]'))
)
# Access second gcaptcha iframe
self.driver.switch_to.frame(gcaptcha)
self.__bypass_webdriver_check()
# Click the audio button
audio_button = WebDriverWait(self.driver, 10).until(
EC.presence_of_element_located((By.CSS_SELECTOR, '.rc-button-audio'))
)
self.__mouse_click(audio_button)
time.sleep(0.5)
def __mouse_click(self, element):
cursor = ActionChains(self.driver)
cursor.move_to_element(element)
cursor.pause(uniform(0.3, 0.5))
cursor.click()
cursor.perform()
def __bypass_webdriver_check(self):
self.driver.execute_script(
'const newProto = navigator.__proto__; delete newProto.webdriver; navigator.__proto__ = newProto;')
def __download_mp3(self):
self.driver.switch_to.default_content()
self.driver.switch_to.frame(self.driver.find_element(By.CSS_SELECTOR, 'iframe[name^=c]'))
self.__bypass_webdriver_check()
# Check if the Google servers are blocking us
if len(self.driver.find_elements(By.CSS_SELECTOR, '.rc-doscaptcha-body-text')) == 0:
audio_file = WebDriverWait(self.driver, 10).until(
EC.presence_of_element_located((By.CSS_SELECTOR, '.rc-audiochallenge-tdownload-link'))
)
# Click the play button
play_button = WebDriverWait(self.driver, 10).until(
EC.presence_of_element_located((By.CSS_SELECTOR, '.rc-audiochallenge-play-button > button'))
)
self.__mouse_click(play_button)
# Get URL of MP3 file
audio_url = audio_file.get_attribute('href')
# Predefine the MP3 file name
# Download the MP3 file
try:
urllib.request.urlretrieve(audio_url, self.mp3)
except Exception as e:
print(e)
return None
else:
return self.mp3
else:
Error('Too many requests have been sent to Google. You are currently being blocked by their servers.')
exit(-1)
def __refresh_mp3(self):
self.driver.switch_to.default_content()
self.driver.switch_to.frame(self.driver.find_element(By.CSS_SELECTOR, 'iframe[name^=c]'))
self.__bypass_webdriver_check()
# Click on the refresh button to retrieve a new mp3 file
refresh_button = self.driver.find_element(By.CSS_SELECTOR, '#recaptcha-reload-button')
self.__mouse_click(refresh_button)
def __submit_transcription(self, text):
self.driver.switch_to.default_content()
self.driver.switch_to.frame(self.driver.find_element(By.CSS_SELECTOR, 'iframe[name^=c]'))
self.__bypass_webdriver_check()
# Input field for response
input_field = self.driver.find_element(By.CSS_SELECTOR, '#audio-response')
# Instantly type the full text without delays because Google isn't checking delays between keystrokes
input_field.send_keys(text)
# Click "Verify" button
verify_button = self.driver.find_element(By.CSS_SELECTOR, '#recaptcha-verify-button')
self.__mouse_click(verify_button)
# Wait roughly 3 seconds for verification to complete
time.sleep(uniform(2, 3))
self.driver.switch_to.default_content()
self.driver.switch_to.frame(self.driver.find_element(By.CSS_SELECTOR, 'iframe[name^=a]'))
self.__bypass_webdriver_check()
# Check to see if verified by recaptcha
try:
self.driver.find_element(By.CSS_SELECTOR, '.recaptcha-checkbox-checked')
except NoSuchElementException:
return False
else:
return True
def __get_response(self):
# Switch back to main parent window and get gcaptcha response
self.driver.switch_to.default_content()
response = self.driver.find_element(By.CSS_SELECTOR, '#g-recaptcha-response').get_attribute('value')
return response
class Error(Exception):
def __init__(self, message):
get_files = os.listdir()
match_regex = re.compile(r'^audio\d+.mp3|chromedriver_\w+\d+.zip$')
filtered_files = [f for f in get_files if match_regex.match(f)]
for file in filtered_files:
clear(file)
raise Exception(f'ERROR: {message}')
if __name__=='__main__':
gcaptcha = Gcaptcha('https://www.google.com/recaptcha/api2/demo')
最终试了,效果还是达到98%的准确率。
百度AI的语音识别无法识别到英文原因
李魔佛 发表了文章 • 0 个评论 • 4175 次浏览 • 2021-04-25 13:23
可以尝试使用ffmepg转下码:
ffmpeg.exe -i 3.mp3 -ac 1 -ar 16000 16k.wav试过后就能够正常识别到语音内容了。
可以尝试使用ffmepg转下码:
ffmpeg.exe -i 3.mp3 -ac 1 -ar 16000 16k.wav试过后就能够正常识别到语音内容了。
机器学习:港股首日上市价格预测
李魔佛 发表了文章 • 0 个评论 • 5070 次浏览 • 2020-09-25 22:57
因为我们花了不少时间爬取了港股新股的数据,可以对这些数据加以利用,利用机器学习的模型,预测港股上市价格以及影响因素的权重。
香港股市常年位于全球新股集资三甲之列,每年都有上百只新股上市。与已上市的正股相比,新股的特点是没有任何历史交易数据,这使新股的feature比较朴素,使其可以变成一个较为简单的机器学习问题。
我们在这里,以练手为目的,用新股首日涨跌幅的预测作为例子,介绍一个比较完整的机器学习流程。
数据获取
一个机器学习的项目,最重要的是数据。没有数据,一切再高级的算法都只是纸上谈兵。上一篇文中,已经获取了最近发行的新股的一些基本数据,还有一些详情数据在详细页里面,需要访问详情页获取。
比如农夫山泉,除了之前爬取的基本数据,如上市市值,招股价,中签率,超额倍数,现价等,还有一些保荐人,包销商等有价值数据,所以我们也需要顺带把这些数据获取过来。这时需要在上一篇文章的基础上,获取每一个新股的详情页地址,然后如法炮制,用xpath把数据提取出来。
基本数据页和详情页保存为2个csv文件:data/ipo_list.csv和data/ipo_details.csv
数据清理和特征提取
接下来要做的是对数据进行清理,扔掉无关的项目,然后做一些特征提取和特征处理。
爬取的两个数据,我们先用pandas读取进来,用股票代码code做index,然后合并成为一个大的dataframe.#Read two files and merge
df1 = pd.read_csv('../data/ipo_list', sep='\t', index_col='code')
df2 = pd.read_csv('../data/ipo_details', sep= '\t', index_col = 0)
#Use combine_first to avoid duplicate columns
df = df1.combine_first(df2)
我们看看我们的dataframe有哪些column先:df.columns.values
array(['area', 'banks', 'buy_ratio', 'category', 'date', 'draw_prob',
'eipo', 'firstday_performance', 'hk_portion', 'ipo_price',
'ipo_price_range', 'market_type', 'name', 'now_price', 'one_hand',
'predict_profile_market_ratio', 'predict_profit_ratio',
'profit_ratio', 'recommender', 'sales', 'shares_per_hand',
'stock_type', 'total_performance', 'total_value', 'website'], dtype=object)
我们的目标,也就是我们要预测的值,是首日涨跌幅,即firstday_performance. 我们需要扔掉一些无关的项目,比如日期、收票银行、网址、当前的股价等等。还要扔掉那些没有公开发售的全配售的股票,因为这些股票没有任何散户参与,跟我们目标无关。# Drop unrelated columns
to_del = ['date', 'banks', 'eipo', 'name', 'now_price', 'website', 'total_performance','predict_profile_market_ratio', 'predict_profit_ratio', 'profit_ratio']
for item in to_del:
del df[item]
#Drop non_public ipo stocks
df = df[df.draw_prob.notnull()]
对于百分比的数据,我们要换成float的形式:def per2float(x):
if not pd.isnull(x):
x = x.strip('%')
return float(x)/100.
else:
return x
#Format percentage
df['draw_prob'] = df['draw_prob'].apply(per2float)
df['firstday_performance'] = df['firstday_performance'].apply(per2float)
df['hk_portion'] = df['hk_portion'].apply(per2float)
对于”认购不足”的情况,我们要把超购数替换成为0:def buy_ratio_process(x):
if x == '认购不足':
return 0.0
else:
return float(x)
#Format buy_ratio
df['buy_ratio'] = df['buy_ratio'].apply(buy_ratio_process)
新股招股的IPO价格是一个区间。有一些新股,招股价上下界拉得很开。因为我们已经有了股价作为另一个,所以我们这里希望能拿到IPO招股价格的上下界范围与招股价相比的一个比例,作为一个新的特征:def get_low_bound(x):
if ',' in str(x):
x = x.replace(',', '')
try:
if pd.isnull(x) or '-' not in x:
return float(x)
else:
x = x.split('-')
return float(x[0])
except Exception as e:
print(e)
print(x)
def get_up_bound(x):
if ',' in str(x):
x = x.replace(',', '')
try:
if pd.isnull(x) or '-' not in x:
return float(x)
else:
x = x.split('-')
return float(x[1])
except Exception as e:
print(e)
print(x)
def get_ipo_range_prop(x):
if pd.isnull(x):
return x
low_bound = get_low_bound(x)
up_bound = get_up_bound(x)
return (up_bound-low_bound)*2/(up_bound+low_bound)
#Merge ipo_price_range to proportion of middle
df['ipo_price_range_ratio'] = df['ipo_price_range'].apply(get_ipo_range_prop)
del df['ipo_price_range']
我们取新股招股价对应总市值的中位数作为另一个特征。因为总市值的绝对值是一个非常大的数字,我们把它按比例缩小,使它的取值和其它特征在一个差不多的范围里。def get_total_value_mid(x):
if pd.isnull(x):
return x
low_bound = get_low_bound(x)
up_bound = get_up_bound(x)
return (up_bound+low_bound)/2
df['total_value_mid'] = df['total_value'].apply(get_total_value_mid)/1000000000.
del df['total_value']
于是我们的数据变成了这样一个278 rows × 15 columns的dataframe,即我们有278个数据点和15个特征:
我们看到诸如地区、业务种类等这些特征是categorical的。同时,保荐人和包销商又有多个item的情况。对于这种特征的处理,我们使用one-hot encoding,对每一个种类创建一个新的category,然后用0-1来表示instance是否属于这个category。
#Now do one-hot encoding for all categorical columns
#One problem is that we have to split('、') first for contents with multiple companies
dftest = df.copy()
def one_hot_encoding(df, column_name):
#Reads a df and target column, does tailored one-hot encoding, and return new df for merge
cat_list = df[column_name].unique().tolist()
cat_set = set()
for items in cat_list:
if pd.isnull(items):
continue
items = items.split('、')
for item in items:
item = item.strip()
cat_set.add(item)
for item in cat_set:
item = column_name + '_' + item
df[item] = 0
def check_onehot(x, cat):
if pd.isnull(x):
return 0
x = x.split('、')
for item in x:
if cat == item.strip():
return 1
return 0
for item in cat_set:
df[column_name + '_' + item] = df[column_name].apply(check_onehot, args=(item, ))
del df[column_name]
return df
dftest = one_hot_encoding(dftest, 'area')
dftest = one_hot_encoding(dftest, 'category')
dftest = one_hot_encoding(dftest, 'market_type')
dftest = one_hot_encoding(dftest, 'recommender')
dftest = one_hot_encoding(dftest, 'sales')
dftest = one_hot_encoding(dftest, 'stock_type')这下我们的数据变成了一个278 rows × 535 columns的dataframe,即我们之前的15个特征因为one-hot encoding,一下子变成了535个特征。这其实是机器学习很常见的一个情况,即我们的数据是一个sparce matrix。
训练模型
有了已经整理好特征的数据,我们可以开始建立机器学习模型了。
这里我们用xgboost为例子建立一个非常简单的模型。xgboost是一个基于boosted tree的模型。大家也可以尝试其它更多的算法模型。
我们把数据读入,然后随机把1/3的股票数据分出来做testing data. 我们这里只是一个示例,更高级的方法可以做诸如n-fold validation,以及grid search寻找最优参数等。
# load data and split feature and label
df = pd.read_csv('../data/hk_ipo_feature_engineered', sep='\t', index_col='code', encoding='utf-8')
Y = df['firstday_performance']
X = df.drop('firstday_performance', axis = 1)
# split data into train and test sets
seed = 7
test_size = 0.33
X_train, X_test, y_train, y_test = train_test_split(X, Y, test_size=test_size, random_state=seed)
# fit model no training data
eval_set = [(X_test, y_test)]
因为新股首日涨跌幅是一个float,所以这是一个regression的问题。我们跑xgboost模型,输出mean squared error (越接近0表明准确率越高):
# fit model no training data
xgb_model = xgb.XGBRegressor().fit(X_train,y_train)
predictions = xgb_model.predict(X_test)
actuals = y_test
print mean_squared_error(actuals, predictions)
0.0643324471123
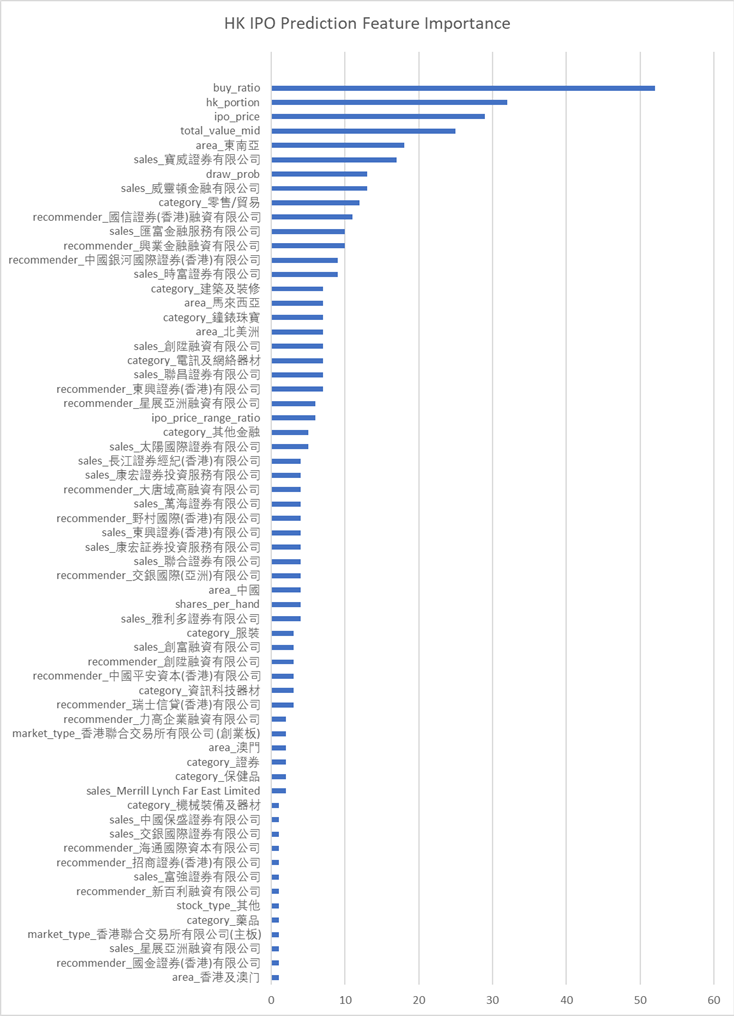
可见准确率还是蛮高的。 xgboost自带了画出特征重要性的方法xgb.plot_importance。 用来描述每个特征对结果的重要程度。
importance = xgb_model.booster().get_score(importance_type='weight')
tuples = [(k, importance[k]) for k in importance]然后利用matplotlib绘制图形。
我们看到几个最强的特征,比如超额倍数、在香港发售的比例、ipo的价格和总市值(细价股更容易涨很多)等。
同时我们还发现了几个比较有意思的特征,比如东南亚地区的股票,和某些包销商与保荐人。
模型预测
这里就略过了。大家大可以自己将即将上市的港股新股做和上面一样的特征处理,然后预测出一个首日涨跌幅,待股票上市后做个对比了!
总结
我们用预测港股新股首日涨跌幅的例子,介绍了一个比较简单的机器学习的流程,包括了数据获取、数据清理、特征处理、模型训练和模型预测等。这其中每一个步骤都可以钻研得非常深;这篇文章只是蜻蜓点水,隔靴搔痒。
最重要的是,掌握了机器学习的知识,也许真的能帮助我们解决很多生活中实际的问题。比如,赚点小钱?
由于微信改版后不再是按时间顺序推送文章,如果后续想持续关注笔者的最新观点,请务必将公众号设为星标,并点击右下角的“赞”和“在看”,不然我又懒得更新了哈,还有更多很好玩的数据等着你哦。
原创文章,转载请注明牛出处
http://30daydo.com/article/608
查看全部
因为我们花了不少时间爬取了港股新股的数据,可以对这些数据加以利用,利用机器学习的模型,预测港股上市价格以及影响因素的权重。
香港股市常年位于全球新股集资三甲之列,每年都有上百只新股上市。与已上市的正股相比,新股的特点是没有任何历史交易数据,这使新股的feature比较朴素,使其可以变成一个较为简单的机器学习问题。
我们在这里,以练手为目的,用新股首日涨跌幅的预测作为例子,介绍一个比较完整的机器学习流程。
数据获取
一个机器学习的项目,最重要的是数据。没有数据,一切再高级的算法都只是纸上谈兵。上一篇文中,已经获取了最近发行的新股的一些基本数据,还有一些详情数据在详细页里面,需要访问详情页获取。
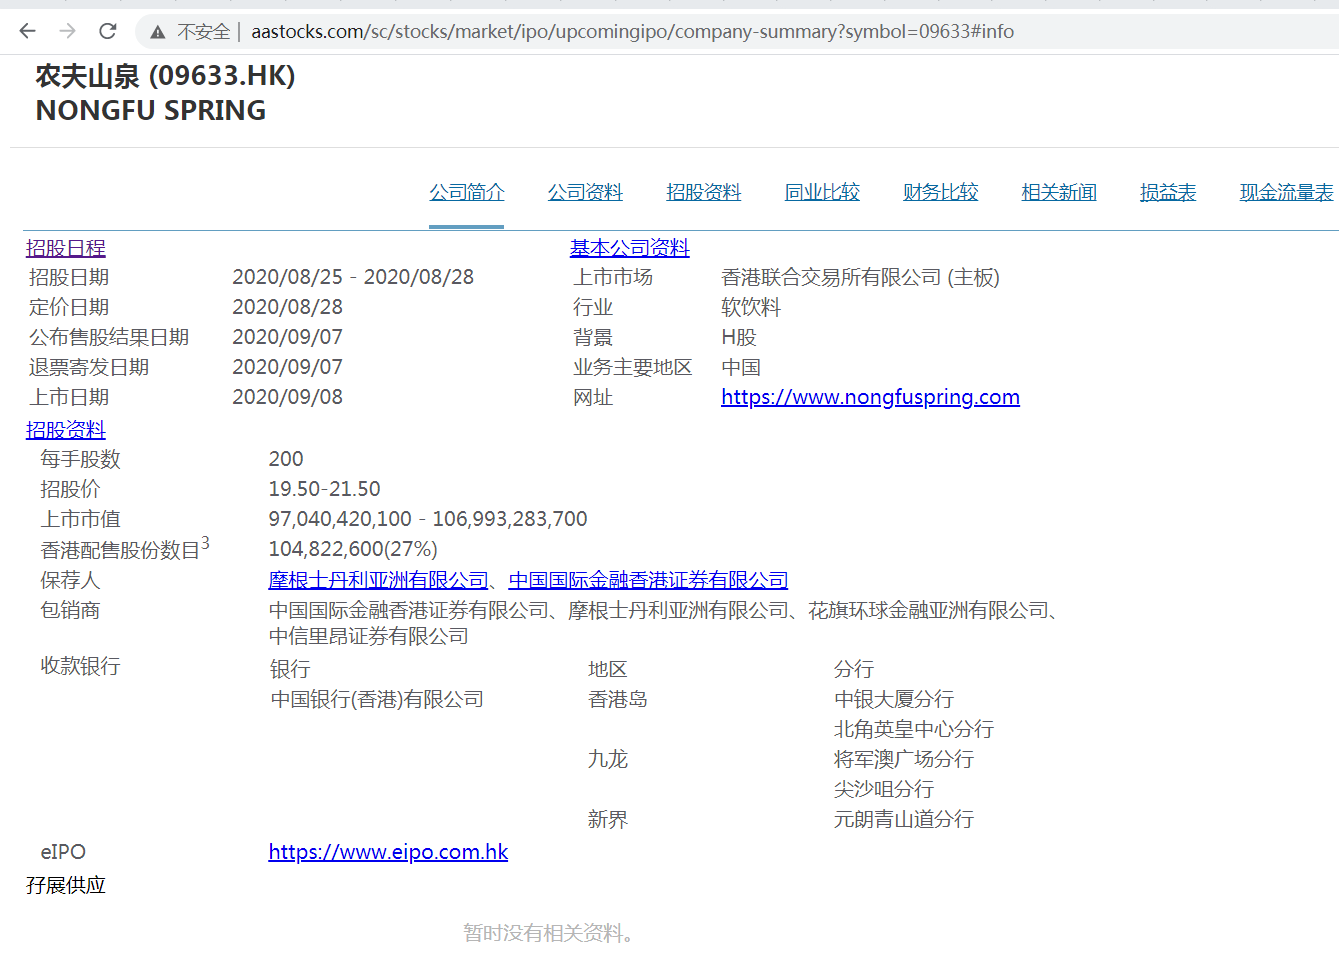
比如农夫山泉,除了之前爬取的基本数据,如上市市值,招股价,中签率,超额倍数,现价等,还有一些保荐人,包销商等有价值数据,所以我们也需要顺带把这些数据获取过来。这时需要在上一篇文章的基础上,获取每一个新股的详情页地址,然后如法炮制,用xpath把数据提取出来。
基本数据页和详情页保存为2个csv文件:data/ipo_list.csv和data/ipo_details.csv
数据清理和特征提取
接下来要做的是对数据进行清理,扔掉无关的项目,然后做一些特征提取和特征处理。
爬取的两个数据,我们先用pandas读取进来,用股票代码code做index,然后合并成为一个大的dataframe.
#Read two files and merge

df1 = pd.read_csv('../data/ipo_list', sep='\t', index_col='code')

df2 = pd.read_csv('../data/ipo_details', sep= '\t', index_col = 0)

#Use combine_first to avoid duplicate columns

df = df1.combine_first(df2)
我们看看我们的dataframe有哪些column先:
df.columns.values


array(['area', 'banks', 'buy_ratio', 'category', 'date', 'draw_prob',

       'eipo', 'firstday_performance', 'hk_portion', 'ipo_price',

       'ipo_price_range', 'market_type', 'name', 'now_price', 'one_hand',

       'predict_profile_market_ratio', 'predict_profit_ratio',

       'profit_ratio', 'recommender', 'sales', 'shares_per_hand',

       'stock_type', 'total_performance', 'total_value', 'website'], dtype=object)
我们的目标,也就是我们要预测的值,是首日涨跌幅,即firstday_performance. 我们需要扔掉一些无关的项目,比如日期、收票银行、网址、当前的股价等等。还要扔掉那些没有公开发售的全配售的股票,因为这些股票没有任何散户参与,跟我们目标无关。
# Drop unrelated columns

to_del = ['date', 'banks', 'eipo', 'name', 'now_price', 'website', 'total_performance','predict_profile_market_ratio', 'predict_profit_ratio', 'profit_ratio']

for item in to_del:

    del df[item]


#Drop non_public ipo stocks

df = df[df.draw_prob.notnull()]
对于百分比的数据,我们要换成float的形式:
def per2float(x):

    if not pd.isnull(x):

        x = x.strip('%')

        return float(x)/100.

    else:

        return x


#Format percentage

df['draw_prob'] = df['draw_prob'].apply(per2float)

df['firstday_performance'] = df['firstday_performance'].apply(per2float)

df['hk_portion'] = df['hk_portion'].apply(per2float)
对于”认购不足”的情况,我们要把超购数替换成为0:
def buy_ratio_process(x):

    if x == '认购不足':

        return 0.0

    else:

        return float(x)


#Format buy_ratio

df['buy_ratio'] = df['buy_ratio'].apply(buy_ratio_process)
新股招股的IPO价格是一个区间。有一些新股,招股价上下界拉得很开。因为我们已经有了股价作为另一个,所以我们这里希望能拿到IPO招股价格的上下界范围与招股价相比的一个比例,作为一个新的特征:
def get_low_bound(x):

    if ',' in str(x):

        x = x.replace(',', '')

    try:

        if pd.isnull(x) or '-' not in x:

            return float(x)

        else:

            x = x.split('-')

            return float(x[0])

    except Exception as e:

        print(e)

        print(x)


def get_up_bound(x):

    if ',' in str(x):

        x = x.replace(',', '')

    try:

        if pd.isnull(x) or '-' not in x:

            return float(x)

        else:

            x = x.split('-')

            return float(x[1])

    except Exception as e:

        print(e)

        print(x)


def get_ipo_range_prop(x):

    if pd.isnull(x):

        return x

    low_bound = get_low_bound(x)

    up_bound = get_up_bound(x)

    return (up_bound-low_bound)*2/(up_bound+low_bound)


#Merge ipo_price_range to proportion of middle

df['ipo_price_range_ratio'] = df['ipo_price_range'].apply(get_ipo_range_prop)

del df['ipo_price_range']
我们取新股招股价对应总市值的中位数作为另一个特征。因为总市值的绝对值是一个非常大的数字,我们把它按比例缩小,使它的取值和其它特征在一个差不多的范围里。
def get_total_value_mid(x):

    if pd.isnull(x):

        return x

    low_bound = get_low_bound(x)

    up_bound = get_up_bound(x)

    return (up_bound+low_bound)/2


df['total_value_mid'] = df['total_value'].apply(get_total_value_mid)/1000000000.

del df['total_value']
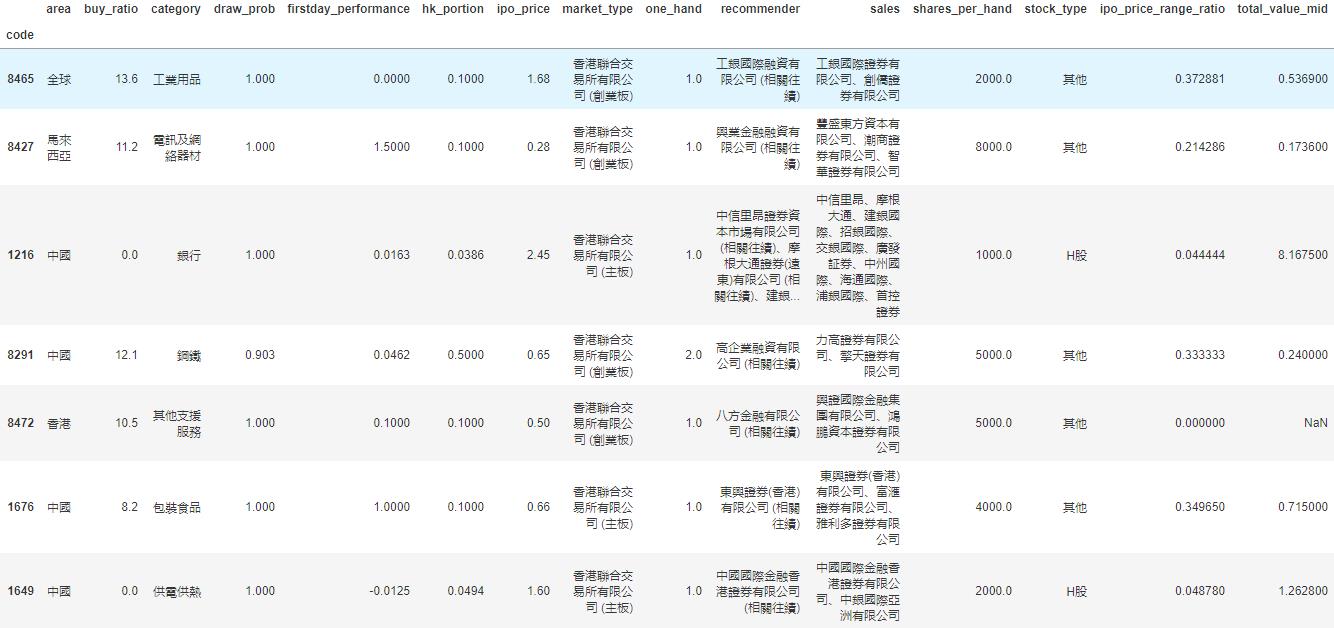
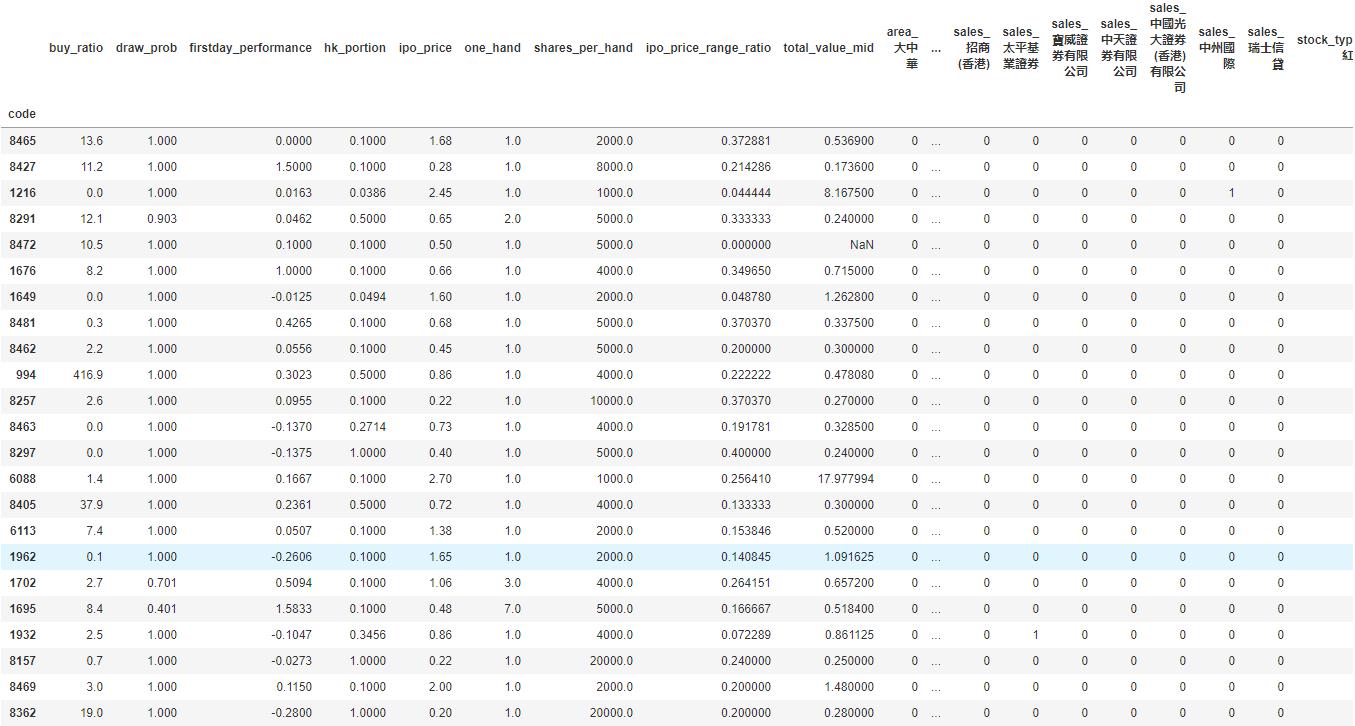
于是我们的数据变成了这样一个278 rows × 15 columns的dataframe,即我们有278个数据点和15个特征:
我们看到诸如地区、业务种类等这些特征是categorical的。同时,保荐人和包销商又有多个item的情况。对于这种特征的处理,我们使用one-hot encoding,对每一个种类创建一个新的category,然后用0-1来表示instance是否属于这个category。
#Now do one-hot encoding for all categorical columns这下我们的数据变成了一个278 rows × 535 columns的dataframe,即我们之前的15个特征因为one-hot encoding,一下子变成了535个特征。这其实是机器学习很常见的一个情况,即我们的数据是一个sparce matrix。
#One problem is that we have to split('、') first for contents with multiple companies
dftest = df.copy()
def one_hot_encoding(df, column_name):
#Reads a df and target column, does tailored one-hot encoding, and return new df for merge
cat_list = df[column_name].unique().tolist()
cat_set = set()
for items in cat_list:
if pd.isnull(items):
continue
items = items.split('、')
for item in items:
item = item.strip()
cat_set.add(item)
for item in cat_set:
item = column_name + '_' + item
df[item] = 0
def check_onehot(x, cat):
if pd.isnull(x):
return 0
x = x.split('、')
for item in x:
if cat == item.strip():
return 1
return 0
for item in cat_set:
df[column_name + '_' + item] = df[column_name].apply(check_onehot, args=(item, ))
del df[column_name]
return df
dftest = one_hot_encoding(dftest, 'area')
dftest = one_hot_encoding(dftest, 'category')
dftest = one_hot_encoding(dftest, 'market_type')
dftest = one_hot_encoding(dftest, 'recommender')
dftest = one_hot_encoding(dftest, 'sales')
dftest = one_hot_encoding(dftest, 'stock_type')
训练模型
有了已经整理好特征的数据,我们可以开始建立机器学习模型了。
这里我们用xgboost为例子建立一个非常简单的模型。xgboost是一个基于boosted tree的模型。大家也可以尝试其它更多的算法模型。
我们把数据读入,然后随机把1/3的股票数据分出来做testing data. 我们这里只是一个示例,更高级的方法可以做诸如n-fold validation,以及grid search寻找最优参数等。
# load data and split feature and label

df = pd.read_csv('../data/hk_ipo_feature_engineered', sep='\t', index_col='code', encoding='utf-8')

Y = df['firstday_performance']

X = df.drop('firstday_performance', axis = 1)

# split data into train and test sets

seed = 7

test_size = 0.33

X_train, X_test, y_train, y_test = train_test_split(X, Y, test_size=test_size, random_state=seed)

# fit model no training data

eval_set = [(X_test, y_test)]
因为新股首日涨跌幅是一个float,所以这是一个regression的问题。我们跑xgboost模型,输出mean squared error (越接近0表明准确率越高):
# fit model no training data可见准确率还是蛮高的。 xgboost自带了画出特征重要性的方法xgb.plot_importance。 用来描述每个特征对结果的重要程度。
xgb_model = xgb.XGBRegressor().fit(X_train,y_train)
predictions = xgb_model.predict(X_test)
actuals = y_test
print mean_squared_error(actuals, predictions)
0.0643324471123
importance = xgb_model.booster().get_score(importance_type='weight')然后利用matplotlib绘制图形。
tuples = [(k, importance[k]) for k in importance]
我们看到几个最强的特征,比如超额倍数、在香港发售的比例、ipo的价格和总市值(细价股更容易涨很多)等。
同时我们还发现了几个比较有意思的特征,比如东南亚地区的股票,和某些包销商与保荐人。
模型预测
这里就略过了。大家大可以自己将即将上市的港股新股做和上面一样的特征处理,然后预测出一个首日涨跌幅,待股票上市后做个对比了!
总结
我们用预测港股新股首日涨跌幅的例子,介绍了一个比较简单的机器学习的流程,包括了数据获取、数据清理、特征处理、模型训练和模型预测等。这其中每一个步骤都可以钻研得非常深;这篇文章只是蜻蜓点水,隔靴搔痒。
最重要的是,掌握了机器学习的知识,也许真的能帮助我们解决很多生活中实际的问题。比如,赚点小钱?
由于微信改版后不再是按时间顺序推送文章,如果后续想持续关注笔者的最新观点,请务必将公众号设为星标,并点击右下角的“赞”和“在看”,不然我又懒得更新了哈,还有更多很好玩的数据等着你哦。
原创文章,转载请注明牛出处
http://30daydo.com/article/608
多线程调用yolo模型会出错(包括使用cv2载入yolo模型)
李魔佛 发表了文章 • 3 个评论 • 5791 次浏览 • 2019-12-05 10:27
多线程调用yolo模型会出错(包括使用cv2载入yolo模型)
多线程调用yolo模型会出错(包括使用cv2载入yolo模型)
RuntimeError: `get_session` is not available when using TensorFlow 2.0.
李魔佛 发表了文章 • 0 个评论 • 14059 次浏览 • 2019-11-28 15:10
pip install tensorflow==1.15 --upgradeHere, we will see how we can upgrade our code to work with tensorflow 2.0.
This error is usually faced when we are loading pre-trained model with tensorflow session/graph or we are building flask api over a pre-trained model and loading model in tensorflow graph to avoid collision of sessions while application is getting multiple requests at once or say in case of multi-threadinng
After tensorflow 2.0 upgrade, i also started facing above error in one of my project when i had built api of pre-trained model with flask. So i looked around in tensorflow 2.0 documents to find a workaround, to avoid this runtime error and upgrade my code to work with tensorflow 2.0 as well rather than downgrading it to tensorflow 1.x .
I had a project on which i had written tutorial as well on how to build Flask api on trained keras model of text classification and then use it in production
But this project was not working after tensorflow upgrade and was facing runtime error.
Stacktrace of error was something like below:
File "/Users/Upasana/Documents/playground/deploy-keras-model-in-production/src/main.py", line 37, in model_predict
with backend.get_session().graph.as_default() as g:
File "/Users/Upasana/Documents/playground/deploy-keras-model-in-production/venv-tf2/lib/python3.6/site-packages/keras/backend/tensorflow_backend.py", line 379, in get_session
'`get_session` is not available '
RuntimeError: `get_session` is not available when using TensorFlow 2.0.
Related code to get model
with backend.get_session().graph.as_default() as g:
model = SentimentService.get_model1()
Related code to load model
def load_deep_model(self, model):
json_file = open('./src/mood-saved-models/' + model + '.json', 'r')
loaded_model_json = json_file.read()
loaded_model = model_from_json(loaded_model_json)
loaded_model.load_weights("./src/mood-saved-models/" + model + ".h5")
loaded_model._make_predict_function()
return loaded_model
get_session is removed in tensorflow 2.0 and hence not available.
so, in order to load saved model we switched methods. Rather than using keras’s load_model, we used tensorflow to load model so that we can load model using distribution strategy.
Note
The tf.distribute.Strategy API provides an abstraction for distributing your training across multiple processing units.
New code to get model
another_strategy = tf.distribute.MirroredStrategy()
with another_strategy.scope():
model = SentimentService.get_model1()
New code to load model
def load_deep_model(self, model):
loaded_model = tf.keras.models.load_model("./src/mood-saved-models/"model + ".h5")
return loaded_model
This worked and solved the problem with runtime error of get_session not available in tensorflow 2.0 . You can refer to Tensorflow 2.0 upgraded article too
Hope, this will solve your problem too. Thanks for following this article. 查看全部
pip install tensorflow==1.15 --upgrade
Here, we will see how we can upgrade our code to work with tensorflow 2.0.


This error is usually faced when we are loading pre-trained model with tensorflow session/graph or we are building flask api over a pre-trained model and loading model in tensorflow graph to avoid collision of sessions while application is getting multiple requests at once or say in case of multi-threadinng


After tensorflow 2.0 upgrade, i also started facing above error in one of my project when i had built api of pre-trained model with flask. So i looked around in tensorflow 2.0 documents to find a workaround, to avoid this runtime error and upgrade my code to work with tensorflow 2.0 as well rather than downgrading it to tensorflow 1.x .


I had a project on which i had written tutorial as well on how to build Flask api on trained keras model of text classification and then use it in production


But this project was not working after tensorflow upgrade and was facing runtime error.


Stacktrace of error was something like below:


 File "/Users/Upasana/Documents/playground/deploy-keras-model-in-production/src/main.py", line 37, in model_predict

    with backend.get_session().graph.as_default() as g:

  File "/Users/Upasana/Documents/playground/deploy-keras-model-in-production/venv-tf2/lib/python3.6/site-packages/keras/backend/tensorflow_backend.py", line 379, in get_session

    '`get_session` is not available '

RuntimeError: `get_session` is not available when using TensorFlow 2.0.

Related code to get model

with backend.get_session().graph.as_default() as g:

        model = SentimentService.get_model1()

Related code to load model

def load_deep_model(self, model):

        json_file = open('./src/mood-saved-models/' + model + '.json', 'r')

        loaded_model_json = json_file.read()

        loaded_model = model_from_json(loaded_model_json)


        loaded_model.load_weights("./src/mood-saved-models/" + model + ".h5")


        loaded_model._make_predict_function()

        return loaded_model

get_session is removed in tensorflow 2.0 and hence not available.


so, in order to load saved model we switched methods. Rather than using keras’s load_model, we used tensorflow to load model so that we can load model using distribution strategy.


Note

The tf.distribute.Strategy API provides an abstraction for distributing your training across multiple processing units.


New code to get model

another_strategy = tf.distribute.MirroredStrategy()

with another_strategy.scope():

    model = SentimentService.get_model1()

New code to load model

def load_deep_model(self, model):

        loaded_model = tf.keras.models.load_model("./src/mood-saved-models/"model + ".h5")

        return loaded_model

This worked and solved the problem with runtime error of get_session not available in tensorflow 2.0 . You can refer to Tensorflow 2.0 upgraded article too


Hope, this will solve your problem too. Thanks for following this article.
yolo voc_label 源码分析
李魔佛 发表了文章 • 0 个评论 • 3786 次浏览 • 2019-11-27 15:19
import xml.etree.ElementTree as ET

import pickle

import os

from os import listdir, getcwd

from os.path import join


sets = [('2012', 'train'), ('2012', 'val'), ('2007', 'train'), ('2007', 'val'), ('2007', 'test')]


# 20类

classes = ["aeroplane", "bicycle", "bird", "boat", "bottle", "bus", "car", "cat", "chair", "cow", "diningtable", "dog",

           "horse", "motorbike", "person", "pottedplant", "sheep", "sofa", "train", "tvmonitor"]


# size w,h

# box x-min,x-max,y-min,y-max

def convert(size, box):

    dw = 1. / size[0]

    dh = 1. / size[1]

    x = (box[0] + box[1]) / 2.0 # 中心点位置

    y = (box[2] + box[3]) / 2.0

    w = box[1] - box[0]

    h = box[3] - box[2]

    x = x * dw

    w = w * dw

    y = y * dh

    h = h * dh # 全部转化为相对坐标

    return (x, y, w, h)


def convert_annotation(year, image_id):

    # 找到2个同样的文件

    in_file = open('VOCdevkit/VOC%s/Annotations/%s.xml' % (year, image_id))

    out_file = open('VOCdevkit/VOC%s/labels/%s.txt' % (year, image_id), 'w')


    tree = ET.parse(in_file)

    root = tree.getroot()

    size = root.find('size')

    w = int(size.find('width').text)

    h = int(size.find('height').text)


    for obj in root.iter('object'):

        difficult = obj.find('difficult').text

        cls = obj.find('name').text

        if cls not in classes or int(difficult) == 1: # difficult ==1 的不要了

            continue

        cls_id = classes.index(cls) # 排在第几位

        xmlbox = obj.find('bndbox')

        b = (float(xmlbox.find('xmin').text), float(xmlbox.find('xmax').text), float(xmlbox.find('ymin').text),

             float(xmlbox.find('ymax').text))

        # 传入的是w,h 与框框的周边

        bb = convert((w, h), b)

        out_file.write(str(cls_id) + " " + " ".join([str(a) for a in bb]) + '\n')


wd = getcwd()


for year, image_set in sets:

    # ('2012', 'train') 循环5次

    # 创建目录 一次性

    if not os.path.exists('VOCdevkit/VOC%s/labels/' % (year)):

        os.makedirs('VOCdevkit/VOC%s/labels/' % (year))


    # 图片的id数据

    image_ids = open('VOCdevkit/VOC%s/ImageSets/Main/%s.txt' % (year, image_set)).read().strip().split()


    # 结果写入这个文件

    list_file = open('%s_%s.txt' % (year, image_set), 'w')


    for image_id in image_ids:

        list_file.write('%s/VOCdevkit/VOC%s/JPEGImages/%s.jpg\n' % (wd, year, image_id)) # 补全路径

        convert_annotation(year, image_id)

    list_file.close()
查看全部
import xml.etree.ElementTree as ET
import pickle
import os
from os import listdir, getcwd
from os.path import join
sets = [('2012', 'train'), ('2012', 'val'), ('2007', 'train'), ('2007', 'val'), ('2007', 'test')]
# 20类
classes = ["aeroplane", "bicycle", "bird", "boat", "bottle", "bus", "car", "cat", "chair", "cow", "diningtable", "dog",
"horse", "motorbike", "person", "pottedplant", "sheep", "sofa", "train", "tvmonitor"]
# size w,h
# box x-min,x-max,y-min,y-max
def convert(size, box):
dw = 1. / size[0]
dh = 1. / size[1]
x = (box[0] + box[1]) / 2.0 # 中心点位置
y = (box[2] + box[3]) / 2.0
w = box[1] - box[0]
h = box[3] - box[2]
x = x * dw
w = w * dw
y = y * dh
h = h * dh # 全部转化为相对坐标
return (x, y, w, h)
def convert_annotation(year, image_id):
# 找到2个同样的文件
in_file = open('VOCdevkit/VOC%s/Annotations/%s.xml' % (year, image_id))
out_file = open('VOCdevkit/VOC%s/labels/%s.txt' % (year, image_id), 'w')
tree = ET.parse(in_file)
root = tree.getroot()
size = root.find('size')
w = int(size.find('width').text)
h = int(size.find('height').text)
for obj in root.iter('object'):
difficult = obj.find('difficult').text
cls = obj.find('name').text
if cls not in classes or int(difficult) == 1: # difficult ==1 的不要了
continue
cls_id = classes.index(cls) # 排在第几位
xmlbox = obj.find('bndbox')
b = (float(xmlbox.find('xmin').text), float(xmlbox.find('xmax').text), float(xmlbox.find('ymin').text),
float(xmlbox.find('ymax').text))
# 传入的是w,h 与框框的周边
bb = convert((w, h), b)
out_file.write(str(cls_id) + " " + " ".join([str(a) for a in bb]) + '\n')
wd = getcwd()
for year, image_set in sets:
# ('2012', 'train') 循环5次
# 创建目录 一次性
if not os.path.exists('VOCdevkit/VOC%s/labels/' % (year)):
os.makedirs('VOCdevkit/VOC%s/labels/' % (year))
# 图片的id数据
image_ids = open('VOCdevkit/VOC%s/ImageSets/Main/%s.txt' % (year, image_set)).read().strip().split()
# 结果写入这个文件
list_file = open('%s_%s.txt' % (year, image_set), 'w')
for image_id in image_ids:
list_file.write('%s/VOCdevkit/VOC%s/JPEGImages/%s.jpg\n' % (wd, year, image_id)) # 补全路径
convert_annotation(year, image_id)
list_file.close()
神经网络中数值梯度的计算 python代码
李魔佛 发表了文章 • 0 个评论 • 5300 次浏览 • 2019-05-07 19:12
import matplotlib.pyplot as plt

import numpy as np

import time

from collections import OrderedDict


def softmax(a):

    a = a - np.max(a)

    exp_a = np.exp(a)

    exp_a_sum = np.sum(exp_a)

    return exp_a / exp_a_sum


def cross_entropy_error(t, y):

    delta = 1e-7

    s = -1 * np.sum(t * np.log(y + delta))

    #     print('cross entropy ',s)

    return s


class simpleNet:

    def __init__(self):

        self.W = np.random.randn(2, 3)


    def predict(self, x):

        print('current w',self.W)

        return np.dot(x, self.W)


    def loss(self, x, t):

        z = self.predict(x)

        #         print(z)

        #         print(z.ndim)

        y = softmax(z)

        #         print('y',y)

        loss = cross_entropy_error(y, t)  # y为预测的值

        return loss


def numerical_gradient_(f, x):  # 针对2维的情况 甚至是多维

    h = 1e-4  # 0.0001

    grad = np.zeros_like(x)


    it = np.nditer(x, flags=['multi_index'], op_flags=['readwrite'])

    while not it.finished:

        idx = it.multi_index

        print('idx', idx)

        tmp_val = x[idx]

        x[idx] = float(tmp_val) + h

        fxh1 = f(x)  # f(x+h)

        print('fxh1 ', fxh1)

        # print('current W', net.W)

        x[idx] = tmp_val - h

        fxh2 = f(x)  # f(x-h)

        print('fxh2 ', fxh2)

        # print('next currnet W ', net.W)

        grad[idx] = (fxh1 - fxh2) / (2 * h)


        x[idx] = tmp_val  # 还原值

        it.iternext()


    return grad


net = simpleNet()

x=np.array([0.6,0.9])

t = np.array([0.0,0.0,1.0])


def f(W):

    return net.loss(x,t)


grads =numerical_gradient_(f,net.W)

print(grads) 查看全部
import matplotlib.pyplot as plt
import numpy as np
import time
from collections import OrderedDict
def softmax(a):
a = a - np.max(a)
exp_a = np.exp(a)
exp_a_sum = np.sum(exp_a)
return exp_a / exp_a_sum
def cross_entropy_error(t, y):
delta = 1e-7
s = -1 * np.sum(t * np.log(y + delta))
# print('cross entropy ',s)
return s
class simpleNet:
def __init__(self):
self.W = np.random.randn(2, 3)
def predict(self, x):
print('current w',self.W)
return np.dot(x, self.W)
def loss(self, x, t):
z = self.predict(x)
# print(z)
# print(z.ndim)
y = softmax(z)
# print('y',y)
loss = cross_entropy_error(y, t) # y为预测的值
return loss
def numerical_gradient_(f, x): # 针对2维的情况 甚至是多维
h = 1e-4 # 0.0001
grad = np.zeros_like(x)
it = np.nditer(x, flags=['multi_index'], op_flags=['readwrite'])
while not it.finished:
idx = it.multi_index
print('idx', idx)
tmp_val = x[idx]
x[idx] = float(tmp_val) + h
fxh1 = f(x) # f(x+h)
print('fxh1 ', fxh1)
# print('current W', net.W)
x[idx] = tmp_val - h
fxh2 = f(x) # f(x-h)
print('fxh2 ', fxh2)
# print('next currnet W ', net.W)
grad[idx] = (fxh1 - fxh2) / (2 * h)
x[idx] = tmp_val # 还原值
it.iternext()
return grad
net = simpleNet()
x=np.array([0.6,0.9])
t = np.array([0.0,0.0,1.0])
def f(W):
return net.loss(x,t)
grads =numerical_gradient_(f,net.W)
print(grads)
运行keras报错 No module named 'numpy.core._multiarray_umath'
李魔佛 发表了文章 • 0 个评论 • 8487 次浏览 • 2019-03-26 18:10
ModuleNotFoundError: No module named 'numpy.core._multiarray_umath'
---------------------------------------------------------------------------
ImportError Traceback (most recent call last)
ImportError: numpy.core.multiarray failed to import
The above exception was the direct cause of the following exception:
SystemError Traceback (most recent call last)
C:\ProgramData\Anaconda3\lib\importlib\_bootstrap.py in _find_and_load(name, import_)
SystemError: <class '_frozen_importlib._ModuleLockManager'> returned a result with an error set
---------------------------------------------------------------------------
ImportError Traceback (most recent call last)
ImportError: numpy.core._multiarray_umath failed to import
---------------------------------------------------------------------------
ImportError Traceback (most recent call last)
ImportError: numpy.core.umath failed to import
2019-03-26 18:01:48.643796: F tensorflow/python/lib/core/bfloat16.cc:675] Check failed: PyBfloat16_Type.tp_base != nullptr
以前没遇到这个问题,所以怀疑是conda自带的numpy版本过低,然后使用命令 pip install numpy -U
把numpy更新到最新的版本,然后问题就解决了。
查看全部
ModuleNotFoundError                       Traceback (most recent call last)

ModuleNotFoundError: No module named 'numpy.core._multiarray_umath'

---------------------------------------------------------------------------

ImportError                               Traceback (most recent call last)

ImportError: numpy.core.multiarray failed to import


The above exception was the direct cause of the following exception:


SystemError                               Traceback (most recent call last)

C:\ProgramData\Anaconda3\lib\importlib\_bootstrap.py in _find_and_load(name, import_)


SystemError: <class '_frozen_importlib._ModuleLockManager'> returned a result with an error set

---------------------------------------------------------------------------

ImportError                               Traceback (most recent call last)

ImportError: numpy.core._multiarray_umath failed to import

---------------------------------------------------------------------------

ImportError                               Traceback (most recent call last)

ImportError: numpy.core.umath failed to import

2019-03-26 18:01:48.643796: F tensorflow/python/lib/core/bfloat16.cc:675] Check failed: PyBfloat16_Type.tp_base != nullptr
以前没遇到这个问题,所以怀疑是conda自带的numpy版本过低,然后使用命令 pip install numpy -U
把numpy更新到最新的版本,然后问题就解决了。
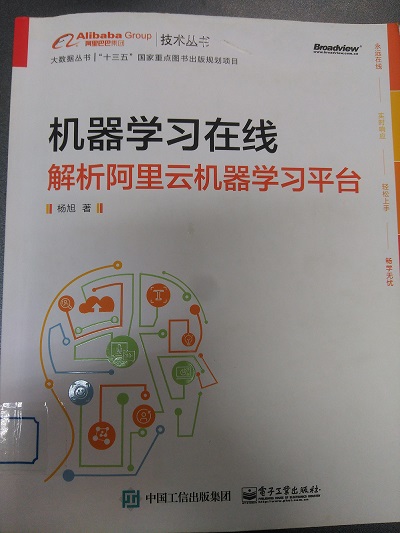
《机器学习在线 解析阿里云机器学习平台》读后感
李魔佛 发表了文章 • 0 个评论 • 4257 次浏览 • 2019-03-10 20:18
查看全部
sklearn中的Bunch数据类型
李魔佛 发表了文章 • 0 个评论 • 17296 次浏览 • 2018-06-07 19:10
那么这个
<class 'sklearn.utils.Bunch'>
是什么数据格式 ?
打印一下:
好吧,原来就是一个字典结构。可以像调用字典一样使用Bunch。
比如 data['image'] 就获取 key为image的内容。
原创地址:http://30daydo.com/article/325
欢迎转载,请注明出处。 查看全部
那么这个
<class 'sklearn.utils.Bunch'>
是什么数据格式 ?
打印一下:
好吧,原来就是一个字典结构。可以像调用字典一样使用Bunch。
比如 data['image'] 就获取 key为image的内容。
原创地址:http://30daydo.com/article/325
欢迎转载,请注明出处。
sklearn中SGDClassifier分类器每次得到的结果都不一样?
李魔佛 发表了文章 • 0 个评论 • 8558 次浏览 • 2018-06-07 17:14
sgdc.fit(X_train,y_train)
sgdc_predict_y = sgdc.predict(X_test)
print 'Accuary of SGD classifier ', sgdc.score(X_test,y_test)
print classification_report(y_test,sgdc_predict_y,target_names=['Benign','Malignant'])
每次输出的结果都不一样? WHY
因为你使用了一个默认参数:
SGDClassifier(random_state = None)
所以这个随机种子每次不一样,所以得到的结果就可能不一样,如果你指定随机种子值,那么每次得到的结果都是一样的了。
原创地址:http://30daydo.com/article/323
欢迎转载,请注明出处。 查看全部
sgdc = SGDClassifier()

sgdc.fit(X_train,y_train)

sgdc_predict_y = sgdc.predict(X_test)

print 'Accuary of SGD classifier ', sgdc.score(X_test,y_test)

print classification_report(y_test,sgdc_predict_y,target_names=['Benign','Malignant'])
每次输出的结果都不一样? WHY
因为你使用了一个默认参数:
SGDClassifier(random_state = None)
所以这个随机种子每次不一样,所以得到的结果就可能不一样,如果你指定随机种子值,那么每次得到的结果都是一样的了。
原创地址:http://30daydo.com/article/323
欢迎转载,请注明出处。
