通知设置 新通知
学习强国Python自动化代码
python爬虫 • 李魔佛 发表了文章 • 1 个评论 • 39766 次浏览 • 2019-03-27 17:45
# _*_ coding: utf-8 _*_


from selenium import webdriver

import time


__author__ = 'Silent_Coder'

__date__ = '2019/3/12 22:41'


HOME_PAGE = 'https://www.xuexi.cn/'

VIDEO_LINK = 'https://www.xuexi.cn/a191dbc3067d516c3e2e17e2e08953d6/b87d700beee2c44826a9202c75d18c85.html?pageNumber=39'

LONG_VIDEO_LINK = 'https://www.xuexi.cn/f65dae4a57fe21fcc36f3506d660891c/b2e5aa79be613aed1f01d261c4a2ae17.html'

LONG_VIDEO_LINK2 = 'https://www.xuexi.cn/0040db2a403b0b9303a68b9ae5a4cca0/b2e5aa79be613aed1f01d261c4a2ae17.html'

TEST_VIDEO_LINK = 'https://www.xuexi.cn/8e35a343fca20ee32c79d67e35dfca90/7f9f27c65e84e71e1b7189b7132b4710.html'

SCORES_LINK = 'https://pc.xuexi.cn/points/my-points.html'

LOGIN_LINK = 'https://pc.xuexi.cn/points/login.html'

ARTICLES_LINK = 'https://www.xuexi.cn/d05cad69216e688d304bb91ef3aac4c6/9a3668c13f6e303932b5e0e100fc248b.html'


options = webdriver.ChromeOptions()

options.add_experimental_option('excludeSwitches', ['enable-automation'])

browser = webdriver.Chrome(executable_path=r'D:\OneDrive\Python\selenium\chromedriver.exe',options=options)


def login_simulation():

    """模拟登录"""

    # 方式一:使用cookies方式

    # 先自己登录,然后复制token值覆盖

    # cookies = {'name': 'token', 'value': ''}

    # browser.add_cookie(cookies)


    # 方式二:自己扫码登录

    browser.get(LOGIN_LINK)

    browser.maximize_window()

    browser.execute_script("var q=document.documentElement.scrollTop=1000")

    time.sleep(10)

    browser.get(HOME_PAGE)

    print("模拟登录完毕\n")


def watch_videos():

    """观看视频"""

    browser.get(VIDEO_LINK)

    videos = browser.find_elements_by_xpath("//div[@id='Ck3ln2wlyg3k00']")

    spend_time = 0


    for i, video in enumerate(videos):

        if i > 6:

            break

        video.click()

        all_handles = browser.window_handles

        browser.switch_to_window(all_handles[-1])

        browser.get(browser.current_url)


        # 点击播放

        browser.find_element_by_xpath("//div[@class='outter']").click()

        # 获取视频时长

        video_duration_str = browser.find_element_by_xpath("//span[@class='duration']").get_attribute('innerText')

        video_duration = int(video_duration_str.split(':')[0]) * 60 + int(video_duration_str.split(':')[1])

        # 保持学习,直到视频结束

        time.sleep(video_duration + 3)

        spend_time += video_duration + 3

        browser.close()

        browser.switch_to_window(all_handles[0])


    # if spend_time < 3010:

    #     browser.get(LONG_VIDEO_LINK)

    #     browser.execute_script("var q=document.documentElement.scrollTop=850")

    #     try:

    #         browser.find_element_by_xpath("//div[@class='outter']").click()

    #     except:

    #         pass

    #

    #     # 观看剩下的时间

    #     time.sleep(3010 - spend_time)

    browser.get(TEST_VIDEO_LINK)

    time.sleep(3010 - spend_time)

    print("播放视频完毕\n")


def read_articles():

    """阅读文章"""

    browser.get(ARTICLES_LINK)

    articles = browser.find_elements_by_xpath("//div[@id='Ca4gvo4bwg7400']")

    for index, article in enumerate(articles):

        if index > 7:

            break

        article.click()

        all_handles = browser.window_handles

        browser.switch_to_window(all_handles[-1])

        browser.get(browser.current_url)

        for i in range(0, 2000, 100):


            js_code = "var q=document.documentElement.scrollTop=" + str(i)

            browser.execute_script(js_code)

            time.sleep(5)

        for i in range(2000, 0, -100):

            js_code = "var q=document.documentElement.scrollTop=" + str(i)

            browser.execute_script(js_code)

            time.sleep(5)

        time.sleep(80)

        browser.close()

        browser.switch_to_window(all_handles[0])

    print("阅读文章完毕\n")


def get_scores():

    """获取当前积分"""

    browser.get(SCORES_LINK)

    time.sleep(2)

    gross_score = browser.find_element_by_xpath("//*[@id='app']/div/div[2]/div/div[2]/div[2]/span[1]")\

        .get_attribute('innerText')

    today_score = browser.find_element_by_xpath("//span[@class='my-points-points']").get_attribute('innerText')

    print("当前总积分:" + str(gross_score))

    print("今日积分:" + str(today_score))

    print("获取积分完毕,即将退出\n")


if __name__ == '__main__':

    login_simulation()  # 模拟登录

    read_articles()     # 阅读文章

    watch_videos()      # 观看视频

    get_scores()        # 获得今日积分

browser.quit() 查看全部
# _*_ coding: utf-8 _*_
from selenium import webdriver
import time
__author__ = 'Silent_Coder'
__date__ = '2019/3/12 22:41'
HOME_PAGE = 'https://www.xuexi.cn/'
VIDEO_LINK = 'https://www.xuexi.cn/a191dbc3067d516c3e2e17e2e08953d6/b87d700beee2c44826a9202c75d18c85.html?pageNumber=39'
LONG_VIDEO_LINK = 'https://www.xuexi.cn/f65dae4a57fe21fcc36f3506d660891c/b2e5aa79be613aed1f01d261c4a2ae17.html'
LONG_VIDEO_LINK2 = 'https://www.xuexi.cn/0040db2a403b0b9303a68b9ae5a4cca0/b2e5aa79be613aed1f01d261c4a2ae17.html'
TEST_VIDEO_LINK = 'https://www.xuexi.cn/8e35a343fca20ee32c79d67e35dfca90/7f9f27c65e84e71e1b7189b7132b4710.html'
SCORES_LINK = 'https://pc.xuexi.cn/points/my-points.html'
LOGIN_LINK = 'https://pc.xuexi.cn/points/login.html'
ARTICLES_LINK = 'https://www.xuexi.cn/d05cad69216e688d304bb91ef3aac4c6/9a3668c13f6e303932b5e0e100fc248b.html'
options = webdriver.ChromeOptions()
options.add_experimental_option('excludeSwitches', ['enable-automation'])
browser = webdriver.Chrome(executable_path=r'D:\OneDrive\Python\selenium\chromedriver.exe',options=options)
def login_simulation():
"""模拟登录"""
# 方式一:使用cookies方式
# 先自己登录,然后复制token值覆盖
# cookies = {'name': 'token', 'value': ''}
# browser.add_cookie(cookies)
# 方式二:自己扫码登录
browser.get(LOGIN_LINK)
browser.maximize_window()
browser.execute_script("var q=document.documentElement.scrollTop=1000")
time.sleep(10)
browser.get(HOME_PAGE)
print("模拟登录完毕\n")
def watch_videos():
"""观看视频"""
browser.get(VIDEO_LINK)
videos = browser.find_elements_by_xpath("//div[@id='Ck3ln2wlyg3k00']")
spend_time = 0
for i, video in enumerate(videos):
if i > 6:
break
video.click()
all_handles = browser.window_handles
browser.switch_to_window(all_handles[-1])
browser.get(browser.current_url)
# 点击播放
browser.find_element_by_xpath("//div[@class='outter']").click()
# 获取视频时长
video_duration_str = browser.find_element_by_xpath("//span[@class='duration']").get_attribute('innerText')
video_duration = int(video_duration_str.split(':')[0]) * 60 + int(video_duration_str.split(':')[1])
# 保持学习,直到视频结束
time.sleep(video_duration + 3)
spend_time += video_duration + 3
browser.close()
browser.switch_to_window(all_handles[0])
# if spend_time < 3010:
# browser.get(LONG_VIDEO_LINK)
# browser.execute_script("var q=document.documentElement.scrollTop=850")
# try:
# browser.find_element_by_xpath("//div[@class='outter']").click()
# except:
# pass
#
# # 观看剩下的时间
# time.sleep(3010 - spend_time)
browser.get(TEST_VIDEO_LINK)
time.sleep(3010 - spend_time)
print("播放视频完毕\n")
def read_articles():
"""阅读文章"""
browser.get(ARTICLES_LINK)
articles = browser.find_elements_by_xpath("//div[@id='Ca4gvo4bwg7400']")
for index, article in enumerate(articles):
if index > 7:
break
article.click()
all_handles = browser.window_handles
browser.switch_to_window(all_handles[-1])
browser.get(browser.current_url)
for i in range(0, 2000, 100):
js_code = "var q=document.documentElement.scrollTop=" + str(i)
browser.execute_script(js_code)
time.sleep(5)
for i in range(2000, 0, -100):
js_code = "var q=document.documentElement.scrollTop=" + str(i)
browser.execute_script(js_code)
time.sleep(5)
time.sleep(80)
browser.close()
browser.switch_to_window(all_handles[0])
print("阅读文章完毕\n")
def get_scores():
"""获取当前积分"""
browser.get(SCORES_LINK)
time.sleep(2)
gross_score = browser.find_element_by_xpath("//*[@id='app']/div/div[2]/div/div[2]/div[2]/span[1]")\
.get_attribute('innerText')
today_score = browser.find_element_by_xpath("//span[@class='my-points-points']").get_attribute('innerText')
print("当前总积分:" + str(gross_score))
print("今日积分:" + str(today_score))
print("获取积分完毕,即将退出\n")
if __name__ == '__main__':
login_simulation() # 模拟登录
read_articles() # 阅读文章
watch_videos() # 观看视频
get_scores() # 获得今日积分
browser.quit()
scrapyd 日志文件中文乱码 解决方案
python爬虫 • 李魔佛 发表了文章 • 0 个评论 • 5250 次浏览 • 2019-03-27 17:13
网上一般的解决方法是修改scrapyd的源码,增加一个utf8的编码页面,需要重新写一个html的页面框架,对于一般只是看看日志的朋友来说,没必要这么大刀阔斧的。
可以直接使用postman来打开日志文件,里面的中文是正常的。
查看全部
最新版的anaconda无法使用pip安装软件:报错 SSL module is not available
李魔佛 发表了文章 • 0 个评论 • 7043 次浏览 • 2019-03-21 14:06
Elapsed: -
An HTTP error occurred when trying to retrieve this URL.
HTTP errors are often intermittent, and a simple retry will get you on your way.
SSLError(MaxRetryError('HTTPSConnectionPool(host=\'mirrors.ustc.edu.cn\', port=443): Max retries exceeded with url: /anaconda/cloud/conda-forge/win-64/repodata.json (Caused by SSLError("Can\'t connect to HTTPS URL because the SSL module is not available."))'))
折腾了很久,最新版的anaconda使用的是python3.7,也按照网上的方法,把openssl安装了,可是问题还是没有得到解决。
无奈下只能下载其他版本的anaconda。 可以到这里下载:
https://mirrors.tuna.tsinghua.edu.cn/anaconda/archive/
下载一个旧版本的anaconda,然后问题就得到解决了。
############ 更新 ##############
新建一个 .condarc 文件,在 windows下的用户名目录下 , 如 administrator下,
输入以下的内容:
channels:
- http://mirrors.tuna.tsinghua.e ... main/
- http://mirrors.tuna.tsinghua.e ... onda/
- http://mirrors.tuna.tsinghua.e ... free/
show_channel_urls: true
ssl_verify: true
重新下载即可。 查看全部
CondaHTTPError: HTTP 000 CONNECTION FAILED for url <https://mirrors.ustc.edu.cn/an ... gt%3B

Elapsed: -


An HTTP error occurred when trying to retrieve this URL.

HTTP errors are often intermittent, and a simple retry will get you on your way.

SSLError(MaxRetryError('HTTPSConnectionPool(host=\'mirrors.ustc.edu.cn\', port=443): Max retries exceeded with url: /anaconda/cloud/conda-forge/win-64/repodata.json (Caused by SSLError("Can\'t connect to HTTPS URL because the SSL module is not available."))'))
折腾了很久,最新版的anaconda使用的是python3.7,也按照网上的方法,把openssl安装了,可是问题还是没有得到解决。
无奈下只能下载其他版本的anaconda。 可以到这里下载:
https://mirrors.tuna.tsinghua.edu.cn/anaconda/archive/
下载一个旧版本的anaconda,然后问题就得到解决了。
############ 更新 ##############
新建一个 .condarc 文件,在 windows下的用户名目录下 , 如 administrator下,
输入以下的内容:
channels:

  - http://mirrors.tuna.tsinghua.e ... main/

  - http://mirrors.tuna.tsinghua.e ... onda/

  - http://mirrors.tuna.tsinghua.e ... free/

show_channel_urls: true

ssl_verify: true
重新下载即可。
shapely windows的安装方式
李魔佛 发表了文章 • 0 个评论 • 5593 次浏览 • 2019-03-19 16:21
报错:
pip install Shapely
UnicodeDecodeError: 'utf-8' codec can't decode byte 0xd5 in position 24: invalid continuation byte
应该是版本兼容问题。 到官网上:https://shapely.readthedocs.io/en/latest/project.html#requirements
发现,windows只能使用源文件安装或者使用conda安装。
源文件安装:
先下载
下载链接:
https://www.lfd.uci.edu/~gohlke/pythonlibs/#shapely
然后使用pip安装
查看全部
报错:
pip install Shapely
UnicodeDecodeError: 'utf-8' codec can't decode byte 0xd5 in position 24: invalid continuation byte
应该是版本兼容问题。 到官网上:https://shapely.readthedocs.io/en/latest/project.html#requirements
发现,windows只能使用源文件安装或者使用conda安装。
源文件安装:
先下载
下载链接:
https://www.lfd.uci.edu/~gohlke/pythonlibs/#shapely
然后使用pip安装
Linux下自制有道词典 - python 解密有道词典JS加密
python爬虫 • 李魔佛 发表了文章 • 0 个评论 • 5365 次浏览 • 2019-02-23 20:17
平时在linux下开发,鉴于没有什么好用翻译软件,打开网易也占用系统资源,所以写了个在控制台的翻译软件接口。
使用python爬虫,查看网页的JS加密方法,一步一步地分析,就能够得到最后的加密方法啦。
直接给出代码:
# -*- coding: utf-8 -*-

# website: http://30daydo.com

# @Time : 2019/2/23 19:34

# @File : youdao.py

# 解密有道词典的JS


import hashlib

import random

import requests

import time


def md5_(word):

    s = bytes(word, encoding='utf8')

    m = hashlib.md5()

    m.update(s)

    ret = m.hexdigest()

    return ret


def get_sign(word, salt):

    ret = md5_('fanyideskweb' + word + salt + 'p09@Bn{h02_BIEe]$P^nG')

    return ret


def youdao(word):

    url = 'http://fanyi.youdao.com/translate_o?smartresult=dict&smartresult=rule'

    headers = {

        'Host': 'fanyi.youdao.com',

        'User-Agent': 'Mozilla/5.0 (Windows NT 6.1; WOW64; rv:47.0) Gecko/20100101 Firefox/47.0',

        'Accept': 'application/json, text/javascript, */*; q=0.01',

        'Accept-Language': 'zh-CN,zh;q=0.8,en-US;q=0.5,en;q=0.3',

        'Accept-Encoding': 'gzip, deflate',

        'Content-Type': 'application/x-www-form-urlencoded; charset=UTF-8',

        'X-Requested-With': 'XMLHttpRequest',

        'Referer': 'http://fanyi.youdao.com/',

        'Content-Length': '252',

        'Cookie': 'YOUDAO_MOBILE_ACCESS_TYPE=1; OUTFOX_SEARCH_USER_ID=1672542763@10.169.0.83; JSESSIONID=aaaWzxpjeDu1gbhopLzKw; ___rl__test__cookies=1550913722828; OUTFOX_SEARCH_USER_ID_NCOO=372126049.6326876',

        'Connection': 'keep-alive',

        'Pragma': 'no-cache',

        'Cache-Control': 'no-cache',

    }


    ts = str(int(time.time()*1000))

    salt=ts+str(random.randint(0,10))

    bv = md5_("5.0 (Windows)")

    sign= get_sign(word,salt)


    post_data = {

        'i': word,

        'from': 'AUTO', 'to': 'AUTO', 'smartresult': 'dict', 'client': 'fanyideskweb', 'salt': salt,

        'sign': sign, 'ts': ts, 'bv': bv, 'doctype': 'json', 'version': '2.1',

        'keyfrom': 'fanyi.web', 'action': 'FY_BY_REALTIME', 'typoResult': 'false'

    }


    r = requests.post(

        url=url,

        headers=headers,

        data=post_data

    )


    for item in r.json().get('smartResult',{}).get('entries'):

        print(item)


word='student'

youdao(word)
得到结果:
Github:
https://github.com/Rockyzsu/CrawlMan/tree/master/youdao_dictionary
原创文章,转载请注明出处
http://30daydo.com/article/416 查看全部
平时在linux下开发,鉴于没有什么好用翻译软件,打开网易也占用系统资源,所以写了个在控制台的翻译软件接口。
使用python爬虫,查看网页的JS加密方法,一步一步地分析,就能够得到最后的加密方法啦。
直接给出代码:
# -*- coding: utf-8 -*-
# website: http://30daydo.com
# @Time : 2019/2/23 19:34
# @File : youdao.py
# 解密有道词典的JS
import hashlib
import random
import requests
import time
def md5_(word):
s = bytes(word, encoding='utf8')
m = hashlib.md5()
m.update(s)
ret = m.hexdigest()
return ret
def get_sign(word, salt):
ret = md5_('fanyideskweb' + word + salt + 'p09@Bn{h02_BIEe]$P^nG')
return ret
def youdao(word):
url = 'http://fanyi.youdao.com/translate_o?smartresult=dict&smartresult=rule'
headers = {
'Host': 'fanyi.youdao.com',
'User-Agent': 'Mozilla/5.0 (Windows NT 6.1; WOW64; rv:47.0) Gecko/20100101 Firefox/47.0',
'Accept': 'application/json, text/javascript, */*; q=0.01',
'Accept-Language': 'zh-CN,zh;q=0.8,en-US;q=0.5,en;q=0.3',
'Accept-Encoding': 'gzip, deflate',
'Content-Type': 'application/x-www-form-urlencoded; charset=UTF-8',
'X-Requested-With': 'XMLHttpRequest',
'Referer': 'http://fanyi.youdao.com/',
'Content-Length': '252',
'Cookie': 'YOUDAO_MOBILE_ACCESS_TYPE=1; OUTFOX_SEARCH_USER_ID=1672542763@10.169.0.83; JSESSIONID=aaaWzxpjeDu1gbhopLzKw; ___rl__test__cookies=1550913722828; OUTFOX_SEARCH_USER_ID_NCOO=372126049.6326876',
'Connection': 'keep-alive',
'Pragma': 'no-cache',
'Cache-Control': 'no-cache',
}
ts = str(int(time.time()*1000))
salt=ts+str(random.randint(0,10))
bv = md5_("5.0 (Windows)")
sign= get_sign(word,salt)
post_data = {
'i': word,
'from': 'AUTO', 'to': 'AUTO', 'smartresult': 'dict', 'client': 'fanyideskweb', 'salt': salt,
'sign': sign, 'ts': ts, 'bv': bv, 'doctype': 'json', 'version': '2.1',
'keyfrom': 'fanyi.web', 'action': 'FY_BY_REALTIME', 'typoResult': 'false'
}
r = requests.post(
url=url,
headers=headers,
data=post_data
)
for item in r.json().get('smartResult',{}).get('entries'):
print(item)
word='student'
youdao(word)
得到结果:
Github:
https://github.com/Rockyzsu/CrawlMan/tree/master/youdao_dictionary
原创文章,转载请注明出处
http://30daydo.com/article/416
imutils resize的用法
李魔佛 发表了文章 • 0 个评论 • 12429 次浏览 • 2019-02-02 14:26
imutils.resize(img,height=xx,width=xxx)
修改图像的大小。 这个函数会根据图片的比例进行重新绘制大小,如果你的图片是200:200的图片比例,那么如果你使用resize函数的时候,resize(img,height=50,width=20) 那么最后修改的图像是已最小的那个数字对齐,也就是width=20,所以最后出来的图片大小是20*20,而不是50*20,或者50*50.
查看全部
imutils.resize(img,height=xx,width=xxx)
修改图像的大小。 这个函数会根据图片的比例进行重新绘制大小,如果你的图片是200:200的图片比例,那么如果你使用resize函数的时候,resize(img,height=50,width=20) 那么最后修改的图像是已最小的那个数字对齐,也就是width=20,所以最后出来的图片大小是20*20,而不是50*20,或者50*50.
scrapy response转化为图片
python爬虫 • 李魔佛 发表了文章 • 0 个评论 • 4427 次浏览 • 2019-02-01 14:39
with open('temp.jpg','wb') as f:
f.write(reponse.body)
即可。
查看全部
with open('temp.jpg','wb') as f:
f.write(reponse.body)
即可。
python 中文图片文字识别
李魔佛 发表了文章 • 0 个评论 • 7216 次浏览 • 2019-02-01 10:47
使用方法很简单,安装好pytesseract(里面很多坑,小白的话不可避免要折腾一番),然后下载一个中文的字库,百度网盘:https://pan.baidu.com/s/1_jom2d95IeR40gsvkhUuvQ
然后把文件放到tesseract的文件夹中 C:\Program Files (x86)\Tesseract-OCR\tessdata
然后就可以拿来识别了:
from PIL import Image

im = Image.open('chinese.jpg')

plt.figure(figsize=(20,20))

plt.imshow(im)


pytesseract.image_to_string(im,lang='chi_sim')
图片的内容是这样的:
然后识别效果如下:
'可L又使用以下的语句i上图片显示大 此'
还是不咋地。
那么可以换成大厂的API。试试百度的:
""" 读取图片 """

def get_file_content(filePath):

    with open(filePath, 'rb') as fp:

        return fp.read()


image = get_file_content('example.jpg')


""" 调用通用文字识别, 图片参数为本地图片 """

client.basicGeneral(image);


""" 如果有可选参数 """

options = {}

options["language_type"] = "CHN_ENG"

options["detect_direction"] = "true"

options["detect_language"] = "true"

options["probability"] = "true"


from aip import AipOcr


""" 你的 APPID AK SK """

APP_ID = '你的 App ID'

API_KEY = '你的 Api Key'

SECRET_KEY = '你的 Secret Key'


client = AipOcr(APP_ID, API_KEY, SECRET_KEY)


""" 带参数调用通用文字识别, 图片参数为本地图片 """

client.basicGeneral(image, options)


url = "https//www.x.com/sample.jpg"


""" 调用通用文字识别, 图片参数为远程url图片 """

client.basicGeneralUrl(url);


""" 如果有可选参数 """

options = {}

options["language_type"] = "CHN_ENG"

options["detect_direction"] = "true"

options["detect_language"] = "true"

options["probability"] = "true"


""" 带参数调用通用文字识别, 图片参数为远程url图片 """

client.basicGeneralUrl(url, options)
先去百度云申请一个API,免费的。
https://cloud.baidu.com/doc/OCR/OCR-Python-SDK.html#.E9.85.8D.E7.BD.AEAipOcr
然后把key复制到上面的代码中就可以了。
然后再调用看看结果:
可以使用以下的语句让图片显示大些正确率明显高很多了。
查看全部
使用方法很简单,安装好pytesseract(里面很多坑,小白的话不可避免要折腾一番),然后下载一个中文的字库,百度网盘:https://pan.baidu.com/s/1_jom2d95IeR40gsvkhUuvQ
然后把文件放到tesseract的文件夹中 C:\Program Files (x86)\Tesseract-OCR\tessdata
然后就可以拿来识别了:
from PIL import Image
im = Image.open('chinese.jpg')
plt.figure(figsize=(20,20))
plt.imshow(im)
pytesseract.image_to_string(im,lang='chi_sim')
图片的内容是这样的:
然后识别效果如下:
'可L又使用以下的语句i上图片显示大 此'
还是不咋地。
那么可以换成大厂的API。试试百度的:
""" 读取图片 """
def get_file_content(filePath):
with open(filePath, 'rb') as fp:
return fp.read()
image = get_file_content('example.jpg')
""" 调用通用文字识别, 图片参数为本地图片 """
client.basicGeneral(image);
""" 如果有可选参数 """
options = {}
options["language_type"] = "CHN_ENG"
options["detect_direction"] = "true"
options["detect_language"] = "true"
options["probability"] = "true"
from aip import AipOcr
""" 你的 APPID AK SK """
APP_ID = '你的 App ID'
API_KEY = '你的 Api Key'
SECRET_KEY = '你的 Secret Key'
client = AipOcr(APP_ID, API_KEY, SECRET_KEY)
""" 带参数调用通用文字识别, 图片参数为本地图片 """
client.basicGeneral(image, options)
url = "https//www.x.com/sample.jpg"
""" 调用通用文字识别, 图片参数为远程url图片 """
client.basicGeneralUrl(url);
""" 如果有可选参数 """
options = {}
options["language_type"] = "CHN_ENG"
options["detect_direction"] = "true"
options["detect_language"] = "true"
options["probability"] = "true"
""" 带参数调用通用文字识别, 图片参数为远程url图片 """
client.basicGeneralUrl(url, options)
先去百度云申请一个API,免费的。
https://cloud.baidu.com/doc/OCR/OCR-Python-SDK.html#.E9.85.8D.E7.BD.AEAipOcr
然后把key复制到上面的代码中就可以了。
然后再调用看看结果:
可以使用以下的语句让图片显示大些正确率明显高很多了。
jupyter notebook 修改plt显示的图片大小
李魔佛 发表了文章 • 0 个评论 • 16474 次浏览 • 2019-02-01 09:17
可以使用以下的语句让图片显示大一些:
im = Image.open('chinese.png')

plt.figure(figsize=(20,20))

plt.imshow(im)
查看全部
可以使用以下的语句让图片显示大一些:
im = Image.open('chinese.png')
plt.figure(figsize=(20,20))
plt.imshow(im)拉勾网的反爬策略
python爬虫 • 李魔佛 发表了文章 • 0 个评论 • 4441 次浏览 • 2019-01-23 10:18
(请注意日期,因为不保证往后的日子里面反爬策略还有效)
1. 封IP,这个没的说,肯定要使用代理IP
2. scrapy里面的需要添加headers,而headers中一定要加上Cookies的数据。 之前要做Request中的cookies参数添加cookies,现在发现失效了,只能在headers中添加cookies数据。
   headers = {'Accept': 'application/json,text/javascript,*/*;q=0.01', 'Accept-Encoding':

        'gzip,deflate,br',

               'Accept-Language': 'zh-CN,zh;q=0.9,en;q=0.8', 'Cache-Control': 'no-cache',

               # 'Connection': 'keep-alive',

               'Content-Type': 'application/x-www-form-urlencoded;charset=UTF-8',

               'Cookie': 'JSESSIONID=ABAAABAABEEAAJAACF8F22F99AFA35F9EEC28F2D0E46A41;_ga=GA1.2.331323650.1548204973;_gat=1;Hm_lvt_4233e74dff0ae5bd0a3d81c6ccf756e6=1548204973;user_trace_token=20190123085612-adf35b62-1ea9-11e9-b744-5254005c3644;LGSID=20190123085612-adf35c69-1ea9-11e9-b744-5254005c3644;PRE_UTM=;PRE_HOST=;PRE_SITE=;PRE_LAND=https%3A%2F%2Fwww.lagou.com%2F;LGUID=20190123085612-adf35ed5-1ea9-11e9-b744-5254005c3644;_gid=GA1.2.1809874038.1548204973;index_location_city=%E6%B7%B1%E5%9C%B3;TG-TRACK-CODE=index_search;SEARCH_ID=169bf76c08b548f8830967a1968d10ca;Hm_lpvt_4233e74dff0ae5bd0a3d81c6ccf756e6=1548204985;LGRID=20190123085624-b52a0555-1ea9-11e9-b744-5254005c3644',

               'Host': 'www.lagou.com', 'Origin': 'https://www.lagou.com', 'Pragma': 'no-cache',

               'Referer': 'https://www.lagou.com/jobs/list_%E7%88%AC%E8%99%AB?labelWords=&fromSearch=true&suginput=',

               'User-Agent': 'Mozilla/5.0(WindowsNT6.3;WOW64)AppleWebKit/537.36(KHTML,likeGecko)Chrome/71.0.3578.98Safari/537.36',

               'X-Anit-Forge-Code': '0',

               'X-Anit-Forge-Token': 'None',

               'X-Requested-With': 'XMLHttpRequest'

} 查看全部
(请注意日期,因为不保证往后的日子里面反爬策略还有效)
1. 封IP,这个没的说,肯定要使用代理IP
2. scrapy里面的需要添加headers,而headers中一定要加上Cookies的数据。 之前要做Request中的cookies参数添加cookies,现在发现失效了,只能在headers中添加cookies数据。
headers = {'Accept': 'application/json,text/javascript,*/*;q=0.01', 'Accept-Encoding':
'gzip,deflate,br',
'Accept-Language': 'zh-CN,zh;q=0.9,en;q=0.8', 'Cache-Control': 'no-cache',
# 'Connection': 'keep-alive',
'Content-Type': 'application/x-www-form-urlencoded;charset=UTF-8',
'Cookie': 'JSESSIONID=ABAAABAABEEAAJAACF8F22F99AFA35F9EEC28F2D0E46A41;_ga=GA1.2.331323650.1548204973;_gat=1;Hm_lvt_4233e74dff0ae5bd0a3d81c6ccf756e6=1548204973;user_trace_token=20190123085612-adf35b62-1ea9-11e9-b744-5254005c3644;LGSID=20190123085612-adf35c69-1ea9-11e9-b744-5254005c3644;PRE_UTM=;PRE_HOST=;PRE_SITE=;PRE_LAND=https%3A%2F%2Fwww.lagou.com%2F;LGUID=20190123085612-adf35ed5-1ea9-11e9-b744-5254005c3644;_gid=GA1.2.1809874038.1548204973;index_location_city=%E6%B7%B1%E5%9C%B3;TG-TRACK-CODE=index_search;SEARCH_ID=169bf76c08b548f8830967a1968d10ca;Hm_lpvt_4233e74dff0ae5bd0a3d81c6ccf756e6=1548204985;LGRID=20190123085624-b52a0555-1ea9-11e9-b744-5254005c3644',
'Host': 'www.lagou.com', 'Origin': 'https://www.lagou.com', 'Pragma': 'no-cache',
'Referer': 'https://www.lagou.com/jobs/list_%E7%88%AC%E8%99%AB?labelWords=&fromSearch=true&suginput=',
'User-Agent': 'Mozilla/5.0(WindowsNT6.3;WOW64)AppleWebKit/537.36(KHTML,likeGecko)Chrome/71.0.3578.98Safari/537.36',
'X-Anit-Forge-Code': '0',
'X-Anit-Forge-Token': 'None',
'X-Requested-With': 'XMLHttpRequest'
} python高手才知道的答案
李魔佛 发表了文章 • 0 个评论 • 2828 次浏览 • 2019-01-22 21:51
1. >>> a = "some_string"
>>> id(a)
140420665652016
>>> id("some" + "_" + "string") # 注意两个的id值是相同的.
140420665652016
2.e = "wtf"
f = "wtf"
e is f
结果 True e = "wtf?"
f = "wtf?"
e is f
结果 False
3.some_dict = {}
some_dict[5.5] = "Ruby"
some_dict[5.0] = "JavaScript"
some_dict[5] = "Python" >>> some_dict[5.5]
"Ruby"
>>> some_dict[5.0]
"Python"
>>> some_dict[5]
"Python"
Python 字典通过检查键值是否相等和比较哈希值来确定两个键是否相同.
具有相同值的不可变对象在Python中始终具有相同的哈希值.
4. 到处返回def some_func():
try:
return 'from_try'
finally:
return 'from_finally' >>> some_func()
'from_finally'
当在 "try...finally" 语句的 try 中执行 return, break 或 continue 后, finally 子句依然会执行.
函数的返回值由最后执行的 return 语句决定. 由于 finally 子句一定会执行, 所以 finally 子句中的 return 将始终是最后执行的语句.
5for i in range(4):
print(i)
i = 10你可曾觉得这个循环只会运行一次?
0 1 2 3
由于循环在Python中工作方式, 赋值语句 i = 10 并不会影响迭代循环, 在每次迭代开始之前, 迭代器(这里指 range(4)) 生成的下一个元素就被解包并赋值给目标列表的变量(这里指 i)了. 查看全部
1.
>>> a = "some_string"

>>> id(a)

140420665652016

>>> id("some" + "_" + "string") # 注意两个的id值是相同的.

140420665652016
2.
e = "wtf"

f = "wtf"

e is f

结果 True
e = "wtf?"

f = "wtf?"

e is f

结果 False
3.
some_dict = {}

some_dict[5.5] = "Ruby"

some_dict[5.0] = "JavaScript"

some_dict[5] = "Python"
>>> some_dict[5.5]
"Ruby"
>>> some_dict[5.0]
"Python"
>>> some_dict[5]
"Python"
Python 字典通过检查键值是否相等和比较哈希值来确定两个键是否相同.
具有相同值的不可变对象在Python中始终具有相同的哈希值.
4. 到处返回
def some_func():

    try:

        return 'from_try'

    finally:

        return 'from_finally'
>>> some_func()

'from_finally'
当在 "try...finally" 语句的 try 中执行 return, break 或 continue 后, finally 子句依然会执行.
函数的返回值由最后执行的 return 语句决定. 由于 finally 子句一定会执行, 所以 finally 子句中的 return 将始终是最后执行的语句.
5
for i in range(4):你可曾觉得这个循环只会运行一次?
print(i)
i = 10
0 1 2 3
由于循环在Python中工作方式, 赋值语句 i = 10 并不会影响迭代循环, 在每次迭代开始之前, 迭代器(这里指 range(4)) 生成的下一个元素就被解包并赋值给目标列表的变量(这里指 i)了.
numpy 二维数组按列合并
李魔佛 发表了文章 • 0 个评论 • 7159 次浏览 • 2019-01-19 21:43
先生产测试数组# np 的运算
n = np.arange(1,17)
转化形态:
n0 = n.reshape(4,4)变成4x4的矩阵
array([[ 1, 2, 3, 4],
[ 5, 6, 7, 8],
[ 9, 10, 11, 12],
[13, 14, 15, 16]])
然后运用concatenate函数拼接:
np.concatenate((n0,n0),axis=1)array([[ 1, 2, 3, 4, 1, 2, 3, 4], [ 5, 6, 7, 8, 5, 6, 7, 8], [ 9, 10, 11, 12, 9, 10, 11, 12], [13, 14, 15, 16, 13, 14, 15, 16]])
这个只需要添加参数axis=1就可以了,axis默认是为0,按照行拼接。
np.concatenate((n0,n0),axis=1)
array([[ 1, 2, 3, 4],
[ 5, 6, 7, 8],
[ 9, 10, 11, 12],
[13, 14, 15, 16],
[ 1, 2, 3, 4],
[ 5, 6, 7, 8],
[ 9, 10, 11, 12],
[13, 14, 15, 16]]) 查看全部
先生产测试数组
# np 的运算

n = np.arange(1,17)
转化形态:
n0 = n.reshape(4,4)变成4x4的矩阵
array([[ 1,  2,  3,  4],

       [ 5,  6,  7,  8],

       [ 9, 10, 11, 12],

       [13, 14, 15, 16]])
然后运用concatenate函数拼接:
np.concatenate((n0,n0),axis=1)
array([[ 1, 2, 3, 4, 1, 2, 3, 4], [ 5, 6, 7, 8, 5, 6, 7, 8], [ 9, 10, 11, 12, 9, 10, 11, 12], [13, 14, 15, 16, 13, 14, 15, 16]])
这个只需要添加参数axis=1就可以了,axis默认是为0,按照行拼接。
np.concatenate((n0,n0),axis=1)
array([[ 1,  2,  3,  4],

       [ 5,  6,  7,  8],

       [ 9, 10, 11, 12],

       [13, 14, 15, 16],

       [ 1,  2,  3,  4],

       [ 5,  6,  7,  8],

       [ 9, 10, 11, 12],

       [13, 14, 15, 16]])
Django2.0+ 加载本地JS文件 配置
李魔佛 发表了文章 • 0 个评论 • 4812 次浏览 • 2019-01-15 10:25
本地调试,把JS存放本地,可以加快调试速度,不然每次都从CDN上取,影响效率,且无法离线运行
(没有网络的情况下)。
环境:python3.6 + Django 2.1.5
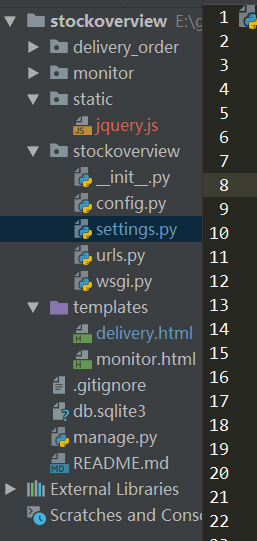
文件结构:
在django项目根目录,创建一个static的目录,里面存放一个jquery.js 的文件(这个文件可以到官方下载),然后在settings.py里面配置:
setting.py
STATIC_URL = '/static/'

STATICFILES_DIRS = (

    os.path.join(BASE_DIR, 'static/'),

)
然后在模板文件 test.html中引用:
<!DOCTYPE html>

{% load staticfiles %}

<html lang="en">

<head>

    <meta charset="UTF-8">

    <title>交割单查询</title>

    <script type="text/javascript" src="{% static 'jquery.js' %}"></script>
然后重新运行django,就可以了。 查看全部
本地调试,把JS存放本地,可以加快调试速度,不然每次都从CDN上取,影响效率,且无法离线运行
(没有网络的情况下)。
环境:python3.6 + Django 2.1.5
文件结构:
在django项目根目录,创建一个static的目录,里面存放一个jquery.js 的文件(这个文件可以到官方下载),然后在settings.py里面配置:
setting.py
STATIC_URL = '/static/'
STATICFILES_DIRS = (
os.path.join(BASE_DIR, 'static/'),
)
然后在模板文件 test.html中引用:
<!DOCTYPE html>
{% load staticfiles %}
<html lang="en">
<head>
<meta charset="UTF-8">
<title>交割单查询</title>
<script type="text/javascript" src="{% static 'jquery.js' %}"></script>
然后重新运行django,就可以了。
python的表达式执行顺序
李魔佛 发表了文章 • 0 个评论 • 2580 次浏览 • 2019-01-10 16:06
答案是False
why ?
因为你要把表达式分开来看
1<2 and 2==1
这样就可以看出问题了。
True and False
那么答案就是False了。
查看全部
发现一个好玩的python脚本,你家小公主一定喜欢哈
李魔佛 发表了文章 • 0 个评论 • 3967 次浏览 • 2019-01-10 15:28
#coding:utf-8

from turtle import *


def nose(x,y):#鼻子

    penup()#提起笔

    goto(x,y)#定位

    pendown()#落笔,开始画

    setheading(-30)#将乌龟的方向设置为to_angle/为数字(0-东、90-北、180-西、270-南)

    begin_fill()#准备开始填充图形

    a=0.4

    for i in range(120):

        if 0<=i<30 or 60<=i<90:

            a=a+0.08

            left(3) #向左转3度

            forward(a) #向前走a的步长

        else:

            a=a-0.08

            left(3)

            forward(a)

    end_fill()#填充完成


    penup()

    setheading(90)

    forward(25)

    setheading(0)

    forward(10)

    pendown()

    pencolor(255,155,192)#画笔颜色

    setheading(10)

    begin_fill()

    circle(5)

    color(160,82,45)#返回或设置pencolor和fillcolor

    end_fill()


    penup()

    setheading(0)

    forward(20)

    pendown()

    pencolor(255,155,192)

    setheading(10)

    begin_fill()

    circle(5)

    color(160,82,45)

    end_fill()


def head(x,y):#头

    color((255,155,192),"pink")

    penup()

    goto(x,y)

    setheading(0)

    pendown()

    begin_fill()

    setheading(180)

    circle(300,-30)

    circle(100,-60)

    circle(80,-100)

    circle(150,-20)

    circle(60,-95)

    setheading(161)

    circle(-300,15)

    penup()

    goto(-100,100)

    pendown()

    setheading(-30)

    a=0.4

    for i in range(60):

        if 0<=i<30 or 60<=i<90:

            a=a+0.08

            lt(3) #向左转3度

            fd(a) #向前走a的步长

        else:

            a=a-0.08

            lt(3)

            fd(a)

    end_fill()


def ears(x,y): #耳朵

    color((255,155,192),"pink")

    penup()

    goto(x,y)

    pendown()

    begin_fill()

    setheading(100)

    circle(-50,50)

    circle(-10,120)

    circle(-50,54)

    end_fill()


    penup()

    setheading(90)

    forward(-12)

    setheading(0)

    forward(30)

    pendown()

    begin_fill()

    setheading(100)

    circle(-50,50)

    circle(-10,120)

    circle(-50,56)

    end_fill()


def eyes(x,y):#眼睛

    color((255,155,192),"white")

    penup()

    setheading(90)

    forward(-20)

    setheading(0)

    forward(-95)

    pendown()

    begin_fill()

    circle(15)

    end_fill()


    color("black")

    penup()

    setheading(90)

    forward(12)

    setheading(0)

    forward(-3)

    pendown()

    begin_fill()

    circle(3)

    end_fill()


    color((255,155,192),"white")

    penup()

    seth(90)

    forward(-25)

    seth(0)

    forward(40)

    pendown()

    begin_fill()

    circle(15)

    end_fill()


    color("black")

    penup()

    setheading(90)

    forward(12)

    setheading(0)

    forward(-3)

    pendown()

    begin_fill()

    circle(3)

    end_fill()


def cheek(x,y):#腮

    color((255,155,192))

    penup()

    goto(x,y)

    pendown()

    setheading(0)

    begin_fill()

    circle(30)

    end_fill()


def mouth(x,y): #嘴

    color(239,69,19)

    penup()

    goto(x,y)

    pendown()

    setheading(-80)

    circle(30,40)

    circle(40,80)


def body(x,y):#身体

    color("red",(255,99,71))

    penup()

    goto(x,y)

    pendown()

    begin_fill()

    setheading(-130)

    circle(100,10)

    circle(300,30)

    setheading(0)

    forward(230)

    setheading(90)

    circle(300,30)

    circle(100,3)

    color((255,155,192),(255,100,100))

    setheading(-135)

    circle(-80,63)

    circle(-150,24)

    end_fill()


def hands(x,y):#手

    color((255,155,192))

    penup()

    goto(x,y)

    pendown()

    setheading(-160)

    circle(300,15)

    penup()

    setheading(90)

    forward(15)

    setheading(0)

    forward(0)

    pendown()

    setheading(-10)

    circle(-20,90)


    penup()

    setheading(90)

    forward(30)

    setheading(0)

    forward(237)

    pendown()

    setheading(-20)

    circle(-300,15)

    penup()

    setheading(90)

    forward(20)

    setheading(0)

    forward(0)

    pendown()

    setheading(-170)

    circle(20,90)


def foot(x,y):#脚

    pensize(10)

    color((240,128,128))

    penup()

    goto(x,y)

    pendown()

    setheading(-90)

    forward(40)

    setheading(-180)

    color("black")

    pensize(15)

    fd(20)


    pensize(10)

    color((240,128,128))

    penup()

    setheading(90)

    forward(40)

    setheading(0)

    forward(90)

    pendown()

    setheading(-90)

    forward(40)

    setheading(-180)

    color("black")

    pensize(15)

    fd(20)


def tail(x,y):#尾巴

    pensize(4)

    color((255,155,192))

    penup()

    goto(x,y)

    pendown()

    seth(0)

    circle(70,20)

    circle(10,330)

    circle(70,30)


def setting():          #参数设置

    pensize(4)

    hideturtle()        #使乌龟无形(隐藏)

    colormode(255)      #将其设置为1.0或255.随后 颜色三元组的r,g,b值必须在0 .. cmode范围内

    color((255,155,192),"pink")

    setup(840,500)

    speed(10)


def main():

    setting()           #画布、画笔设置

    nose(-100,100)      #鼻子

    head(-69,167)       #头

    ears(0,160)         #耳朵

    eyes(0,140)         #眼睛

    cheek(80,10)        #腮

    mouth(-20,30)       #嘴

    body(-32,-8)        #身体

    hands(-56,-45)      #手

    foot(2,-177)        #脚

    tail(148,-155)      #尾巴

    done()


if __name__ == '__main__':

    main()
安装turtle
pip install turtle
然后运行上面代码即可哈。
查看全部
#coding:utf-8
from turtle import *
def nose(x,y):#鼻子
penup()#提起笔
goto(x,y)#定位
pendown()#落笔,开始画
setheading(-30)#将乌龟的方向设置为to_angle/为数字(0-东、90-北、180-西、270-南)
begin_fill()#准备开始填充图形
a=0.4
for i in range(120):
if 0<=i<30 or 60<=i<90:
a=a+0.08
left(3) #向左转3度
forward(a) #向前走a的步长
else:
a=a-0.08
left(3)
forward(a)
end_fill()#填充完成
penup()
setheading(90)
forward(25)
setheading(0)
forward(10)
pendown()
pencolor(255,155,192)#画笔颜色
setheading(10)
begin_fill()
circle(5)
color(160,82,45)#返回或设置pencolor和fillcolor
end_fill()
penup()
setheading(0)
forward(20)
pendown()
pencolor(255,155,192)
setheading(10)
begin_fill()
circle(5)
color(160,82,45)
end_fill()
def head(x,y):#头
color((255,155,192),"pink")
penup()
goto(x,y)
setheading(0)
pendown()
begin_fill()
setheading(180)
circle(300,-30)
circle(100,-60)
circle(80,-100)
circle(150,-20)
circle(60,-95)
setheading(161)
circle(-300,15)
penup()
goto(-100,100)
pendown()
setheading(-30)
a=0.4
for i in range(60):
if 0<=i<30 or 60<=i<90:
a=a+0.08
lt(3) #向左转3度
fd(a) #向前走a的步长
else:
a=a-0.08
lt(3)
fd(a)
end_fill()
def ears(x,y): #耳朵
color((255,155,192),"pink")
penup()
goto(x,y)
pendown()
begin_fill()
setheading(100)
circle(-50,50)
circle(-10,120)
circle(-50,54)
end_fill()
penup()
setheading(90)
forward(-12)
setheading(0)
forward(30)
pendown()
begin_fill()
setheading(100)
circle(-50,50)
circle(-10,120)
circle(-50,56)
end_fill()
def eyes(x,y):#眼睛
color((255,155,192),"white")
penup()
setheading(90)
forward(-20)
setheading(0)
forward(-95)
pendown()
begin_fill()
circle(15)
end_fill()
color("black")
penup()
setheading(90)
forward(12)
setheading(0)
forward(-3)
pendown()
begin_fill()
circle(3)
end_fill()
color((255,155,192),"white")
penup()
seth(90)
forward(-25)
seth(0)
forward(40)
pendown()
begin_fill()
circle(15)
end_fill()
color("black")
penup()
setheading(90)
forward(12)
setheading(0)
forward(-3)
pendown()
begin_fill()
circle(3)
end_fill()
def cheek(x,y):#腮
color((255,155,192))
penup()
goto(x,y)
pendown()
setheading(0)
begin_fill()
circle(30)
end_fill()
def mouth(x,y): #嘴
color(239,69,19)
penup()
goto(x,y)
pendown()
setheading(-80)
circle(30,40)
circle(40,80)
def body(x,y):#身体
color("red",(255,99,71))
penup()
goto(x,y)
pendown()
begin_fill()
setheading(-130)
circle(100,10)
circle(300,30)
setheading(0)
forward(230)
setheading(90)
circle(300,30)
circle(100,3)
color((255,155,192),(255,100,100))
setheading(-135)
circle(-80,63)
circle(-150,24)
end_fill()
def hands(x,y):#手
color((255,155,192))
penup()
goto(x,y)
pendown()
setheading(-160)
circle(300,15)
penup()
setheading(90)
forward(15)
setheading(0)
forward(0)
pendown()
setheading(-10)
circle(-20,90)
penup()
setheading(90)
forward(30)
setheading(0)
forward(237)
pendown()
setheading(-20)
circle(-300,15)
penup()
setheading(90)
forward(20)
setheading(0)
forward(0)
pendown()
setheading(-170)
circle(20,90)
def foot(x,y):#脚
pensize(10)
color((240,128,128))
penup()
goto(x,y)
pendown()
setheading(-90)
forward(40)
setheading(-180)
color("black")
pensize(15)
fd(20)
pensize(10)
color((240,128,128))
penup()
setheading(90)
forward(40)
setheading(0)
forward(90)
pendown()
setheading(-90)
forward(40)
setheading(-180)
color("black")
pensize(15)
fd(20)
def tail(x,y):#尾巴
pensize(4)
color((255,155,192))
penup()
goto(x,y)
pendown()
seth(0)
circle(70,20)
circle(10,330)
circle(70,30)
def setting(): #参数设置
pensize(4)
hideturtle() #使乌龟无形(隐藏)
colormode(255) #将其设置为1.0或255.随后 颜色三元组的r,g,b值必须在0 .. cmode范围内
color((255,155,192),"pink")
setup(840,500)
speed(10)
def main():
setting() #画布、画笔设置
nose(-100,100) #鼻子
head(-69,167) #头
ears(0,160) #耳朵
eyes(0,140) #眼睛
cheek(80,10) #腮
mouth(-20,30) #嘴
body(-32,-8) #身体
hands(-56,-45) #手
foot(2,-177) #脚
tail(148,-155) #尾巴
done()
if __name__ == '__main__':
main()
安装turtle
pip install turtle
然后运行上面代码即可哈。
CryptoJS.enc.UTF8 中文乱码
python爬虫 • 李魔佛 发表了文章 • 4 个评论 • 16780 次浏览 • 2019-01-08 15:52
内容用CryptoJS解密出来的,解出来是一个HTML格式的文本,标签,英文是正常显示的,但是中文是乱码的。
demo: # data='中国人'
data='hello'
ret = CryptoJS.AES.encrypt(data,'secret key 123')
content = ret.toString()
result = CryptoJS.AES.decrypt(content,'secret key 123')
print(result.toString(CryptoJS.enc.Utf8))data用hello可以解密成功,
用“中国人”就还原不了
调试中。
待更新。
已解决:
看大佬最近几期文章,有一篇解决了,就是去Python目录下lib文件夹里面dsubprocess.py
文件下更改encding为UTF-8, 查看全部
内容用CryptoJS解密出来的,解出来是一个HTML格式的文本,标签,英文是正常显示的,但是中文是乱码的。
demo:
# data='中国人'data用hello可以解密成功,
data='hello'
ret = CryptoJS.AES.encrypt(data,'secret key 123')
content = ret.toString()
result = CryptoJS.AES.decrypt(content,'secret key 123')
print(result.toString(CryptoJS.enc.Utf8))
用“中国人”就还原不了
调试中。
待更新。
已解决:
看大佬最近几期文章,有一篇解决了,就是去Python目录下lib文件夹里面dsubprocess.py
文件下更改encding为UTF-8,
missing 1 required positional argument on_delete --Django2.0
李魔佛 发表了文章 • 0 个评论 • 3131 次浏览 • 2018-12-26 15:23
使用ForeignKey 报错
TypeError: __init__() missing 1 required positional argument: 'on_delete'
解决办法:from django.db import models
class Article(models.Model):
category = models.ForeignKey('Category', on_delete=models.PROTECT)
title = models.CharField(max_length=55)
# ...
def __str__(self):
return self.title
定义ForeignKey的时候添加参数on_delete,然后需要重新migration model,不然还是会报错。
(如果还是不行,把migration文件夹的内容全部删掉,在migrated一下) 查看全部
使用ForeignKey 报错
TypeError: __init__() missing 1 required positional argument: 'on_delete'
解决办法:
from django.db import models

class Article(models.Model):

    category = models.ForeignKey('Category', on_delete=models.PROTECT)

    title =  models.CharField(max_length=55)

    # ...


    def __str__(self):

        return self.title
定义ForeignKey的时候添加参数on_delete,然后需要重新migration model,不然还是会报错。
(如果还是不行,把migration文件夹的内容全部删掉,在migrated一下)
浏览器抓包post字段里面有 (unable to decode value) ,requests如何正确的post
python爬虫 • 李魔佛 发表了文章 • 0 个评论 • 7162 次浏览 • 2018-12-12 14:52
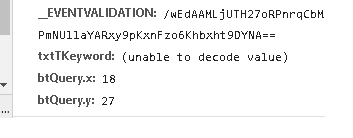
数据是通过post形式提交的, 字段txtTKeyword无法显示,看来是用了其他的编码导致了浏览器无法识别。
可以使用fiddler工具查看。
在python中用代码直接编码后post,不然服务器无法识别提交的数据
注意不需要用 urllib.parse.quote(uncode_str),直接encode就可以(特殊情况特殊处理,有些网站就是奇怪)
s='耐克球鞋'

s =s.encode('gb2312')

 data = {'__VIEWSTATE': view_state,

        '__EVENTVALIDATION': event_validation,

        'txtTKeyword': s,

        'btQuery.x': 41,

        'btQuery.y': 24,

        }


r = session.post(url=self.base_url, headers=headers,

                     data=data,proxies=self.get_proxy()
查看全部
数据是通过post形式提交的, 字段txtTKeyword无法显示,看来是用了其他的编码导致了浏览器无法识别。
可以使用fiddler工具查看。
在python中用代码直接编码后post,不然服务器无法识别提交的数据
注意不需要用 urllib.parse.quote(uncode_str),直接encode就可以(特殊情况特殊处理,有些网站就是奇怪)
s='耐克球鞋'
s =s.encode('gb2312')
data = {'__VIEWSTATE': view_state,
'__EVENTVALIDATION': event_validation,
'txtTKeyword': s,
'btQuery.x': 41,
'btQuery.y': 24,
}
r = session.post(url=self.base_url, headers=headers,
data=data,proxies=self.get_proxy()
randint python 的用法
李魔佛 发表了文章 • 0 个评论 • 3478 次浏览 • 2018-12-10 14:50
random.randint(a, b)
Return a random integer N such that a <= N <= b.
返回一个a到b之间的整数,包括a和b。
random.randint(a, b)
Return a random integer N such that a <= N <= b.
返回一个a到b之间的整数,包括a和b。
python 代码获取mongodb数据库下所有的collection 文档名字
李魔佛 发表了文章 • 0 个评论 • 5836 次浏览 • 2018-11-27 11:41
db['db_pledge'].list_collection_names()
db['db_pledge'].collection_names()

db['db_pledge'].list_collection_names()
批量获取Grequests返回内容
python爬虫 • 李魔佛 发表了文章 • 0 个评论 • 6930 次浏览 • 2018-11-23 10:36
如何批量获取Grequests返回内容?
import grequests

import requests

import bs4


def simple_request(url):

    page = requests.get(url)

    return page


urls = [

    'http://www.heroku.com',

    'http://python-tablib.org',

    'http://httpbin.org',

    'http://python-requests.org',

    'http://kennethreitz.com'

]


rs = [grequests.get(simple_request(u)) for u in urls]


grequests.map(rs)
注意,上面的写法是错误的!!!!!!
grequests.get只能接受url!!! 不能放入一个函数。
正确的写法:
rs = (grequests.get(u) for u in urls)

requests = grequests.map(rs)

for response in requests:

    market_watch(response.content)
具体的对response内容操作放入到market_watch函数中。
查看全部
如何批量获取Grequests返回内容?
import grequests
import requests
import bs4
def simple_request(url):
page = requests.get(url)
return page
urls = [
'http://www.heroku.com',
'http://python-tablib.org',
'http://httpbin.org',
'http://python-requests.org',
'http://kennethreitz.com'
]
rs = [grequests.get(simple_request(u)) for u in urls]
grequests.map(rs)
注意,上面的写法是错误的!!!!!!
grequests.get只能接受url!!! 不能放入一个函数。
正确的写法:
rs = (grequests.get(u) for u in urls)
requests = grequests.map(rs)
for response in requests:
market_watch(response.content)
具体的对response内容操作放入到market_watch函数中。
python3 列表推导式 vs map 差别
李魔佛 发表了文章 • 0 个评论 • 4785 次浏览 • 2018-11-22 11:25
速度:
如果map里面是用的lambda,那么map速度会比列表推导式要慢,正常情况map速度稍微快那么一点点。
$ python -mtimeit -s'xs=range(10)' 'map(hex, xs)'

100000 loops, best of 3: 4.86 usec per loop


$ python -mtimeit -s'xs=range(10)' '[hex(x) for x in xs]'

100000 loops, best of 3: 5.58 usec per loop
可以看到map稍微快一些
使用lambda$ python -mtimeit -s'xs=range(10)' 'map(lambda x: x+2, xs)'
100000 loops, best of 3: 4.24 usec per loop
$ python -mtimeit -s'xs=range(10)' '[x+2 for x in xs]'
100000 loops, best of 3: 2.32 usec per loop列表推导式稍微快些。
因为map返回的是生成器,所以map对于大容量的操作,不会导致内存爆掉。
而列表推导式则会爆内存,不过也有解决方案,就是使用()替代【】,这时返回的是生成器推导式
>>> [str(n) for n in range(10**100)]谨慎运行上面的,你电脑会卡到爆
如果换成map就不会有问题>>> map(str, range(10**100))
<map object at 0x2201d50>
或者>>> (str(n) for n in range(10**100))
<generator object <genexpr> at 0xacbdef>也不会有问题。
原创文章,转载请注明:
http://30daydo.com/article/378
查看全部
速度:
如果map里面是用的lambda,那么map速度会比列表推导式要慢,正常情况map速度稍微快那么一点点。
$ python -mtimeit -s'xs=range(10)' 'map(hex, xs)'可以看到map稍微快一些
100000 loops, best of 3: 4.86 usec per loop
$ python -mtimeit -s'xs=range(10)' '[hex(x) for x in xs]'
100000 loops, best of 3: 5.58 usec per loop
使用lambda
$ python -mtimeit -s'xs=range(10)' 'map(lambda x: x+2, xs)'列表推导式稍微快些。
100000 loops, best of 3: 4.24 usec per loop
$ python -mtimeit -s'xs=range(10)' '[x+2 for x in xs]'
100000 loops, best of 3: 2.32 usec per loop
因为map返回的是生成器,所以map对于大容量的操作,不会导致内存爆掉。
而列表推导式则会爆内存,不过也有解决方案,就是使用()替代【】,这时返回的是生成器推导式
>>> [str(n) for n in range(10**100)]谨慎运行上面的,你电脑会卡到爆如果换成map就不会有问题
>>> map(str, range(10**100))

<map object at 0x2201d50>
或者
>>> (str(n) for n in range(10**100))也不会有问题。
<generator object <genexpr> at 0xacbdef>
原创文章,转载请注明:
http://30daydo.com/article/378
Elastic报错:Fielddata is disabled on text fields by default
李魔佛 发表了文章 • 3 个评论 • 9212 次浏览 • 2018-11-09 15:57
"error": {
"root_cause": [
{
"type": "illegal_argument_exception",
"reason": "Fielddata is disabled on text fields by default. Set fielddata=true on [state] in order to load fielddata in memory by uninverting the inverted index. Note that this can however use significant memory. Alternatively use a keyword field instead."
}
],
"type": "search_phase_execution_exception",
"reason": "all shards failed",
"phase": "query",
"grouped": true,
"failed_shards": [
{
"shard": 0,
"index": "bank",
"node": "HuFlhO8OSLSGr3RP6J2z6Q",
"reason": {
"type": "illegal_argument_exception",
"reason": "Fielddata is disabled on text fields by default. Set fielddata=true on [state] in order to load fielddata in memory by uninverting the inverted index. Note that this can however use significant memory. Alternatively use a keyword field instead."
}
}
]
},
"status": 400
}
解决办法:
查询的时候添加keyword
如上面的查询使用的是:{"size":0,
"aggs":{"group_by_state":
{
"terms":{"field":"state"}
}}
}
就会报错。
使用下面的语句就不会错误了{"size":0,
"aggs":{"group_by_state":
{
"terms":{"field":"state.keyword"}
}}
}
原文链接:
http://30daydo.com/article/366
查看全部
{

    "error": {

        "root_cause": [

            {

                "type": "illegal_argument_exception",

                "reason": "Fielddata is disabled on text fields by default. Set fielddata=true on [state] in order to load fielddata in memory by uninverting the inverted index. Note that this can however use significant memory. Alternatively use a keyword field instead."

            }

        ],

        "type": "search_phase_execution_exception",

        "reason": "all shards failed",

        "phase": "query",

        "grouped": true,

        "failed_shards": [

            {

                "shard": 0,

                "index": "bank",

                "node": "HuFlhO8OSLSGr3RP6J2z6Q",

                "reason": {

                    "type": "illegal_argument_exception",

                    "reason": "Fielddata is disabled on text fields by default. Set fielddata=true on [state] in order to load fielddata in memory by uninverting the inverted index. Note that this can however use significant memory. Alternatively use a keyword field instead."

                }

            }

        ]

    },

    "status": 400

}
解决办法:
查询的时候添加keyword
如上面的查询使用的是:
{"size":0,

"aggs":{"group_by_state":

{

"terms":{"field":"state"}

}}

}
就会报错。
使用下面的语句就不会错误了
{"size":0,

"aggs":{"group_by_state":

{

"terms":{"field":"state.keyword"}

}}

}
原文链接:
http://30daydo.com/article/366
统一社会信用代码真伪校验
李魔佛 发表了文章 • 0 个评论 • 8289 次浏览 • 2018-10-26 11:28
二是在组织机构代码前增加行政区划代码,这个组合不难发现就是税务登记证号码。这样就提高了统一社会代码的兼容性,在过渡期内税务机关可以利用这种嵌套规则更加便利地升级到新的信用代码系统。
三是预留前两位给登记机关和机构类别,这样统一社会信用代码在应用中更加清晰高效,第一位便于登记机关管理,可以作为检索条目,第二位可以准确给组织机构归类,方便细化分管。
四是统一社会信用代码的主体标识码天生具有的大容量。通过数字字母组合,加上指数级增长,可以确保在很长一段时间内无需升位就可容纳大量组织机构。
五是统一社会信用代码位数为18位,和身份证的位数相同,这一巧妙设计在未来“两码管两人”的应用中可以实现登记、检索、填表等统一。
六是统一社会信用代码中内嵌的主体标识码具有校验位,同时自身第十八位也是校验位,与身份证号相比是双校验,确保了号码准确性
第17,18位是校验位,具体的校验规则如下: # -*-coding=utf-8-*-
# @Time : 2018/10/30 15:23
# @File : social_code_gen2.py
# -*- coding: utf-8 -*-
'''
Created on 2017年4月5日
18位统一社会信用代码从2015年10月1日正式实行
@author: rocky
'''
# 统一社会信用代码中不使用I,O,Z,S,V
SOCIAL_CREDIT_CHECK_CODE_DICT = {
'0':0,'1':1,'2':2,'3':3,'4':4,'5':5,'6':6,'7':7,'8':8,'9':9,
'A':10,'B':11,'C':12, 'D':13, 'E':14, 'F':15, 'G':16, 'H':17, 'J':18, 'K':19, 'L':20, 'M':21, 'N':22, 'P':23, 'Q':24,
'R':25, 'T':26, 'U':27, 'W':28, 'X':29, 'Y':30}
# GB11714-1997全国组织机构代码编制规则中代码字符集
ORGANIZATION_CHECK_CODE_DICT = {
'0':0,'1':1,'2':2,'3':3,'4':4,'5':5,'6':6,'7':7,'8':8,'9':9,
'A':10,'B':11,'C':12, 'D':13, 'E':14, 'F':15, 'G':16, 'H':17,'I':18, 'J':19, 'K':20, 'L':21, 'M':22, 'N':23, 'O':24,'P':25, 'Q':26,
'R':27,'S':28, 'T':29, 'U':30,'V':31, 'W':32, 'X':33, 'Y':34,'Z':35}
class UnifiedSocialCreditIdentifier(object):
'''
统一社会信用代码
'''
def __init__(self):
'''
Constructor
'''
def check_social_credit_code(self,code):
'''
校验统一社会信用代码的校验码
计算校验码公式:
C9 = 31-mod(sum(Ci*Wi),31),其中Ci为组织机构代码的第i位字符,Wi为第i位置的加权因子,C9为校验码
'''
# 第i位置上的加权因子
weighting_factor = [1,3,9,27,19,26,16,17,20,29,25,13,8,24,10,30,28]
# 本体代码
ontology_code = code[0:17]
# 校验码
check_code = code[17]
# 计算校验码
tmp_check_code = self.gen_check_code(weighting_factor, ontology_code, 31, SOCIAL_CREDIT_CHECK_CODE_DICT)
if tmp_check_code==check_code:
return True
else:
return False
def check_organization_code(self,code):
'''
校验组织机构代码是否正确,该规则按照GB 11714编制
统一社会信用代码的第9~17位为主体标识码(组织机构代码),共九位字符
计算校验码公式:
C9 = 11-mod(sum(Ci*Wi),11),其中Ci为组织机构代码的第i位字符,Wi为第i位置的加权因子,C9为校验码
@param code: 统一社会信用代码
'''
# 第i位置上的加权因子
weighting_factor = [3,7,9,10,5,8,4,2]
# 第9~17位为主体标识码(组织机构代码)
organization_code = code[8:17]
# 本体代码
ontology_code=organization_code[0:8]
# 校验码
check_code = organization_code[8]
#
print(organization_code,ontology_code,check_code)
# 计算校验码
tmp_check_code = self.gen_check_code(weighting_factor, ontology_code, 11, ORGANIZATION_CHECK_CODE_DICT)
if tmp_check_code==check_code:
return True
else:
return False
def gen_check_code(self,weighting_factor,ontology_code, modulus,check_code_dict):
'''
@param weighting_factor: 加权因子
@param ontology_code:本体代码
@param modulus: 模数
@param check_code_dict: 字符字典
'''
total = 0
for i in range(len(ontology_code)):
if ontology_code[i].isdigit():
print(ontology_code[i] ,weighting_factor[i])
total += int(ontology_code[i]) * weighting_factor[i]
else:
total += check_code_dict[ontology_code[i]]*weighting_factor[i]
diff = modulus - total % modulus
print(diff)
return list(check_code_dict.keys())[list(check_code_dict.values())[diff]]
if __name__ == '__main__':
u = UnifiedSocialCreditIdentifier()
print(u.check_organization_code(code='91421126331832178C'))
print(u.check_social_credit_code(code='91420100052045470K'))
更新:
引用具体的生成规则
如下是《法人和其他组织统一社会信用代码编码规则》的说明。
1 范围
本标准规定了法人和其他组织统一社会信用代码(以下简称统一代码)的术语和定义、构成。本标准适用于对统一代码的编码、信息处理和信息共享交换。
2 规范性引用文件
下列文件对于本文件的应用是必不可少的。凡是注日期的引用文件,仅注日期的版本适用于本文件。凡是不注日期的引用文件,其最新版本(包括所有的修改单)适用于本文件。
GB/T 2260 中华人民共和国行政区划代码GB 11714 全国组织机构代码编制规则GB/T 17710 信息技术 安全技术 校验字符系统
3 术语和定义
下列术语和定义适用于本文件。
3.1 组织机构 organization
企业、事业单位、机关、社会团体及其他依法成立的单位的通称。[GB/T 20091-2006, 定义2.2]
3.2 法人 legal entities
具有民事权利能力和民事行为能力,依法独立享有民事权利和承担民事义务的组织。
3.3 其他组织 other organizations
合法成立、有一定的组织机构和财产,不具备法人资格的组织。
3.4 组织机构代码 organization code
主体标识码 subject identification code按照GB 11714编制,赋予每一个组织机构在全国范围内唯一的,始终不变的识别标识码。
3.5 统一社会信用代码 unified social credit identifier
每一个法人和其他组织在全国范围内唯一的,终身不变的法定身份识别码。
4 统一代码的构成
4.1 结构
统一代码由十八位的阿拉伯数字或大写英文字母(不使用I、O、Z、S、V)组成。
第1位:登记管理部门代码(共一位字符)第2位:机构类别代码(共一位字符)第3位~第8位:登记管理机关行政区划码(共六位阿拉伯数字)第9位~第17位:主体标识码(组织机构代码)(共九位字符)第18位:校验码(共一位字符)
4.2 代码及说明
登记管理部门代码:使用阿拉伯数字或大写英文字母表示。
机构编制:1民政:5工商:9其他:Y
机构类别代码:使用阿拉伯数字或大写英文字母表示。
机构编制机关:11打头机构编制事业单位:12打头机构编制中央编办直接管理机构编制的群众团体:13打头机构编制其他:19打头民政社会团体:51打头民政民办非企业单位:52打头民政基金会:53打头民政其他:59打头工商企业:91打头工商个体工商户:92打头工商农民专业合作社:93打头其他:Y1打头
登记管理机关行政区划码:只能使用阿拉伯数字表示。按照GB/T 2260编码。
主体标识码(组织机构代码):使用阿拉伯数字或英文大写字母表示。按照GB 11714编码。
在实行统一社会信用代码之前,以前的组织机构代码证上的组织机构代码由九位字符组成。格式为XXXXXXXX-Y。前面八位被称为“本体代码”;最后一位被称为“校验码”。校验码和本体代码由一个连字号(-)连接起来。以便让人很容易的看出校验码。但是三证合一后,组织机构的九位字符全部被纳入统一社会信用代码的第9位至第17位,其原有组织机构代码上的连字号不带入统一社会信用代码。
原有组织机构代码上的“校验码”的计算规则是:
例如:某公司的组织机构代码是:59467239-9。那其最后一位的组织机构代码校验码9是如何计算出来的呢?
第一步:取组织机构代码的前八位本体代码为基数。5 9 4 6 7 2 3 9提示:如果本体代码中含有英文大写字母。则A的基数是10,B的基数是11,C的基数是12,依此类推,直到Z的基数是35。
第二步:取加权因子数值。因为组织机构代码的本体代码一共是八位字符。则这八位的加权因子数值从左到右分别是:3、7、9、10、5、8、4、2。
第三步:本体代码基数与对应位数的因子数值相乘。5×3=15,9×7=63,4×9=36,6×10=60,7×5=35,2×8=16,3×4=12,9×2=18第四步:将乘积求和相加。15+63+36+60+35+16+12+18=255第五步:将和数除以11,求余数。255÷11=33,余数是2。第六步:用阿拉伯数字11减去余数,得求校验码的数值。当校验码的数值为10时,校验码用英文大写字母X来表示;当校验码的数值为11时,校验码用0来表示;其余求出的校验码数值就用其本身的阿拉伯数字来表示。11-2=9,因此此公司完整的组织机构代码为 59467239-9。
校验码:使用阿拉伯数字或大写英文字母来表示。校验码的计算方法参照 GB/T 17710。
例如:某公司的统一社会信用代码为91512081MA62K0260E,那其最后一位的校验码E是如何计算出来的呢?
第一步:取统一社会信用代码的前十七位为基数。9 1 5 1 2 0 8 1 21 10 6 2 19 0 2 6 0提示:如果前十七位统一社会信用代码含有英文大写字母(不使用I、O、Z、S、V这五个英文字母)。则英文字母对应的基数分别为:A=10、B=11、C=12、D=13、E=14、F=15、G=16、H=17、J=18、K=19、L=20、M=21、N=22、P=23、Q=24、R=25、T=26、U=27、W=28、X=29、Y=30
第二步:取加权因子数值。因为统一社会信用代码前面前面有十七位字符。则这十七位的加权因子数值从左到右分别是:1、3、9、27、19、26、16、17、20、29、25、13、8、24、10、30、28
第三步:基数与对应位数的因子数值相乘。9×1=9,1×3=3,5×9=45,1×27=27,2×19=38,0×26=0,8×16=1281×17=17,21×20=420,10×29=290,6×25=150,2×13=26,19×8=1520×23=0,2×10=20,6×30=180,0×28=0
第四步:将乘积求和相加。9+3+45+27+38+0+128+17+420+290+150+26+152+0+20+180+0=1495
第五步:将和数除以31,求余数。1495÷31=48,余数是17。
第六步:用阿拉伯数字31减去余数,得求校验码的数值。当校验码的数值为0~9时,就直接用该校验码的数值作为最终的统一社会信用代码的校验码;如果校验码的数值是10~30,则校验码转换为对应的大写英文字母。对应关系为:A=10、B=11、C=12、D=13、E=14、F=15、G=16、H=17、J=18、K=19、L=20、M=21、N=22、P=23、Q=24、R=25、T=26、U=27、W=28、X=29、Y=30
因为,31-17=14,所以该公司完整的统一社会信用代码为 91512081MA62K0260E。
————————————————
统一社会信用代码与原来营业执照注册号、税务登记号、组织机构代码的转换关系
由于18位统一社会信用代码从2015年10月1日才正式实行。当前还有很多系统并没有完全转换到统一社会信用代码上。当您遇到需要让您填写组织机构代码或者税务登记号的时候,您应该如何从统一社会信用代码获取信息呢?
实质上:统一社会信用代码的第九位到第十七位就是原来的组织机构代码。统一社会信用代码的第三位到第十七位绝大多数的情况都是原来的税务登记证号。(不过由于少数发证机构对地方行政区划代码做了规范。所以,有少部分企业的新的统一社会信用代码并不一定的第3位到第8位的阿拉伯数字并一定能完全对应以前的税务登记证号的前六位。)统一社会信用代码无法对应原来营业执照的注册号。当遇到非要您填写营业执照的注册号,又暂时无法识别统一社会信用代码的场合。你则只有拿出以前旧的营业执照查看上面的注册号。
例如:91370200163562681G这个统一社会信用代码。
其组织机构代码是:16356268-1其税务登记号是:370200163562681 如果与之前的税务登记号稍微有所出入,则一般是370200不一致。尤其是00这两位
原创文章,转载请注明出处
http://30daydo.com/article/364
查看全部
一是嵌入了组织机构代码作为主体标识码。通过组织机构代码的唯一性确保社会信用代码不会重码。换言之,组织机构代码的唯一性完美“遗传”给统一社会信用代码。
二是在组织机构代码前增加行政区划代码,这个组合不难发现就是税务登记证号码。这样就提高了统一社会代码的兼容性,在过渡期内税务机关可以利用这种嵌套规则更加便利地升级到新的信用代码系统。
三是预留前两位给登记机关和机构类别,这样统一社会信用代码在应用中更加清晰高效,第一位便于登记机关管理,可以作为检索条目,第二位可以准确给组织机构归类,方便细化分管。
四是统一社会信用代码的主体标识码天生具有的大容量。通过数字字母组合,加上指数级增长,可以确保在很长一段时间内无需升位就可容纳大量组织机构。
五是统一社会信用代码位数为18位,和身份证的位数相同,这一巧妙设计在未来“两码管两人”的应用中可以实现登记、检索、填表等统一。
六是统一社会信用代码中内嵌的主体标识码具有校验位,同时自身第十八位也是校验位,与身份证号相比是双校验,确保了号码准确性
第17,18位是校验位,具体的校验规则如下:
# -*-coding=utf-8-*-


# @Time : 2018/10/30 15:23

# @File : social_code_gen2.py


# -*- coding: utf-8 -*-

'''

Created on 2017年4月5日

18位统一社会信用代码从2015年10月1日正式实行


@author: rocky

'''

# 统一社会信用代码中不使用I,O,Z,S,V


SOCIAL_CREDIT_CHECK_CODE_DICT = {

                '0':0,'1':1,'2':2,'3':3,'4':4,'5':5,'6':6,'7':7,'8':8,'9':9,

                'A':10,'B':11,'C':12, 'D':13, 'E':14, 'F':15, 'G':16, 'H':17, 'J':18, 'K':19, 'L':20, 'M':21, 'N':22, 'P':23, 'Q':24,

               'R':25, 'T':26, 'U':27, 'W':28, 'X':29, 'Y':30}

# GB11714-1997全国组织机构代码编制规则中代码字符集

ORGANIZATION_CHECK_CODE_DICT = {

                '0':0,'1':1,'2':2,'3':3,'4':4,'5':5,'6':6,'7':7,'8':8,'9':9,

                'A':10,'B':11,'C':12, 'D':13, 'E':14, 'F':15, 'G':16, 'H':17,'I':18, 'J':19, 'K':20, 'L':21, 'M':22, 'N':23, 'O':24,'P':25, 'Q':26,

               'R':27,'S':28, 'T':29, 'U':30,'V':31, 'W':32, 'X':33, 'Y':34,'Z':35}


class UnifiedSocialCreditIdentifier(object):

    '''

    统一社会信用代码

    '''


    def __init__(self):

        '''

        Constructor

        '''

    def check_social_credit_code(self,code):

        '''

        校验统一社会信用代码的校验码

        计算校验码公式:

            C9 = 31-mod(sum(Ci*Wi),31),其中Ci为组织机构代码的第i位字符,Wi为第i位置的加权因子,C9为校验码

        '''

        # 第i位置上的加权因子

        weighting_factor = [1,3,9,27,19,26,16,17,20,29,25,13,8,24,10,30,28]

        # 本体代码

        ontology_code = code[0:17]

        # 校验码

        check_code = code[17]

        # 计算校验码

        tmp_check_code = self.gen_check_code(weighting_factor, ontology_code, 31, SOCIAL_CREDIT_CHECK_CODE_DICT)

        if tmp_check_code==check_code:

            return True

        else:

            return False


    def check_organization_code(self,code):

        '''

        校验组织机构代码是否正确,该规则按照GB 11714编制

        统一社会信用代码的第9~17位为主体标识码(组织机构代码),共九位字符

        计算校验码公式:

            C9 = 11-mod(sum(Ci*Wi),11),其中Ci为组织机构代码的第i位字符,Wi为第i位置的加权因子,C9为校验码

        @param  code: 统一社会信用代码

        '''

        # 第i位置上的加权因子

        weighting_factor = [3,7,9,10,5,8,4,2]

        # 第9~17位为主体标识码(组织机构代码)

        organization_code = code[8:17]

        # 本体代码

        ontology_code=organization_code[0:8]

        # 校验码

        check_code = organization_code[8]

        #

        print(organization_code,ontology_code,check_code)

        # 计算校验码

        tmp_check_code = self.gen_check_code(weighting_factor, ontology_code, 11, ORGANIZATION_CHECK_CODE_DICT)

        if tmp_check_code==check_code:

            return True

        else:

            return False


    def gen_check_code(self,weighting_factor,ontology_code, modulus,check_code_dict):

        '''

        @param weighting_factor: 加权因子

        @param ontology_code:本体代码

        @param modulus:  模数

        @param check_code_dict: 字符字典

        '''

        total = 0

        for i in range(len(ontology_code)):

            if ontology_code[i].isdigit():

                print(ontology_code[i] ,weighting_factor[i])

                total += int(ontology_code[i]) * weighting_factor[i]

            else:

                total += check_code_dict[ontology_code[i]]*weighting_factor[i]

        diff = modulus - total % modulus

        print(diff)

        return list(check_code_dict.keys())[list(check_code_dict.values())[diff]]


if __name__ == '__main__':

    u = UnifiedSocialCreditIdentifier()

    print(u.check_organization_code(code='91421126331832178C'))

    print(u.check_social_credit_code(code='91420100052045470K'))
更新:
引用具体的生成规则

如下是《法人和其他组织统一社会信用代码编码规则》的说明。
1 范围
本标准规定了法人和其他组织统一社会信用代码(以下简称统一代码)的术语和定义、构成。本标准适用于对统一代码的编码、信息处理和信息共享交换。
2 规范性引用文件
下列文件对于本文件的应用是必不可少的。凡是注日期的引用文件,仅注日期的版本适用于本文件。凡是不注日期的引用文件,其最新版本(包括所有的修改单)适用于本文件。
GB/T 2260 中华人民共和国行政区划代码GB 11714 全国组织机构代码编制规则GB/T 17710 信息技术 安全技术 校验字符系统
3 术语和定义
下列术语和定义适用于本文件。
3.1 组织机构 organization
企业、事业单位、机关、社会团体及其他依法成立的单位的通称。[GB/T 20091-2006, 定义2.2]
3.2 法人 legal entities
具有民事权利能力和民事行为能力,依法独立享有民事权利和承担民事义务的组织。
3.3 其他组织 other organizations
合法成立、有一定的组织机构和财产,不具备法人资格的组织。
3.4 组织机构代码 organization code
主体标识码 subject identification code按照GB 11714编制,赋予每一个组织机构在全国范围内唯一的,始终不变的识别标识码。
3.5 统一社会信用代码 unified social credit identifier
每一个法人和其他组织在全国范围内唯一的,终身不变的法定身份识别码。
4 统一代码的构成
4.1 结构
统一代码由十八位的阿拉伯数字或大写英文字母(不使用I、O、Z、S、V)组成。
第1位:登记管理部门代码(共一位字符)第2位:机构类别代码(共一位字符)第3位~第8位:登记管理机关行政区划码(共六位阿拉伯数字)第9位~第17位:主体标识码(组织机构代码)(共九位字符)第18位:校验码(共一位字符)
4.2 代码及说明
登记管理部门代码:使用阿拉伯数字或大写英文字母表示。
机构编制:1民政:5工商:9其他:Y
机构类别代码:使用阿拉伯数字或大写英文字母表示。
机构编制机关:11打头机构编制事业单位:12打头机构编制中央编办直接管理机构编制的群众团体:13打头机构编制其他:19打头民政社会团体:51打头民政民办非企业单位:52打头民政基金会:53打头民政其他:59打头工商企业:91打头工商个体工商户:92打头工商农民专业合作社:93打头其他:Y1打头
登记管理机关行政区划码:只能使用阿拉伯数字表示。按照GB/T 2260编码。
主体标识码(组织机构代码):使用阿拉伯数字或英文大写字母表示。按照GB 11714编码。
在实行统一社会信用代码之前,以前的组织机构代码证上的组织机构代码由九位字符组成。格式为XXXXXXXX-Y。前面八位被称为“本体代码”;最后一位被称为“校验码”。校验码和本体代码由一个连字号(-)连接起来。以便让人很容易的看出校验码。但是三证合一后,组织机构的九位字符全部被纳入统一社会信用代码的第9位至第17位,其原有组织机构代码上的连字号不带入统一社会信用代码。
原有组织机构代码上的“校验码”的计算规则是:
例如:某公司的组织机构代码是:59467239-9。那其最后一位的组织机构代码校验码9是如何计算出来的呢?
第一步:取组织机构代码的前八位本体代码为基数。5 9 4 6 7 2 3 9提示:如果本体代码中含有英文大写字母。则A的基数是10,B的基数是11,C的基数是12,依此类推,直到Z的基数是35。
第二步:取加权因子数值。因为组织机构代码的本体代码一共是八位字符。则这八位的加权因子数值从左到右分别是:3、7、9、10、5、8、4、2。
第三步:本体代码基数与对应位数的因子数值相乘。5×3=15,9×7=63,4×9=36,6×10=60,7×5=35,2×8=16,3×4=12,9×2=18第四步:将乘积求和相加。15+63+36+60+35+16+12+18=255第五步:将和数除以11,求余数。255÷11=33,余数是2。第六步:用阿拉伯数字11减去余数,得求校验码的数值。当校验码的数值为10时,校验码用英文大写字母X来表示;当校验码的数值为11时,校验码用0来表示;其余求出的校验码数值就用其本身的阿拉伯数字来表示。11-2=9,因此此公司完整的组织机构代码为 59467239-9。
校验码:使用阿拉伯数字或大写英文字母来表示。校验码的计算方法参照 GB/T 17710。
例如:某公司的统一社会信用代码为91512081MA62K0260E,那其最后一位的校验码E是如何计算出来的呢?
第一步:取统一社会信用代码的前十七位为基数。9 1 5 1 2 0 8 1 21 10 6 2 19 0 2 6 0提示:如果前十七位统一社会信用代码含有英文大写字母(不使用I、O、Z、S、V这五个英文字母)。则英文字母对应的基数分别为:A=10、B=11、C=12、D=13、E=14、F=15、G=16、H=17、J=18、K=19、L=20、M=21、N=22、P=23、Q=24、R=25、T=26、U=27、W=28、X=29、Y=30
第二步:取加权因子数值。因为统一社会信用代码前面前面有十七位字符。则这十七位的加权因子数值从左到右分别是:1、3、9、27、19、26、16、17、20、29、25、13、8、24、10、30、28
第三步:基数与对应位数的因子数值相乘。9×1=9,1×3=3,5×9=45,1×27=27,2×19=38,0×26=0,8×16=1281×17=17,21×20=420,10×29=290,6×25=150,2×13=26,19×8=1520×23=0,2×10=20,6×30=180,0×28=0
第四步:将乘积求和相加。9+3+45+27+38+0+128+17+420+290+150+26+152+0+20+180+0=1495
第五步:将和数除以31,求余数。1495÷31=48,余数是17。
第六步:用阿拉伯数字31减去余数,得求校验码的数值。当校验码的数值为0~9时,就直接用该校验码的数值作为最终的统一社会信用代码的校验码;如果校验码的数值是10~30,则校验码转换为对应的大写英文字母。对应关系为:A=10、B=11、C=12、D=13、E=14、F=15、G=16、H=17、J=18、K=19、L=20、M=21、N=22、P=23、Q=24、R=25、T=26、U=27、W=28、X=29、Y=30
因为,31-17=14,所以该公司完整的统一社会信用代码为 91512081MA62K0260E。
————————————————
统一社会信用代码与原来营业执照注册号、税务登记号、组织机构代码的转换关系
由于18位统一社会信用代码从2015年10月1日才正式实行。当前还有很多系统并没有完全转换到统一社会信用代码上。当您遇到需要让您填写组织机构代码或者税务登记号的时候,您应该如何从统一社会信用代码获取信息呢?
实质上:统一社会信用代码的第九位到第十七位就是原来的组织机构代码。统一社会信用代码的第三位到第十七位绝大多数的情况都是原来的税务登记证号。(不过由于少数发证机构对地方行政区划代码做了规范。所以,有少部分企业的新的统一社会信用代码并不一定的第3位到第8位的阿拉伯数字并一定能完全对应以前的税务登记证号的前六位。)统一社会信用代码无法对应原来营业执照的注册号。当遇到非要您填写营业执照的注册号,又暂时无法识别统一社会信用代码的场合。你则只有拿出以前旧的营业执照查看上面的注册号。
例如:91370200163562681G这个统一社会信用代码。
其组织机构代码是:16356268-1其税务登记号是:370200163562681 如果与之前的税务登记号稍微有所出入,则一般是370200不一致。尤其是00这两位
原创文章,转载请注明出处
http://30daydo.com/article/364
报错 ImportError cannot import name patterns Django版本兼容问题
李魔佛 发表了文章 • 0 个评论 • 5397 次浏览 • 2018-10-25 11:20
百度出来的csdn上的结果:https://blog.csdn.net/xudailong_blog/article/details/78313568
就是不对的,我把django降级到1.10,也是报错,明显不对嘛。
官方上说的1.8之后不建议使用,所以应该降级到1.8才可以。
降级命令:
pip install django==1.8
即可。
查看全部
百度出来的csdn上的结果:https://blog.csdn.net/xudailong_blog/article/details/78313568
就是不对的,我把django降级到1.10,也是报错,明显不对嘛。
官方上说的1.8之后不建议使用,所以应该降级到1.8才可以。
降级命令:
pip install django==1.8
即可。
雪球的元卫南靠打赏收割了多少钱 ? python爬虫实例
python爬虫 • 李魔佛 发表了文章 • 7 个评论 • 32765 次浏览 • 2018-10-23 18:37
今天重新爬了一下,元卫南今年的人气暴涨,在2019年开始到现在,已经获取了31851.6元的打赏金额,虽然金额也不是特别高,但是已经比他2019年前所有打赏金额之和还要高了。 具体分析过程见 http://30daydo.com/article/362
********* 2019-08-05 更新 ***********
文章是去年写的,没想到最近居然在雪球火了。 后续会更新下最新的数据,还有趴一趴释老毛的打赏金额。
雪球的元卫南每天坚持发帖,把一个股民的日常描述的栩栩如生,让人感叹股民的无助与悲哀。 同时也看到上了严重杠杆后,对生活造成的压力,靠着借债来给股票续命。
元卫南雪球链接:https://xueqiu.com/u/2227798650
而且不断有人质疑元卫南写文章,靠打赏金来消费粉丝。 刚开始我也这么觉得,毕竟不少人几十块,一百块的打赏,十几万的粉丝,那每天的收入都很客观呀。 于是抱着好奇心,把元卫南的所有专栏的文章都爬下来,获取每个文章的赏金金额,然后就知道元兄到底靠赏金拿了多少钱。
撸起袖子干。 代码不多,在python3的环境下运行,隐去了header的个人信息,如果在电脑上运行,把你个人的header和cookie加上即可# -*-coding=utf-8-*-
# @Time : 2018/10/23 9:26
# @File : money_reward.py
import requests
from collections import OrderedDict
import time
import datetime
import pymongo
import config
session = requests.Session()
def get_proxy(retry=10):
proxyurl = 'http://{}:8081/dynamicIp/common/getDynamicIp.do'.format(config.PROXY)
count = 0
for i in range(retry):
try:
r = requests.get(proxyurl, timeout=10)
except Exception as e:
print(e)
count += 1
print('代理获取失败,重试' + str(count))
time.sleep(1)
else:
js = r.json()
proxyServer = 'http://{0}:{1}'.format(js.get('ip'), js.get('port'))
proxies_random = {
'http': proxyServer
}
return proxies_random
def get_content(url):
headers = {
# 此处添加个人的header信息
}
try:
proxy = get_proxy()
except Exception as e:
print(e)
proxy = get_proxy()
try:
r = session.get(url=url, headers=headers,proxies=proxy,timeout=10)
except Exception as e:
print(e)
proxy = get_proxy()
r = session.get(url=url, headers=headers,proxies=proxy,timeout=10)
return r
def parse_content(post_id):
url = 'https://xueqiu.com/statuses/reward/list_by_user.json?status_id={}&page=1&size=99999999'.format(post_id)
r = get_content(url)
print(r.text)
if r.status_code != 200:
print('status code != 200')
failed_doc.insert({'post_id':post_id,'status':0})
return None
try:
js_data = r.json()
except Exception as e:
print(e)
print('can not parse to json')
print(post_id)
failed_doc.insert({'post_id': post_id, 'status': 0})
return
ret =
been_reward_user = '元卫南'
for item in js_data.get('items'):
name = item.get('name')
amount = item.get('amount')
description = item.get('description')
user_id = item.get('user_id')
created_at = item.get('created_at')
if created_at:
created_at = datetime.datetime.fromtimestamp(int(created_at) / 1000).strftime('%Y-%m-%d %H:%M:%S')
d = OrderedDict()
d['name'] = name
d['user_id'] = user_id
d['amount'] = amount / 100
d['description'] = description
d['created_at'] = created_at
d['been_reward'] = been_reward_user
ret.append(d)
print(ret)
if ret:
doc.insert_many(ret)
failed_doc.insert({'post_id':post_id,'status':1})
def get_all_page_id(user_id):
doc = db['db_parker']['xueqiu_zhuanglan']
get_page_url = 'https://xueqiu.com/statuses/original/timeline.json?user_id={}&page=1'.format(user_id)
r = get_content(get_page_url)
max_page = int(r.json().get('maxPage'))
for i in range(1, max_page + 1):
url = 'https://xueqiu.com/statuses/original/timeline.json?user_id=2227798650&page={}'.format(i)
r = get_content(url)
js_data = r.json()
ret =
for item in js_data.get('list'):
d = OrderedDict()
d['article_id'] = item.get('id')
d['title'] = item.get('title')
d['description'] = item.get('description')
d['view_count'] = item.get('view_count')
d['target'] = 'https://xueqiu.com/' + item.get('target')
d['user_id']= item.get('user_id')
d['created_at'] = datetime.datetime.fromtimestamp(int(item.get('created_at')) / 1000).strftime(
'%Y-%m-%d %H:%M:%S')
ret.append(d)
print(d)
doc.insert_many(ret)
def loop_page_id():
doc = db['db_parker']['xueqiu_zhuanglan']
ret = doc.find({},{'article_id':1})
failed_doc = db['db_parker']['xueqiu_reward_status']
failed_ret = failed_doc.find({'status':1})
article_id_list =
for i in failed_ret:
article_id_list.append(i.get('article_id'))
for item in ret:
article_id = item.get('article_id')
print(article_id)
if article_id in article_id_list:
continue
else:
parse_content(article_id)
loop_page_id()
然后就是开始爬。
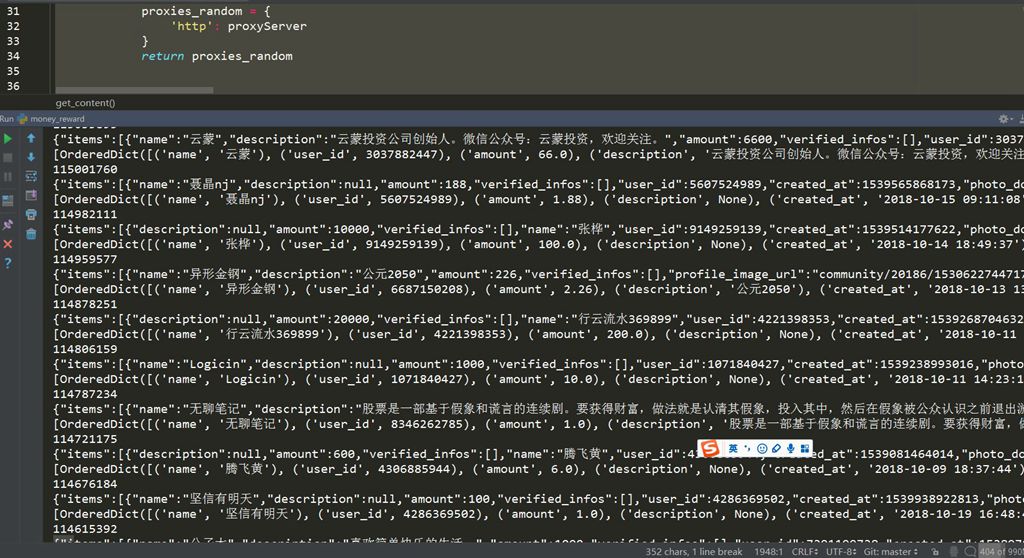
因为使用了代理,所有速度回有点慢,大概10分钟就把所有内容爬完了。
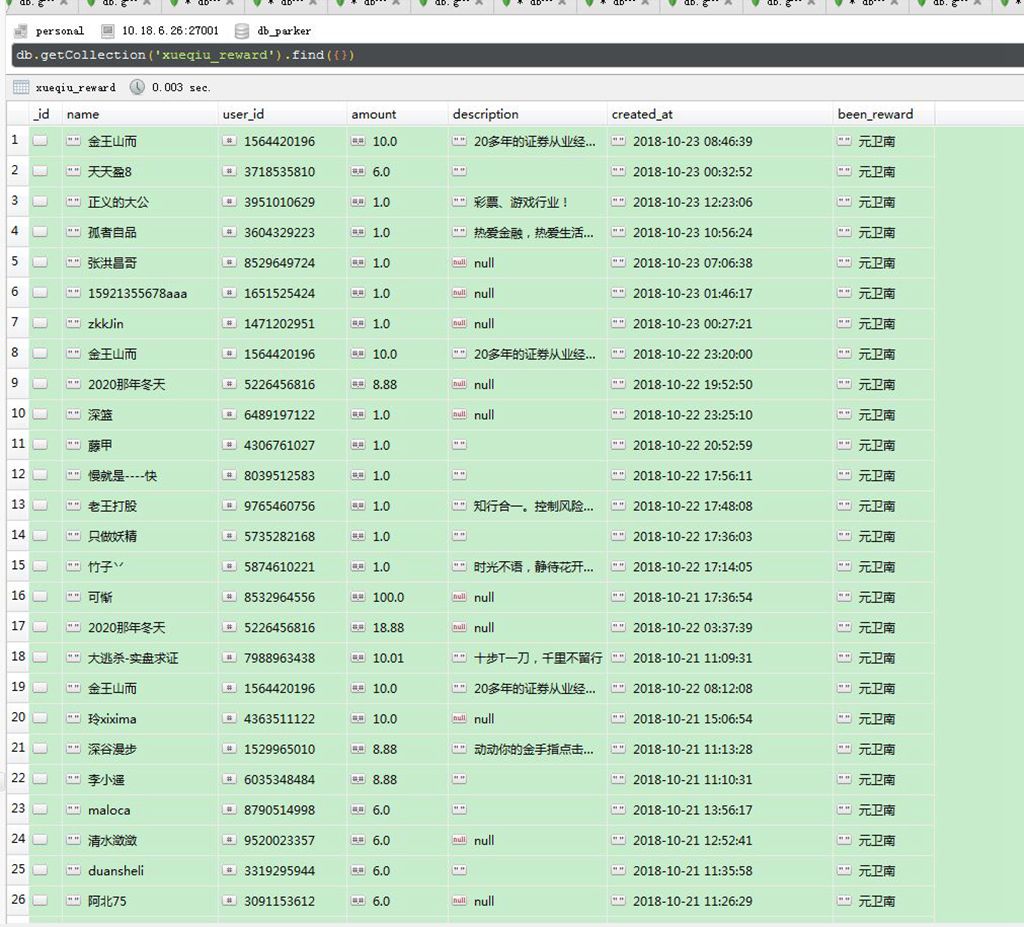
点击查看大图
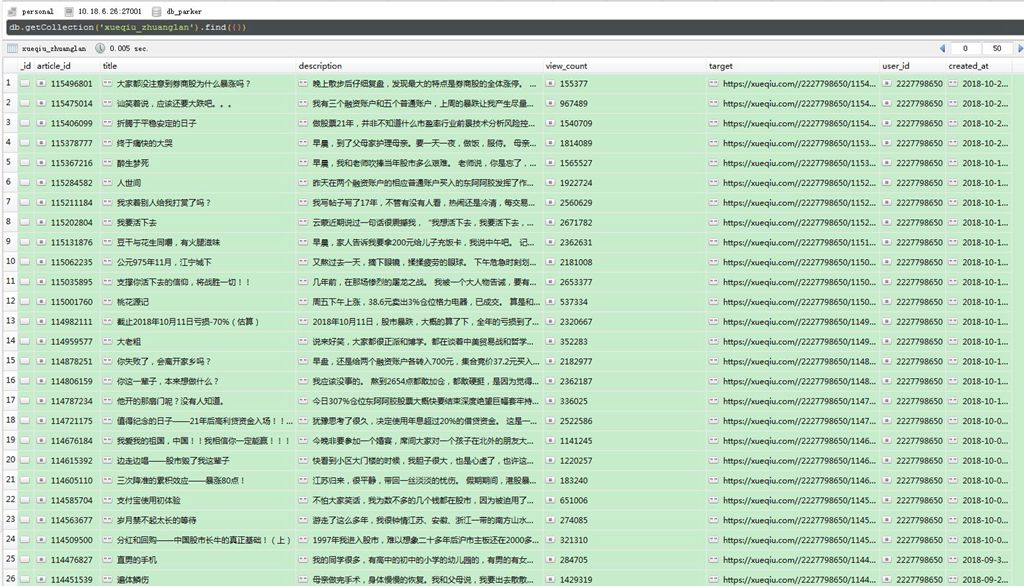
数据是存储在mongodb数据库中,打开mongodb,可以查看每一条数据,还可以做统计。
点击查看大图
从今天(2018-10-23)追溯到元兄第一篇专栏文章(2014-2-17),元兄总共发了1144篇文章。
点击查看大图
然后再看另外一个打赏的列表
点击查看大图
从最新的开始日期(2018-10-23),这位 金王山而 的用户似乎打赏的很多次,看了是元兄的忠实粉丝。
统计了下,元神共有4222次打赏。
点击查看大图
打赏总金额为:
24128.13
点击查看大图
好吧,太出乎意料了!!! 还以为会有几百万的打赏金额呀,最后算出来才只有24128,这点钱,元兄只够补仓5手东阿阿胶呀。
然后按照打赏金额排序:
点击查看大图
打赏最高金额的是唐史主任,金额为250元,200元的有十来个, 还看到之前梁大师打赏的200元,可以排在并列前10了。
其实大部分人都是拿小钱来打赏下,2元以下就有2621,占了50%了。
还是很支持元神每天坚持发帖,在当前的行情下或可以聊以慰藉,或娱乐大家,或引以为戒,让大家看到股市对散户生活造成的影响,避免重蹈覆辙。
原创文章
转载请注明出处:
http://30daydo.com/article/361
个人公众号:
下篇:
python数据分析入门 分析雪球元卫南每个月打赏收入 查看全部
今天重新爬了一下,元卫南今年的人气暴涨,在2019年开始到现在,已经获取了31851.6元的打赏金额,虽然金额也不是特别高,但是已经比他2019年前所有打赏金额之和还要高了。 具体分析过程见 http://30daydo.com/article/362
********* 2019-08-05 更新 ***********
文章是去年写的,没想到最近居然在雪球火了。 后续会更新下最新的数据,还有趴一趴释老毛的打赏金额。
雪球的元卫南每天坚持发帖,把一个股民的日常描述的栩栩如生,让人感叹股民的无助与悲哀。 同时也看到上了严重杠杆后,对生活造成的压力,靠着借债来给股票续命。
元卫南雪球链接:https://xueqiu.com/u/2227798650
而且不断有人质疑元卫南写文章,靠打赏金来消费粉丝。 刚开始我也这么觉得,毕竟不少人几十块,一百块的打赏,十几万的粉丝,那每天的收入都很客观呀。 于是抱着好奇心,把元卫南的所有专栏的文章都爬下来,获取每个文章的赏金金额,然后就知道元兄到底靠赏金拿了多少钱。
撸起袖子干。 代码不多,在python3的环境下运行,隐去了header的个人信息,如果在电脑上运行,把你个人的header和cookie加上即可
# -*-coding=utf-8-*-


# @Time : 2018/10/23 9:26

# @File : money_reward.py

import requests

from collections import OrderedDict

import time

import datetime

import pymongo

import config


session = requests.Session()

def get_proxy(retry=10):

    proxyurl = 'http://{}:8081/dynamicIp/common/getDynamicIp.do'.format(config.PROXY)

    count = 0

    for i in range(retry):

        try:

            r = requests.get(proxyurl, timeout=10)

        except Exception as e:

            print(e)

            count += 1

            print('代理获取失败,重试' + str(count))

            time.sleep(1)


        else:

            js = r.json()

            proxyServer = 'http://{0}:{1}'.format(js.get('ip'), js.get('port'))

            proxies_random = {

                'http': proxyServer

            }

            return proxies_random


def get_content(url):

    headers = {

        # 此处添加个人的header信息

    }

    try:

        proxy = get_proxy()

    except Exception as e:

        print(e)

        proxy = get_proxy()


    try:

        r = session.get(url=url, headers=headers,proxies=proxy,timeout=10)

    except Exception as e:

        print(e)

        proxy = get_proxy()

        r = session.get(url=url, headers=headers,proxies=proxy,timeout=10)


    return r


def parse_content(post_id):

    url = 'https://xueqiu.com/statuses/reward/list_by_user.json?status_id={}&page=1&size=99999999'.format(post_id)

    r = get_content(url)

    print(r.text)

    if r.status_code != 200:

        print('status code != 200')

        failed_doc.insert({'post_id':post_id,'status':0})

        return None


    try:


        js_data = r.json()

    except Exception as e:

        print(e)

        print('can not parse to json')

        print(post_id)

        failed_doc.insert({'post_id': post_id, 'status': 0})

        return


    ret =

    been_reward_user = '元卫南'

    for item in js_data.get('items'):

        name = item.get('name')

        amount = item.get('amount')

        description = item.get('description')

        user_id = item.get('user_id')

        created_at = item.get('created_at')

        if created_at:

            created_at = datetime.datetime.fromtimestamp(int(created_at) / 1000).strftime('%Y-%m-%d %H:%M:%S')


        d = OrderedDict()

        d['name'] = name

        d['user_id'] = user_id

        d['amount'] = amount / 100

        d['description'] = description

        d['created_at'] = created_at

        d['been_reward'] = been_reward_user

        ret.append(d)


    print(ret)

    if ret:

        doc.insert_many(ret)

        failed_doc.insert({'post_id':post_id,'status':1})


def get_all_page_id(user_id):

    doc = db['db_parker']['xueqiu_zhuanglan']


    get_page_url = 'https://xueqiu.com/statuses/original/timeline.json?user_id={}&page=1'.format(user_id)

    r = get_content(get_page_url)

    max_page = int(r.json().get('maxPage'))


    for i in range(1, max_page + 1):

        url = 'https://xueqiu.com/statuses/original/timeline.json?user_id=2227798650&page={}'.format(i)

        r = get_content(url)

        js_data = r.json()

        ret =


        for item in js_data.get('list'):

            d = OrderedDict()


            d['article_id'] = item.get('id')

            d['title'] = item.get('title')

            d['description'] = item.get('description')

            d['view_count'] = item.get('view_count')

            d['target'] = 'https://xueqiu.com/' + item.get('target')

            d['user_id']= item.get('user_id')

            d['created_at'] = datetime.datetime.fromtimestamp(int(item.get('created_at')) / 1000).strftime(

                '%Y-%m-%d %H:%M:%S')


            ret.append(d)

        print(d)

        doc.insert_many(ret)


def loop_page_id():

    doc = db['db_parker']['xueqiu_zhuanglan']

    ret = doc.find({},{'article_id':1})

    failed_doc = db['db_parker']['xueqiu_reward_status']

    failed_ret = failed_doc.find({'status':1})

    article_id_list =

    for i in failed_ret:

        article_id_list.append(i.get('article_id'))


    for item in ret:

        article_id = item.get('article_id')

        print(article_id)

        if article_id in article_id_list:

            continue

        else:

            parse_content(article_id)


loop_page_id()
然后就是开始爬。
因为使用了代理,所有速度回有点慢,大概10分钟就把所有内容爬完了。
点击查看大图
数据是存储在mongodb数据库中,打开mongodb,可以查看每一条数据,还可以做统计。
点击查看大图
从今天(2018-10-23)追溯到元兄第一篇专栏文章(2014-2-17),元兄总共发了1144篇文章。
点击查看大图
然后再看另外一个打赏的列表
点击查看大图
从最新的开始日期(2018-10-23),这位 金王山而 的用户似乎打赏的很多次,看了是元兄的忠实粉丝。
统计了下,元神共有4222次打赏。
点击查看大图
打赏总金额为:
24128.13
点击查看大图
好吧,太出乎意料了!!! 还以为会有几百万的打赏金额呀,最后算出来才只有24128,这点钱,元兄只够补仓5手东阿阿胶呀。
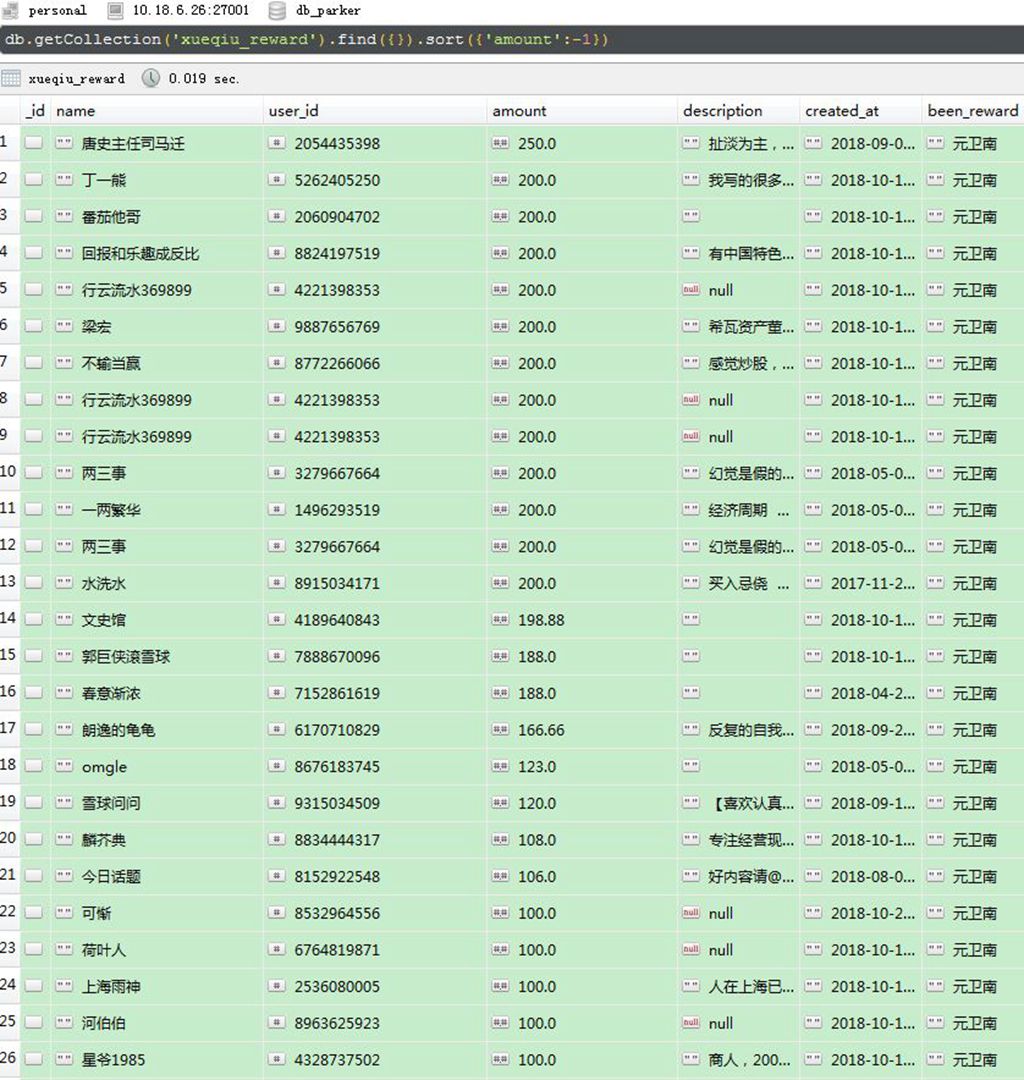
然后按照打赏金额排序:
点击查看大图
打赏最高金额的是唐史主任,金额为250元,200元的有十来个, 还看到之前梁大师打赏的200元,可以排在并列前10了。
其实大部分人都是拿小钱来打赏下,2元以下就有2621,占了50%了。
还是很支持元神每天坚持发帖,在当前的行情下或可以聊以慰藉,或娱乐大家,或引以为戒,让大家看到股市对散户生活造成的影响,避免重蹈覆辙。
原创文章
转载请注明出处:
http://30daydo.com/article/361
个人公众号:

下篇:
python数据分析入门 分析雪球元卫南每个月打赏收入
python3 pytesseract Tesseract-OCR 验证码识别工具的安装
python爬虫 • 李魔佛 发表了文章 • 2 个评论 • 5156 次浏览 • 2018-10-13 19:48
1. 首先安装Tesseract-OCR
可以google或者百度搜索,实在找不到可以到百度网盘下载:
https://pan.baidu.com/s/1Y7nLk5QKioK2DG5oxrMFlQ
下载后就直接安装, 安装时记住安装的路径,默认是在 C:\Program Files (x86)\Tesseract-OCR
2. 安装 pytesseract
使用pip命令安装
pip install pytesseract
3. 配置环境变量:
我的电脑 右键,点击属性
有个环境变量的选项:
然后添加一个环境变量:
名字叫:TESSDATA_PREFIX
它的值就是Tesseract-OCR安装路径
比如我的就是 C:\Program Files (x86)\Tesseract-OCR
4. 一般按照前三步就可以正常使用pytesseract了。
如果还是无法使用,那么可以找到文件 pytesseract.py,这个文件看你是安装的python2还是python3,
假如是python3,那么文件路径大概就是在 C:\python3_64\Lib\site-packages\pytesseract (具体位置根据你的python安装路径为准), 然后打开这个文件, 大概在28行的位置:
把这个tesseract_cmd的路径修改为 tesseract_cmd = r'C:\Program Files (x86)\Tesseract-OCR\tesseract.exe'
然后最重要的一部就是。 关掉你的pycharm或者IDE,或者cmd命令行。
重新打开pycharm或者新开一个cmd窗口, 然后运行一下pytesseract的识别代码,就可以正常识别拉。
from PIL import Image

im = Image.open('test_0.jpg')

pytesseract.image_to_string(im)
查看全部
1. 首先安装Tesseract-OCR
可以google或者百度搜索,实在找不到可以到百度网盘下载:
https://pan.baidu.com/s/1Y7nLk5QKioK2DG5oxrMFlQ
下载后就直接安装, 安装时记住安装的路径,默认是在 C:\Program Files (x86)\Tesseract-OCR
2. 安装 pytesseract
使用pip命令安装
pip install pytesseract
3. 配置环境变量:
我的电脑 右键,点击属性
有个环境变量的选项:
然后添加一个环境变量:
名字叫:TESSDATA_PREFIX
它的值就是Tesseract-OCR安装路径
比如我的就是 C:\Program Files (x86)\Tesseract-OCR
4. 一般按照前三步就可以正常使用pytesseract了。
如果还是无法使用,那么可以找到文件 pytesseract.py,这个文件看你是安装的python2还是python3,
假如是python3,那么文件路径大概就是在 C:\python3_64\Lib\site-packages\pytesseract (具体位置根据你的python安装路径为准), 然后打开这个文件, 大概在28行的位置:
把这个tesseract_cmd的路径修改为 tesseract_cmd = r'C:\Program Files (x86)\Tesseract-OCR\tesseract.exe'
然后最重要的一部就是。 关掉你的pycharm或者IDE,或者cmd命令行。
重新打开pycharm或者新开一个cmd窗口, 然后运行一下pytesseract的识别代码,就可以正常识别拉。
from PIL import Image
im = Image.open('test_0.jpg')
pytesseract.image_to_string(im)


