通知设置 新通知
DBeaver中建表 报错: Incorrect table definition; there can be ony one auto column and it must be
马化云 发表了文章 • 0 个评论 • 3374 次浏览 • 2022-10-26 10:00
在DBeaver中建表,建了一列主键,自增的,保存。报错。
错误原因:
Incorrect table definition; there can be only one auto column and it must be defined as a key
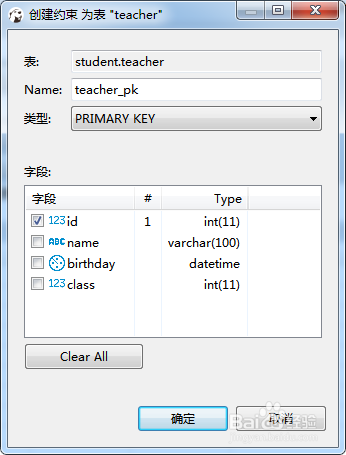
需要设置改为为主键。
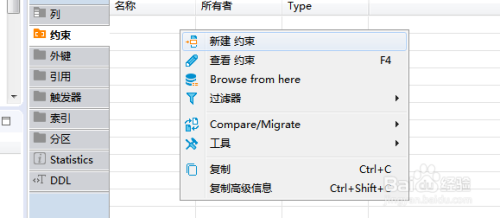
设置地方:
在约束关系那里,选定一个主键即可!
查看全部
Django mysql SSL 证书配置
马化云 发表了文章 • 0 个评论 • 2667 次浏览 • 2022-10-13 15:35
具体配置如下:
ca_path = '/etc/ssl/certs/ca-certificates.crt' # 证书地址


DATABASES = {

    'default': {

        'ENGINE': 'django.db.backends.mysql',

        'NAME': 'wordpress',

        'USER': 'root',

        'PASSWORD': '123456',

        'HOST': '127.0.0.1`',

        'PORT': 3306,

        'OPTIONS': {'ssl':{'KEY': ca_path}}

    }

} 查看全部
具体配置如下:
ca_path = '/etc/ssl/certs/ca-certificates.crt' # 证书地址
DATABASES = {
'default': {
'ENGINE': 'django.db.backends.mysql',
'NAME': 'wordpress',
'USER': 'root',
'PASSWORD': '123456',
'HOST': '127.0.0.1`',
'PORT': 3306,
'OPTIONS': {'ssl':{'KEY': ca_path}}
}
}
SQLAlchemy mysql ssl证书 连接
马化云 发表了文章 • 0 个评论 • 2911 次浏览 • 2022-10-09 20:50
需要加上参数:
connect_args,加上ssl路径。
from sqlalchemy import create_engine

ca_path = '/etc/ssl/certs/ca-certificates.crt' # linux 证书路径

ssl_args = {'ssl_ca': ca_path}


engine = create_engine('mysql+pymysql://root:password@127.0.01:3306/wordpressdb?charset=utf8',

echo = True,

connect_args=ssl_args

) 查看全部
需要加上参数:
connect_args,加上ssl路径。
from sqlalchemy import create_engine
ca_path = '/etc/ssl/certs/ca-certificates.crt' # linux 证书路径
ssl_args = {'ssl_ca': ca_path}
engine = create_engine('mysql+pymysql://root:password@127.0.01:3306/wordpressdb?charset=utf8',
echo = True,
connect_args=ssl_args
)
influxdb什么都没有做,数据目录占用很大磁盘空间
李魔佛 发表了文章 • 0 个评论 • 3718 次浏览 • 2022-10-08 10:11
后面就没有怎么导入数据。
结果最近硬盘一直警报,说空间不够了。
经过一番排查,发现是influxdb的数据目录很大,有接近100GB。
默认目录在这里:
/var/lib/influxdb/engine/data
停止服务:
sudo systemctl restart influxdb
不过这样下次系统重启,influxdb还是会自动重启。还需要把服务给禁用掉。
update-rc.d influxdb remove
如果没有报错,就成功了。
查看全部
后面就没有怎么导入数据。
结果最近硬盘一直警报,说空间不够了。
经过一番排查,发现是influxdb的数据目录很大,有接近100GB。
默认目录在这里:
/var/lib/influxdb/engine/data
停止服务:
sudo systemctl restart influxdb
不过这样下次系统重启,influxdb还是会自动重启。还需要把服务给禁用掉。
update-rc.d influxdb remove
如果没有报错,就成功了。
systemctl start influxdb 服务启动出错
李魔佛 发表了文章 • 0 个评论 • 4064 次浏览 • 2022-07-21 19:12
csdn的原文内容:
https://blog.csdn.net/xiangjai/article/details/123718413
安装上面的配置走,ubuntu的influxdb一直无法启动。
只好一个一个选项的排除:
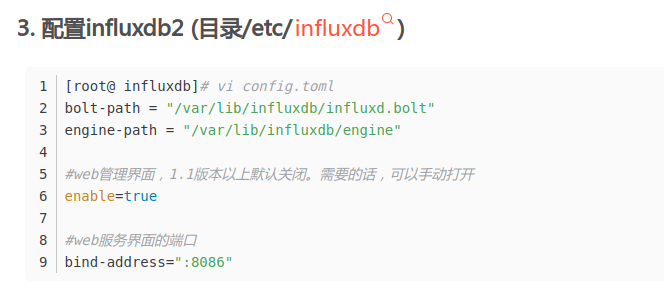
最后发现那个bind-address的问题:
把端口哪行注释了,先用着。。。bolt-path = "/var/lib/influxdb/influxd.bolt"
engine-path = "/var/lib/influxdb/engine"
enable = true
#bind-address = ":8086" 查看全部
csdn的原文内容:
https://blog.csdn.net/xiangjai/article/details/123718413
安装上面的配置走,ubuntu的influxdb一直无法启动。
只好一个一个选项的排除:
最后发现那个bind-address的问题:
把端口哪行注释了,先用着。。。
bolt-path = "/var/lib/influxdb/influxd.bolt"

engine-path = "/var/lib/influxdb/engine"

enable = true

#bind-address = ":8086"
influxdb 2.x和1.x 把api差也太多了吧。 基本不往上兼容
李魔佛 发表了文章 • 0 个评论 • 3972 次浏览 • 2022-07-21 12:43
网上信息凌乱。
导致很多人写技术内容的时候不会提前说明当前的influxdb的版本。
只能不断地试错。
$ influx -precision rfc3339

Error: unknown shorthand flag: 'p' in -precision

See 'influx -h' for help
没有一个命令对得上的。。
后续自己写个influxdb 2.x的教程吧,当做自己的学习笔记也好。
### 更新
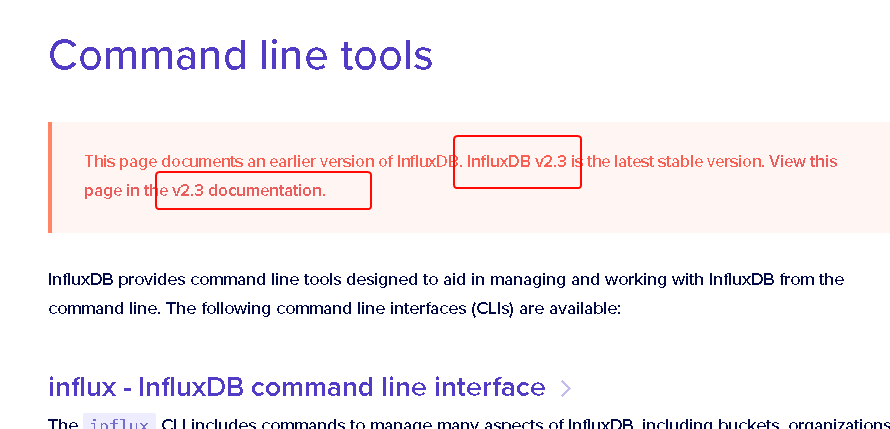
刚在写,结果就发现 v2.3 以上的接口又有分叉。。。 真的是日狗了的
查看全部
腾讯云轻量服务器使用mysqldump导出数据 导致进程被杀
李魔佛 发表了文章 • 0 个评论 • 2400 次浏览 • 2022-05-18 19:43
稍微密集一点,直接被杀掉。
在方面放mysql服务,简直就是煞笔行为。
稍微密集一点,直接被杀掉。
在方面放mysql服务,简直就是煞笔行为。
centos yum安装mysql client 客户端
马化云 发表了文章 • 0 个评论 • 3886 次浏览 • 2022-05-17 11:51
这时需要从官网下载
1.安装rpm源
rpm -ivh https://repo.mysql.com//mysql57-community-release-el7-11.noarch.rpm
2.安装客户端
#可以通过yum搜索yum search mysql
#若是64位的话直接安装yum install mysql-community-client.x86_64
结果报错
报以下密钥错误:The GPG keys listed for the "MySQL 5.7 Community Server" repository are already installed but they are not correct for this package.
Check that the correct key URLs are configured for this repository.
则先执行以下命令再安装:rpm --import https://repo.mysql.com/RPM-GPG-KEY-mysql-2022
wget -q -O - https://repo.mysql.com/RPM-GPG-KEY-mysql-2022|yum install然后重新安装 yum install mysql-community-client.x86_64
操作:
连到数据库:mysql -h 数据库地址 -u数据库用户名 -p数据库密码 -D 数据库名称
mysql -h 88.88.19.252 -utravelplat -pHdkj1234 -D etravel
数据库导出(表结构):mysqldump -h 数据库地址 -u数据库用户名 -p数据库密码 -d 数据库名称 > 文件名.sql
mysqldump -h 88.88.19.252 -utravelplat -pHdkj1234 -d etravel > db20190713.sql
数据库导出(表结构 + 表数据):mysqldump -h 数据库地址 -u数据库用户名 -p数据库密码 数据库名称 > 文件名.sql
mysqldump -h 88.88.19.252 -utravelplat -pHdkj1234 etravel > db20190713.sql
数据库表导出(表结构 + 表数据):
mysqldump -h 88.88.19.252 -utravelplat -pHdkj1234 etravel doc > doc.sql
导入到数据库:source 文件名.sql
source db20190713.sql
查看全部
这时需要从官网下载
1.安装rpm源
rpm -ivh https://repo.mysql.com//mysql57-community-release-el7-11.noarch.rpm
2.安装客户端
#可以通过yum搜索
yum search mysql
#若是64位的话直接安装
yum install mysql-community-client.x86_64
结果报错
报以下密钥错误:
The GPG keys listed for the "MySQL 5.7 Community Server" repository are already installed but they are not correct for this package.

Check that the correct key URLs are configured for this repository.
则先执行以下命令再安装:
rpm --import https://repo.mysql.com/RPM-GPG-KEY-mysql-2022然后重新安装 yum install mysql-community-client.x86_64
wget -q -O - https://repo.mysql.com/RPM-GPG-KEY-mysql-2022|yum install
操作:
连到数据库:mysql -h 数据库地址 -u数据库用户名 -p数据库密码 -D 数据库名称
mysql -h 88.88.19.252 -utravelplat -pHdkj1234 -D etravel
数据库导出(表结构):mysqldump -h 数据库地址 -u数据库用户名 -p数据库密码 -d 数据库名称 > 文件名.sql
mysqldump -h 88.88.19.252 -utravelplat -pHdkj1234 -d etravel > db20190713.sql
数据库导出(表结构 + 表数据):mysqldump -h 数据库地址 -u数据库用户名 -p数据库密码 数据库名称 > 文件名.sql
mysqldump -h 88.88.19.252 -utravelplat -pHdkj1234 etravel > db20190713.sql
数据库表导出(表结构 + 表数据):
mysqldump -h 88.88.19.252 -utravelplat -pHdkj1234 etravel doc > doc.sql
导入到数据库:source 文件名.sql
source db20190713.sql
cronsun 数据备份与恢复
李魔佛 发表了文章 • 0 个评论 • 2624 次浏览 • 2022-04-09 18:10
cronsun提供的csctl工具可以备份和恢复cronsun的任务数据。
备份数据:
# 请将 --conf 修改为你自己保存的 base.json 文件的路径

# --file 为备份文件路径,会自动加上 .zip 后缀,这里不需要写后缀

csctl backup --conf={/path/to/base.json} --dir=./ --file=cronsun_data
恢复数据# 请将 --conf 修改为你自己保存的 base.json 文件的路径
# --file 为备份文件路径
csctl restore --conf={/path/to/base.json} --file=./cronsun_data.zip
把数据导入之后,还需要在新的机器上,web登录,把运行的节点逐个改为新节点。 这个有点不智能,不过,相比每一个都要手动更新全部内容,也很好很多,节省很多时间了。 查看全部
cronsun提供的csctl工具可以备份和恢复cronsun的任务数据。
备份数据:
# 请将 --conf 修改为你自己保存的 base.json 文件的路径
# --file 为备份文件路径,会自动加上 .zip 后缀,这里不需要写后缀
csctl backup --conf={/path/to/base.json} --dir=./ --file=cronsun_data
恢复数据
# 请将 --conf 修改为你自己保存的 base.json 文件的路径

# --file 为备份文件路径

csctl restore --conf={/path/to/base.json} --file=./cronsun_data.zip
把数据导入之后,还需要在新的机器上,web登录,把运行的节点逐个改为新节点。 这个有点不智能,不过,相比每一个都要手动更新全部内容,也很好很多,节省很多时间了。
etcd连接带用户名与密码
李魔佛 发表了文章 • 0 个评论 • 5719 次浏览 • 2022-04-09 00:57
ENDPOINT = http://127.0.0.1:2379

./etcdctl --endpoints=$ENDPOINT put foo "Hello World" --user="root" --password="password"
这样就把foo的值设为 "Hello World"
同理,如果要读取foo的值,只需要
ENDPOINT = http://127.0.0.1:2379

./etcdctl --endpoints=$ENDPOINT get foo --user="root" --password="password"
就可以把你上一个设置的值读取出来。
查看全部
ENDPOINT = http://127.0.0.1:2379
./etcdctl --endpoints=$ENDPOINT put foo "Hello World" --user="root" --password="password"
这样就把foo的值设为 "Hello World"
同理,如果要读取foo的值,只需要
ENDPOINT = http://127.0.0.1:2379
./etcdctl --endpoints=$ENDPOINT get foo --user="root" --password="password"
就可以把你上一个设置的值读取出来。
折腾了半天,结果发现windows上无法使用redis 布隆过滤器插件
李魔佛 发表了文章 • 0 个评论 • 4655 次浏览 • 2021-05-16 06:09
# Using Bloom Filter from redisbloom.client import Client rb = Client() rb.bfCreate('bloom', 0.01, 1000) rb.bfAdd('bloom', 'foo') # returns 1 rb.bfAdd('bloom', 'foo') # returns 0 rb.bfExists('bloom', 'foo') # returns 1 rb.bfExists('bloom', 'noexist') # returns 0
报错:
redis.exceptions.ResponseError: unknown command BF.RESERVE, with args beginning with: bloom, 0.01, 1000
连docker上得镜像也不支持。
更别说windows版本上的redis按照插件了。
只好用linux的docker了。
docker run -p 6379:6379 --name redis-redisbloom redislabs/rebloom:latest
查看全部
# Using Bloom Filter from redisbloom.client import Client rb = Client() rb.bfCreate('bloom', 0.01, 1000) rb.bfAdd('bloom', 'foo') # returns 1 rb.bfAdd('bloom', 'foo') # returns 0 rb.bfExists('bloom', 'foo') # returns 1 rb.bfExists('bloom', 'noexist') # returns 0
报错:
redis.exceptions.ResponseError: unknown command BF.RESERVE, with args beginning with: bloom, 0.01, 1000
连docker上得镜像也不支持。
更别说windows版本上的redis按照插件了。
只好用linux的docker了。
docker run -p 6379:6379 --name redis-redisbloom redislabs/rebloom:latest
redis启动报错
李魔佛 发表了文章 • 0 个评论 • 4965 次浏览 • 2021-02-21 14:50
Failed to start Advanced key-value store
csdn查出来的全是垃圾。
后面再stackoverflow看了下,尝试其中一个方案:
使用命令启动
/usr/bin/redis-server /etc/redis/redis-conf
然后一起就又正常了, 如果还是报错,把bind的ip地址后面那截改为127.0.0.1,后面那个ipv6格式的不要 查看全部
Failed to start Advanced key-value store
csdn查出来的全是垃圾。
后面再stackoverflow看了下,尝试其中一个方案:
使用命令启动
/usr/bin/redis-server /etc/redis/redis-conf
然后一起就又正常了, 如果还是报错,把bind的ip地址后面那截改为127.0.0.1,后面那个ipv6格式的不要
mysql存储过程学习
李魔佛 发表了文章 • 0 个评论 • 3641 次浏览 • 2020-10-18 16:38
环境 : MySQL8 + Navicat
1 .创建一个存储过程:
在navicat的查询窗口执行:
delimiter $$

create procedure hello_procedure ()

begin

select 'hello world';

END $$


call hello_procedure();
查看全部
环境 : MySQL8 + Navicat
1 .创建一个存储过程:
在navicat的查询窗口执行:
delimiter $$
create procedure hello_procedure ()
begin
select 'hello world';
END $$
call hello_procedure();
DBUtils 包名更新为dbutils,居然大部分包名都由驼峰命名改为下划线了
李魔佛 发表了文章 • 0 个评论 • 4423 次浏览 • 2020-10-04 17:01
from DBUtils.PooledDB import PooledDB, SharedDBConnection

POOL = PooledDB
现在是这样的了:
from dbutils.persistent_db import PersistentDB至于使用方法还是和原来的差不多。
原创文章,转载请注明出处
http://30daydo.com/article/611
查看全部
from DBUtils.PooledDB import PooledDB, SharedDBConnection
POOL = PooledDB
现在是这样的了:
from dbutils.persistent_db import PersistentDB至于使用方法还是和原来的差不多。
原创文章,转载请注明出处
http://30daydo.com/article/611
在Docker中配置Kibana连接ElasticSearch的一些小坑
李魔佛 发表了文章 • 0 个评论 • 12803 次浏览 • 2020-08-09 01:49
elasticseacrh.user='elastic'
elasticsearch.password='xxxxxx' # 你之前配置ES时设置的密码
BUT, 上面的配置在docker环境下无法正常启动使用kibana, 通过docker logs 容器ID, 查看的日志信息:
  log   [17:39:09.057] [warning][data][elasticsearch] No living connections

  log   [17:39:09.058] [warning][licensing][plugins] License information could not be obtained from Elasticsearch due to Error: No Living connections error

  log   [17:39:09.635] [warning][admin][elasticsearch] Unable to revive connection: http://127.0.0.1:9200/

  log   [17:39:09.636] [warning][admin][elasticsearch] No living connections

  log   [17:39:12.137] [warning][admin][elasticsearch] Unable to revive connection: http://127.0.0.1:9200/

  log   [17:39:12.138] [warning][admin][elasticsearch] No living connections

  log   [17:39:14.640] [warning][admin][elasticsearch] Unable to revive connection: http://127.0.0.1:9200/

  log   [17:39:14.640] [warning][admin][elasticsearch] No living connections

  log   [17:39:17.143] [warning][admin][elasticsearch] Unable to revive connection: http://127.0.0.1:9200/

  log   [17:39:17.143] [warning][admin][elasticsearch] No living connections

  log   [17:39:19.645] [warning][admin][elasticsearch] Unable to revive connection: http://127.0.0.1:9200/
使用curl访问127.0.0.1:920也是正常的,后来想到docker貌似没有配置桥接网络,两个docker可能无法互通,故把kibana.yaml里面的host改为主机的真实IP(内网172网段ip),然后问题就得到解决了。 查看全部
elasticseacrh.user='elastic'
elasticsearch.password='xxxxxx' # 你之前配置ES时设置的密码
BUT, 上面的配置在docker环境下无法正常启动使用kibana, 通过docker logs 容器ID, 查看的日志信息:
log [17:39:09.057] [warning][data][elasticsearch] No living connections使用curl访问127.0.0.1:920也是正常的,后来想到docker貌似没有配置桥接网络,两个docker可能无法互通,故把kibana.yaml里面的host改为主机的真实IP(内网172网段ip),然后问题就得到解决了。
log [17:39:09.058] [warning][licensing][plugins] License information could not be obtained from Elasticsearch due to Error: No Living connections error
log [17:39:09.635] [warning][admin][elasticsearch] Unable to revive connection: http://127.0.0.1:9200/
log [17:39:09.636] [warning][admin][elasticsearch] No living connections
log [17:39:12.137] [warning][admin][elasticsearch] Unable to revive connection: http://127.0.0.1:9200/
log [17:39:12.138] [warning][admin][elasticsearch] No living connections
log [17:39:14.640] [warning][admin][elasticsearch] Unable to revive connection: http://127.0.0.1:9200/
log [17:39:14.640] [warning][admin][elasticsearch] No living connections
log [17:39:17.143] [warning][admin][elasticsearch] Unable to revive connection: http://127.0.0.1:9200/
log [17:39:17.143] [warning][admin][elasticsearch] No living connections
log [17:39:19.645] [warning][admin][elasticsearch] Unable to revive connection: http://127.0.0.1:9200/
(1412, 'Table definition has changed, please retry transaction')
李魔佛 发表了文章 • 0 个评论 • 6332 次浏览 • 2020-06-13 23:20
(1412, 'Table definition has changed, please retry transaction')
一个原因是因为多个线程操作数据库,当前的cursor对应的数据库被切换到其他库了。
比如 cursor在数据库A,正在不断query一条语句,然后另一个线程在在切换cursor到另外一个数据库B。
查看全部
(1412, 'Table definition has changed, please retry transaction')
一个原因是因为多个线程操作数据库,当前的cursor对应的数据库被切换到其他库了。
比如 cursor在数据库A,正在不断query一条语句,然后另一个线程在在切换cursor到另外一个数据库B。
redis desktop manager windows客户端
李魔佛 发表了文章 • 0 个评论 • 3314 次浏览 • 2020-05-07 20:37
怪不得这么垃圾。。。。。
怪不得这么垃圾。。。。。
windows下logstash6.5安装配置 网上的教程是linux,有坑
李魔佛 发表了文章 • 2 个评论 • 4719 次浏览 • 2020-02-28 10:05
百度里搜到的logstash安装配置教程 千篇一律都是这样子。
启动服务测试一下是否安装成功:
cd bin

 ./logstash -e 'input { stdin { } } output { stdout {} }'
上面的是linux运行的。
windows下把logstash改为logstash.bat 然后运行。
报错:
ERROR: Unknown command '{'


See: 'bin/logstash --help'

[ERROR] 2020-02-28 10:04:29.307 [main] Logstash - java.lang.IllegalStateException: Logstash stopped processing because of an error: (SystemExit) exit
后来搜了下国外的网站。原来问题出在那个单引号上,把单引号改为双引号就可以了。
查看全部
百度里搜到的logstash安装配置教程 千篇一律都是这样子。
启动服务测试一下是否安装成功:
cd bin
./logstash -e 'input { stdin { } } output { stdout {} }'
上面的是linux运行的。
windows下把logstash改为logstash.bat 然后运行。
报错:
ERROR: Unknown command '{'
See: 'bin/logstash --help'
[ERROR] 2020-02-28 10:04:29.307 [main] Logstash - java.lang.IllegalStateException: Logstash stopped processing because of an error: (SystemExit) exit后来搜了下国外的网站。原来问题出在那个单引号上,把单引号改为双引号就可以了。
bandcamp移动开发更简单
linxiaojue 发表了文章 • 0 个评论 • 4516 次浏览 • 2019-12-14 05:12
http://TalkingData.bandcamp.com/
http://Bugly.bandcamp.com/
http://Box2D.bandcamp.com/
http://aineice.bandcamp.com/
http://wyyp.bandcamp.com/
http://Prepo.bandcamp.com/
http://Chipmunk.bandcamp.com/
http://openinstall.bandcamp.com/
http://MobileInsight.bandcamp.com/
http://zhugelo.bandcamp.com/
http://CobubRazor.bandcamp.com/
http://Testin.bandcamp.com/
http://crashlytics.bandcamp.com/
http://APKProtect.bandcamp.com/
http://Ucloud.bandcamp.com/
http://ydkfpgj.bandcamp.com/releases
http://TalkingData.bandcamp.com/releases
http://Bugly.bandcamp.com/releases
http://Box2D.bandcamp.com/releases
http://aineice.bandcamp.com/releases
http://wyyp.bandcamp.com/releases
http://Prepo.bandcamp.com/releases
http://Chipmunk.bandcamp.com/releases
http://openinstall.bandcamp.com/releases
http://MobileInsight.bandcamp.com/releases
http://zhugelo.bandcamp.com/releases
http://CobubRazor.bandcamp.com/releases
http://Testin.bandcamp.com/releases
http://crashlytics.bandcamp.com/releases
http://APKProtect.bandcamp.com/releases
http://Ucloud.bandcamp.com/releases 查看全部
http://TalkingData.bandcamp.com/
http://Bugly.bandcamp.com/
http://Box2D.bandcamp.com/
http://aineice.bandcamp.com/
http://wyyp.bandcamp.com/
http://Prepo.bandcamp.com/
http://Chipmunk.bandcamp.com/
http://openinstall.bandcamp.com/
http://MobileInsight.bandcamp.com/
http://zhugelo.bandcamp.com/
http://CobubRazor.bandcamp.com/
http://Testin.bandcamp.com/
http://crashlytics.bandcamp.com/
http://APKProtect.bandcamp.com/
http://Ucloud.bandcamp.com/
http://ydkfpgj.bandcamp.com/releases
http://TalkingData.bandcamp.com/releases
http://Bugly.bandcamp.com/releases
http://Box2D.bandcamp.com/releases
http://aineice.bandcamp.com/releases
http://wyyp.bandcamp.com/releases
http://Prepo.bandcamp.com/releases
http://Chipmunk.bandcamp.com/releases
http://openinstall.bandcamp.com/releases
http://MobileInsight.bandcamp.com/releases
http://zhugelo.bandcamp.com/releases
http://CobubRazor.bandcamp.com/releases
http://Testin.bandcamp.com/releases
http://crashlytics.bandcamp.com/releases
http://APKProtect.bandcamp.com/releases
http://Ucloud.bandcamp.com/releases
python redis.StrictRedis.from_url 连接redis
李魔佛 发表了文章 • 0 个评论 • 8059 次浏览 • 2019-08-23 16:43
用url的方式连接redis
r=redis.StrictRedis.from_url(url)
url为以下的格式:
redis://[:password]@localhost:6379/0

rediss://[:password]@localhost:6379/0

unix://[:password]@/path/to/socket.sock?db=0
原创文章,转载请注明出处:
http://30daydo.com/article/527
查看全部
用url的方式连接redis
r=redis.StrictRedis.from_url(url)
url为以下的格式:
redis://[:password]@localhost:6379/0
rediss://[:password]@localhost:6379/0
unix://[:password]@/path/to/socket.sock?db=0
原创文章,转载请注明出处:
http://30daydo.com/article/527
mongodb 判断列表字段不为空
李魔佛 发表了文章 • 0 个评论 • 9824 次浏览 • 2019-08-20 11:08
db.test_tab.insert({array:[]})

db.test_tab.insert({array:[]})

db.test_tab.insert({array:[]})

db.test_tab.insert({array:[1,2,3,4,5]})

db.test_tab.insert({array:[1,2,3,4,5,6]})
使用以下命令判断列表不为空:
db.getCollection("example").find({array:{$exists:true,$ne:[]}}); # 字段不为0 查看全部
db.test_tab.insert({array:[]})
db.test_tab.insert({array:[]})
db.test_tab.insert({array:[]})
db.test_tab.insert({array:[1,2,3,4,5]})
db.test_tab.insert({array:[1,2,3,4,5,6]})使用以下命令判断列表不为空:
db.getCollection("example").find({array:{$exists:true,$ne:[]}}); # 字段不为0 redis health_check_interval 参数无效
李魔佛 发表了文章 • 0 个评论 • 9915 次浏览 • 2019-08-09 16:13
 # helper

    class RedisHelp(object):


        def __init__(self,channel):

            # self.pool = redis.ConnectionPool('10.18.6.46',port=6379)


            # self.conn = redis.Redis(connection_pool=self.pool)

            # 上面的方式无法使用订阅者 发布者模式


            self.conn = redis.Redis(host='10.18.6.46')

            self.publish_channel = channel

            self.subscribe_channel = channel


        def publish(self,msg):

            self.conn.publish(self.publish_channel,msg) # 1. 渠道名 ,2 信息


        def subscribe(self):

            self.pub = self.conn.pubsub()

            self.pub.subscribe(self.subscribe_channel)

            self.pub.parse_response()

            print('initial')

            return self.pub


    helper = RedisHelp('cuiqingcai')


    # 订阅者

    if sys.argv[1]=='s':

        print('in subscribe mode')

        pub = helper.subscribe()

        while 1:

            print('waiting for publish')

            pubsub.check_health()

            msg = pub.parse_response()


            s=str(msg[2],encoding='utf-8')

            print(s)

            if s=='exit':

                break


    # 发布者

    elif sys.argv[1]=='p':

        print('in publish mode')

        msg = sys.argv[2]

        print(f'msg -> {msg}')

        helper.publish(msg)
而官网的文档说使用参数:
health_check_interval=30 # 30s心跳检测一次
但实际上这个参数在最新的redis 3.3以上是被去掉了。 所以是无办法使用 self.conn = redis.Redis(host='10.18.6.46',health_check_interval=30)
这点在作者的github页面里面也得到了解释。
https://github.com/andymccurdy/redis-py/issues/1199
所以要改成
data = client.blpop('key', timeout=300)
300s后超时,data为None,重新监听。
查看全部
# helper
class RedisHelp(object):
def __init__(self,channel):
# self.pool = redis.ConnectionPool('10.18.6.46',port=6379)
# self.conn = redis.Redis(connection_pool=self.pool)
# 上面的方式无法使用订阅者 发布者模式
self.conn = redis.Redis(host='10.18.6.46')
self.publish_channel = channel
self.subscribe_channel = channel
def publish(self,msg):
self.conn.publish(self.publish_channel,msg) # 1. 渠道名 ,2 信息
def subscribe(self):
self.pub = self.conn.pubsub()
self.pub.subscribe(self.subscribe_channel)
self.pub.parse_response()
print('initial')
return self.pub
helper = RedisHelp('cuiqingcai')
# 订阅者
if sys.argv[1]=='s':
print('in subscribe mode')
pub = helper.subscribe()
while 1:
print('waiting for publish')
pubsub.check_health()
msg = pub.parse_response()
s=str(msg[2],encoding='utf-8')
print(s)
if s=='exit':
break
# 发布者
elif sys.argv[1]=='p':
print('in publish mode')
msg = sys.argv[2]
print(f'msg -> {msg}')
helper.publish(msg)
而官网的文档说使用参数:
health_check_interval=30 # 30s心跳检测一次
但实际上这个参数在最新的redis 3.3以上是被去掉了。 所以是无办法使用 self.conn = redis.Redis(host='10.18.6.46',health_check_interval=30)
这点在作者的github页面里面也得到了解释。
https://github.com/andymccurdy/redis-py/issues/1199
所以要改成
data = client.blpop('key', timeout=300)
300s后超时,data为None,重新监听。
mongodb 修改嵌套字典字典的字段名
李魔佛 发表了文章 • 0 个评论 • 7143 次浏览 • 2019-08-05 13:55
db.test.update({},{$rename:{'旧字段':'新字段'}},true,true)
比如下面的例子:db.getCollection('example').update({},{$rename:{'corp':'企业'}})
上面就是把字段corp改为企业。
如果是嵌套字段呢?
比如 corp字典是一个字典,里面是 { 'address':'USA', 'phone':'12345678' }
那么要修改里面的address为地址:
db.getCollection('example').update({},{$rename:{'corp.address':'corp.地址'}})
原创文章,转载请注明出处
原文连接:http://30daydo.com/article/521
查看全部
db.test.update({},{$rename:{'旧字段':'新字段'}},true,true)
比如下面的例子:
db.getCollection('example').update({},{$rename:{'corp':'企业'}})上面就是把字段corp改为企业。
如果是嵌套字段呢?
比如 corp字典是一个字典,里面是 { 'address':'USA', 'phone':'12345678' }
那么要修改里面的address为地址:
db.getCollection('example').update({},{$rename:{'corp.address':'corp.地址'}})原创文章,转载请注明出处
原文连接:http://30daydo.com/article/521
mongodb motor 异步操作比同步操作的时间要慢?
量化投机者 回复了问题 • 2 人关注 • 1 个回复 • 6410 次浏览 • 2019-08-03 09:01
mongodb find得到的数据顺序每次都是一样的
李魔佛 发表了文章 • 0 个评论 • 3971 次浏览 • 2019-07-26 09:00
Django 版本不兼容报错 AuthenticationMiddleware
李魔佛 发表了文章 • 0 个评论 • 7756 次浏览 • 2019-07-04 15:43
?: (admin.E408) 'django.contrib.auth.middleware.AuthenticationMiddleware' must be in MIDDLEWARE in order to use the admin application.
在之前的版本上没有问题,更新后就出错。
降级Django
pip install django=2.1.7
PS: 这个django的版本兼容的确是个大问题,哪天升级了下django版本,不经过严格的测试就带来灾难性的后果。 查看全部
ERRORS:

?: (admin.E408) 'django.contrib.auth.middleware.AuthenticationMiddleware' must be in MIDDLEWARE in order to use the admin application.
在之前的版本上没有问题,更新后就出错。
降级Django
pip install django=2.1.7
PS: 这个django的版本兼容的确是个大问题,哪天升级了下django版本,不经过严格的测试就带来灾难性的后果。
使用pymongo中的find_one_and_update出错:需要分片键
李魔佛 发表了文章 • 0 个评论 • 6842 次浏览 • 2019-06-10 17:13
raise OperationFailure(msg % errmsg, code, response)
pymongo.errors.OperationFailure: Query for sharded findAndModify must contain the shard key
2019-06-10 16:14:32 [scrapy.core.engine] INFO: Closing spider (finished)
2019-06-10 16:14:32 [scrapy.statscollectors] INFO: Dumping Scrapy stats:
需要在查询语句中把分片键也添加进去。
因为findOneModify只会找一个记录,但是到底在哪个分片的记录呢? 因为不确定,所以才需要把shard加上去。
参考官方:
Targeted Operations vs. Broadcast Operations
Generally, the fastest queries in a sharded environment are those that mongos route to a single shard, using the shard key and the cluster meta data from the config server. These targeted operations use the shard key value to locate the shard or subset of shards that satisfy the query document.
For queries that don’t include the shard key, mongos must query all shards, wait for their responses and then return the result to the application. These “scatter/gather” queries can be long running operations.
Broadcast Operations
mongos instances broadcast queries to all shards for the collection unless the mongos can determine which shard or subset of shards stores this data.
After the mongos receives responses from all shards, it merges the data and returns the result document. The performance of a broadcast operation depends on the overall load of the cluster, as well as variables like network latency, individual shard load, and number of documents returned per shard. Whenever possible, favor operations that result in targeted operation over those that result in a broadcast operation.
Multi-update operations are always broadcast operations.
The updateMany() and deleteMany() methods are broadcast operations, unless the query document specifies the shard key in full.
Targeted Operations
mongos can route queries that include the shard key or the prefix of a compound shard key a specific shard or set of shards. mongos uses the shard key value to locate the chunk whose range includes the shard key value and directs the query at the shard containing that chunk.
For example, if the shard key is:
copy
{ a: 1, b: 1, c: 1 }
The mongos program can route queries that include the full shard key or either of the following shard key prefixes at a specific shard or set of shards:
copy
{ a: 1 }
{ a: 1, b: 1 }
All insertOne() operations target to one shard. Each document in the insertMany() array targets to a single shard, but there is no guarantee all documents in the array insert into a single shard.
All updateOne(), replaceOne() and deleteOne() operations must include the shard key or _id in the query document. MongoDB returns an error if these methods are used without the shard key or _id.
Depending on the distribution of data in the cluster and the selectivity of the query, mongos may still perform a broadcast operation to fulfill these queries.
Index Use
If the query does not include the shard key, the mongos must send the query to all shards as a “scatter/gather” operation. Each shard will, in turn, use either the shard key index or another more efficient index to fulfill the query.
If the query includes multiple sub-expressions that reference the fields indexed by the shard key and the secondary index, the mongos can route the queries to a specific shard and the shard will use the index that will allow it to fulfill most efficiently.
Sharded Cluster Security
Use Internal Authentication to enforce intra-cluster security and prevent unauthorized cluster components from accessing the cluster. You must start each mongod or mongos in the cluster with the appropriate security settings in order to enforce internal authentication.
See Deploy Sharded Cluster with Keyfile Access Control for a tutorial on deploying a secured shardedcluster.
Cluster Users
Sharded clusters support Role-Based Access Control (RBAC) for restricting unauthorized access to cluster data and operations. You must start each mongod in the cluster, including the config servers, with the --auth option in order to enforce RBAC. Alternatively, enforcing Internal Authentication for inter-cluster security also enables user access controls via RBAC.
With RBAC enforced, clients must specify a --username, --password, and --authenticationDatabase when connecting to the mongos in order to access cluster resources.
Each cluster has its own cluster users. These users cannot be used to access individual shards.
See Enable Access Control for a tutorial on enabling adding users to an RBAC-enabled MongoDB deployment. 查看全部
  File "C:\ProgramData\Anaconda3\lib\site-packages\pymongo\helpers.py", line 155, in _check_command_response

    raise OperationFailure(msg % errmsg, code, response)

pymongo.errors.OperationFailure: Query for sharded findAndModify must contain the shard key

2019-06-10 16:14:32 [scrapy.core.engine] INFO: Closing spider (finished)

2019-06-10 16:14:32 [scrapy.statscollectors] INFO: Dumping Scrapy stats:
需要在查询语句中把分片键也添加进去。
因为findOneModify只会找一个记录,但是到底在哪个分片的记录呢? 因为不确定,所以才需要把shard加上去。
参考官方:
Targeted Operations vs. Broadcast Operations

Generally, the fastest queries in a sharded environment are those that mongos route to a single shard, using the shard key and the cluster meta data from the config server. These targeted operations use the shard key value to locate the shard or subset of shards that satisfy the query document.

For queries that don’t include the shard key, mongos must query all shards, wait for their responses and then return the result to the application. These “scatter/gather” queries can be long running operations.

Broadcast Operations

mongos instances broadcast queries to all shards for the collection unless the mongos can determine which shard or subset of shards stores this data.


After the mongos receives responses from all shards, it merges the data and returns the result document. The performance of a broadcast operation depends on the overall load of the cluster, as well as variables like network latency, individual shard load, and number of documents returned per shard. Whenever possible, favor operations that result in targeted operation over those that result in a broadcast operation.

Multi-update operations are always broadcast operations.

The updateMany() and deleteMany() methods are broadcast operations, unless the query document specifies the shard key in full.

Targeted Operations

mongos can route queries that include the shard key or the prefix of a compound shard key a specific shard or set of shards. mongos uses the shard key value to locate the chunk whose range includes the shard key value and directs the query at the shard containing that chunk.


For example, if the shard key is:

copy

{ a: 1, b: 1, c: 1 }


The mongos program can route queries that include the full shard key or either of the following shard key prefixes at a specific shard or set of shards:

copy

{ a: 1 }

{ a: 1, b: 1 }


All insertOne() operations target to one shard. Each document in the insertMany() array targets to a single shard, but there is no guarantee all documents in the array insert into a single shard.

All updateOne(), replaceOne() and deleteOne() operations must include the shard key or _id in the query document. MongoDB returns an error if these methods are used without the shard key or _id.

Depending on the distribution of data in the cluster and the selectivity of the query, mongos may still perform a broadcast operation to fulfill these queries.

Index Use

If the query does not include the shard key, the mongos must send the query to all shards as a “scatter/gather” operation. Each shard will, in turn, use either the shard key index or another more efficient index to fulfill the query.

If the query includes multiple sub-expressions that reference the fields indexed by the shard key and the secondary index, the mongos can route the queries to a specific shard and the shard will use the index that will allow it to fulfill most efficiently.

Sharded Cluster Security

Use Internal Authentication to enforce intra-cluster security and prevent unauthorized cluster components from accessing the cluster. You must start each mongod or mongos in the cluster with the appropriate security settings in order to enforce internal authentication.

See Deploy Sharded Cluster with Keyfile Access Control for a tutorial on deploying a secured shardedcluster.

Cluster Users

Sharded clusters support Role-Based Access Control (RBAC) for restricting unauthorized access to cluster data and operations. You must start each mongod in the cluster, including the config servers, with the --auth option in order to enforce RBAC. Alternatively, enforcing Internal Authentication for inter-cluster security also enables user access controls via RBAC.

With RBAC enforced, clients must specify a --username, --password, and --authenticationDatabase when connecting to the mongos in order to access cluster resources.

Each cluster has its own cluster users. These users cannot be used to access individual shards.

See Enable Access Control for a tutorial on enabling adding users to an RBAC-enabled MongoDB deployment.
Warning: unable to run listCollections, attempting to approximate collection
李魔佛 发表了文章 • 0 个评论 • 20580 次浏览 • 2019-06-07 17:35
Warning: unable to run listCollections, attempting to approximate collection names by parsing connectionStatus
那是因为设置了密码,但是没有进行认证导致的错误。这个错误为啥不直接说明原因呢。汗
直接: db.auth('admin','密码')
认证成功返回1, 然后重新执行show tables就可以看到所有的表了。 查看全部
Warning: unable to run listCollections, attempting to approximate collection names by parsing connectionStatus
那是因为设置了密码,但是没有进行认证导致的错误。这个错误为啥不直接说明原因呢。汗
直接: db.auth('admin','密码')
认证成功返回1, 然后重新执行show tables就可以看到所有的表了。
python连接mongodb集群 cluster
李魔佛 发表了文章 • 0 个评论 • 5880 次浏览 • 2019-06-03 15:55
连接方法如下:import pymongo
db = pymongo.MongoClient('mongodb://10.18.6.46,10.18.6.26,10.18.6.102')上面默认的端口do都是27017,如果是其他端口,需要这样修改:db = pymongo.MongoClient('mongodb://10.18.6.46:8888,10.18.6.26:9999,10.18.6.102:7777')
然后就可以正常读写数据库:
读:coll=db['testdb']['testcollection'].find()
for i in coll:
print(i)输出内容:{'_id': ObjectId('5cf4c7981ee9edff72e5c503'), 'username': 'hello'}
{'_id': ObjectId('5cf4c7991ee9edff72e5c504'), 'username': 'hello'}
{'_id': ObjectId('5cf4c7991ee9edff72e5c505'), 'username': 'hello'}
{'_id': ObjectId('5cf4c79a1ee9edff72e5c506'), 'username': 'hello'}
{'_id': ObjectId('5cf4c7b21ee9edff72e5c507'), 'username': 'hello world'}
写:collection = db['testdb']['testcollection']
for i in range(10):
collection.insert({'username':'huston{}'.format(i)})
原创文章,转载请注明出处:
http://30daydo.com/article/494
查看全部
连接方法如下:
import pymongo上面默认的端口do都是27017,如果是其他端口,需要这样修改:
db = pymongo.MongoClient('mongodb://10.18.6.46,10.18.6.26,10.18.6.102')
db = pymongo.MongoClient('mongodb://10.18.6.46:8888,10.18.6.26:9999,10.18.6.102:7777')然后就可以正常读写数据库:
读:
coll=db['testdb']['testcollection'].find()输出内容:
for i in coll:
print(i)
{'_id': ObjectId('5cf4c7981ee9edff72e5c503'), 'username': 'hello'}

{'_id': ObjectId('5cf4c7991ee9edff72e5c504'), 'username': 'hello'}

{'_id': ObjectId('5cf4c7991ee9edff72e5c505'), 'username': 'hello'}

{'_id': ObjectId('5cf4c79a1ee9edff72e5c506'), 'username': 'hello'}

{'_id': ObjectId('5cf4c7b21ee9edff72e5c507'), 'username': 'hello world'}
写:
collection = db['testdb']['testcollection']


for i in range(10):

    collection.insert({'username':'huston{}'.format(i)})
原创文章,转载请注明出处:
http://30daydo.com/article/494


